


Introduction: Why Every Home Needs a Smart Water Shut-Off Valve
Water damage is one of the costliest and most disruptive issues homeowners face, often occurring without warning and leading to expensive repairs and insurance claims. Traditional shut-off valves can prevent some disasters, but what if you’re away when a pipe bursts or a leak starts? Enter the smart water shut-off valve—a device designed to automatically detect leaks and shut off your home’s water supply in seconds. These innovative gadgets integrate with your home’s Wi-Fi and smart home systems, offering remote control and real-time alerts to your smartphone. In this comprehensive guide, you’ll learn how to select, install, and maintain a smart water shut-off valve, including essential tools, setup tips, troubleshooting advice, and best practices for ongoing leak prevention. Whether you’re a seasoned DIYer or tackling your first major plumbing upgrade, this step-by-step tutorial will empower you to protect your home and gain peace of mind—all while saving potentially thousands of dollars in water damage.
Understanding Smart Water Shut-Off Valves
How Do Smart Water Shut-Off Valves Work?
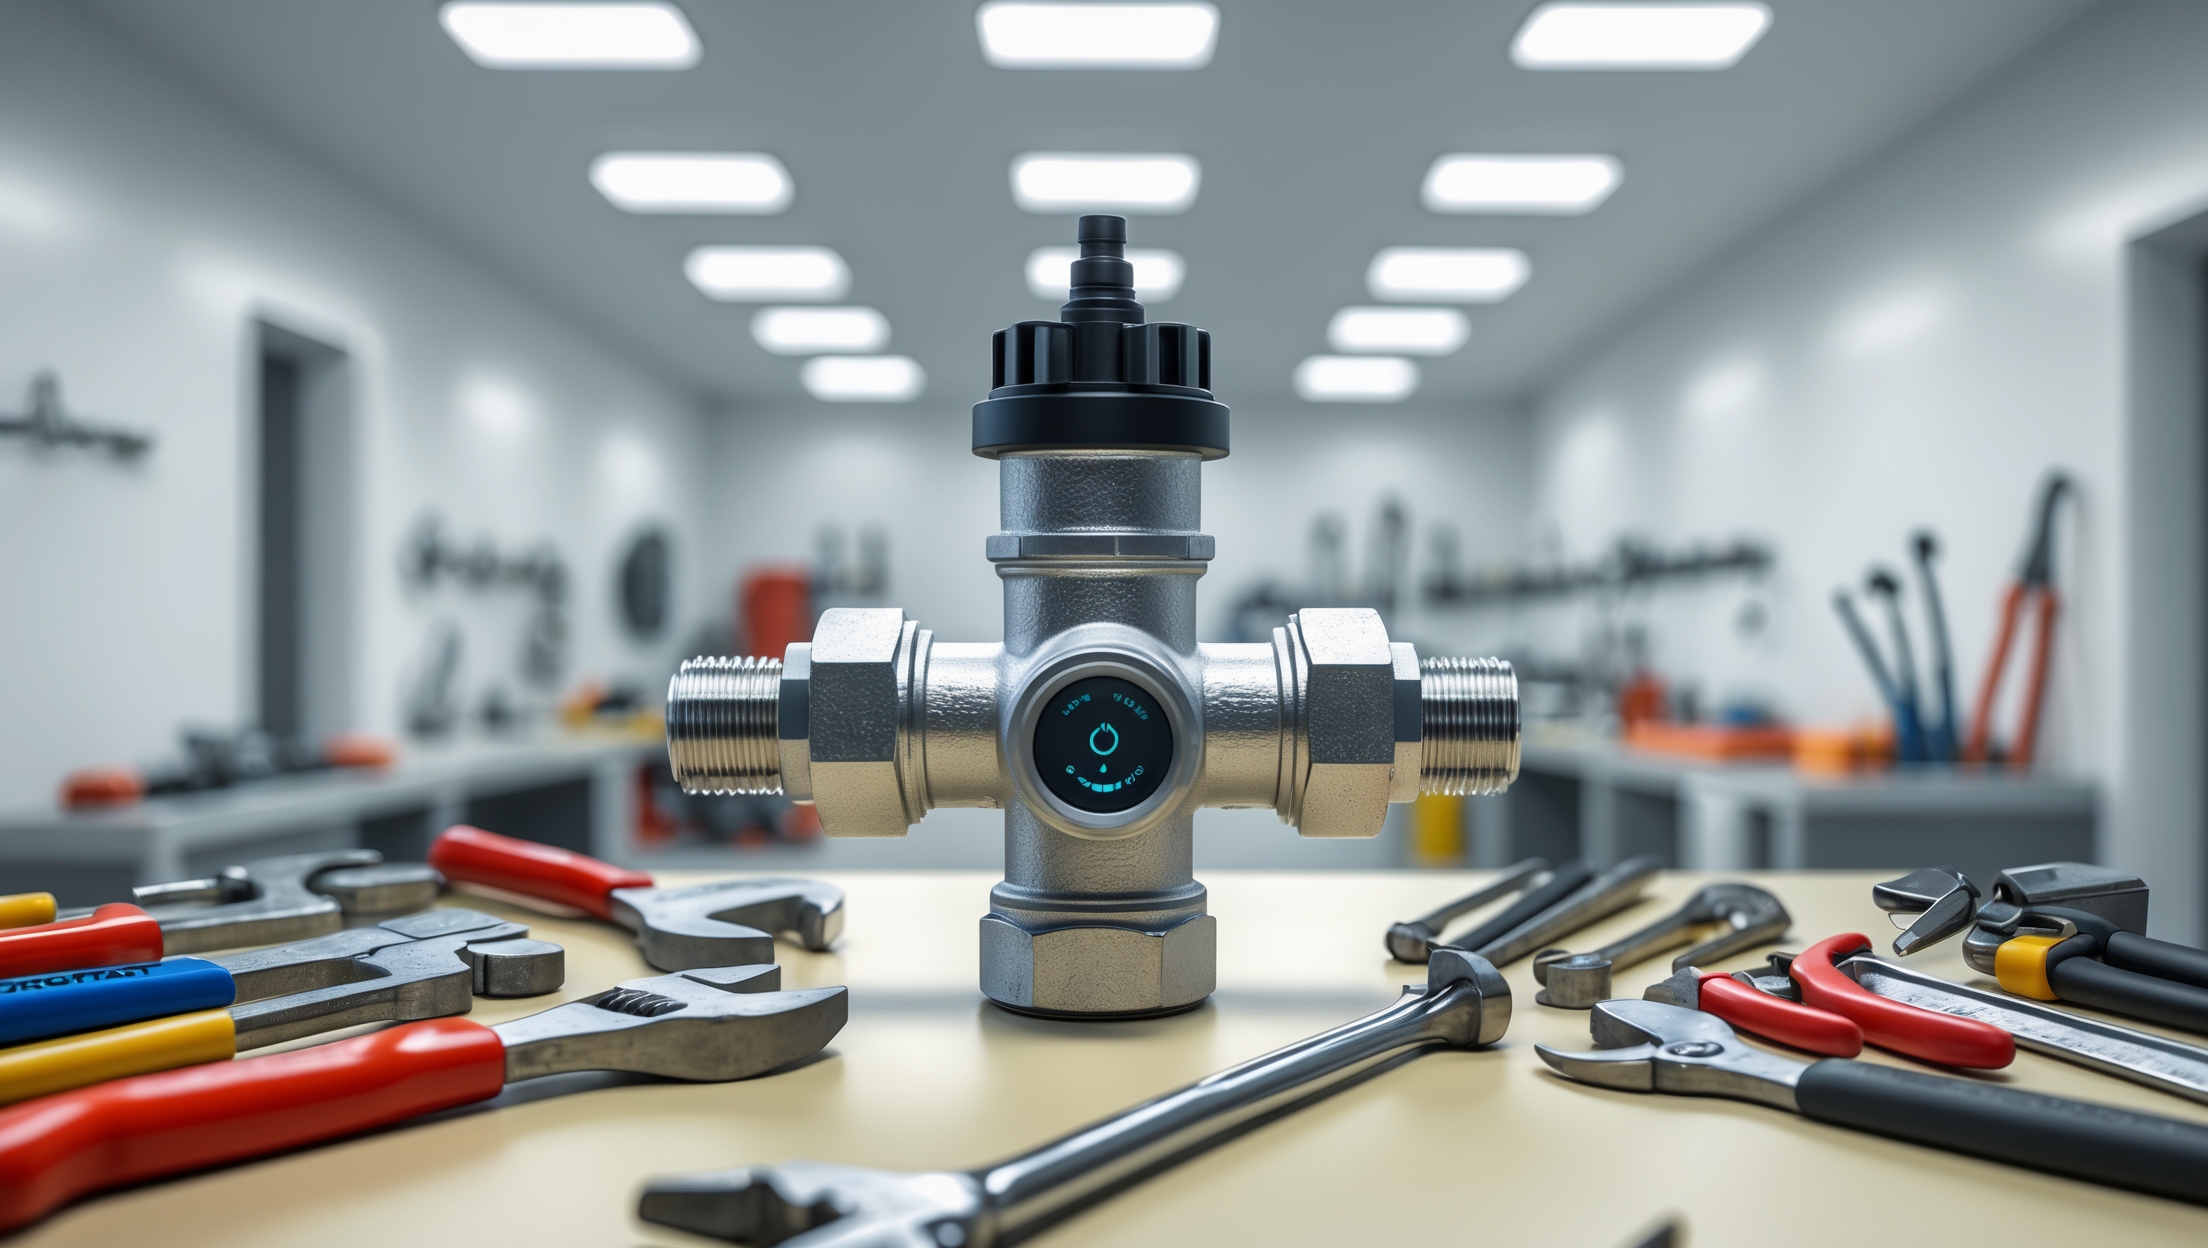
Smart water shut-off valves are electronic devices installed on your main water line. They use sensors to detect leaks, pressure changes, or abnormal water flow. When a potential leak is identified, the valve closes automatically, stopping the flow of water and preventing further damage. Most models connect to your home Wi-Fi, enabling remote monitoring and control via a smartphone app. Some systems also integrate with smart home platforms like Alexa, Google Assistant, or Apple HomeKit.
Key Features to Look For
- Automatic Leak Detection: Built-in sensors or integration with separate leak detectors in high-risk areas (laundry, bathrooms, kitchen).
- Remote Control: Manual shut-off from anywhere using your phone.
- Smart Home Compatibility: Integration with existing smart devices and routines.
- Battery Backup: Ensures operation during power outages.
- Flow Monitoring: Real-time analytics on water usage and anomalies.
- Easy Installation: DIY-friendly options with clear instructions and required hardware.
Is DIY Installation Right for You?
Assessing Your Plumbing Skills
Installing a smart water shut-off valve is a manageable project for those comfortable with basic plumbing tasks, such as shutting off the water, cutting a pipe, and using common tools. If you’ve replaced a section of pipe, swapped out a faucet, or installed a water filter, you can likely handle this upgrade. However, if your main line is hard to access, made of unusual material, or if you lack confidence cutting and reassembling pipes, consider hiring a licensed plumber or consulting with one before beginning.
Understanding Local Codes and Insurance Requirements
Before starting, check that your new valve is compliant with local plumbing codes. Some municipalities have specific requirements regarding backflow prevention, device certification, or installation by a licensed professional. Notify your home insurance provider, as some offer discounts for leak detection devices or require documentation for coverage.
Tools and Materials Checklist
- Smart water shut-off valve kit (includes valve, controller, mounting hardware)
- Pipe cutter (for copper, PEX, or PVC as appropriate)
- Adjustable wrench and/or channel locks
- Pliers
- Measuring tape
- Pipe deburring tool (for copper or PEX)
- Teflon tape or pipe thread sealant
- Bucket and towels (for residual water in pipes)
- Drill and bits (if mounting the controller to a wall)
- Smartphone/tablet for device setup
- Marker or pencil for marking cuts
- Optional: Leak detectors for additional coverage
Step-by-Step Installation Guide
1. Preparation and Safety
- Shut off the main water supply at the street or main shut-off valve.
- Open a faucet at the lowest point in your home to drain water from the pipes.
- Lay down towels and a bucket to catch any remaining water.
- Turn off the power to nearby outlets if working in a damp area.
2. Mark and Cut the Pipe
- Identify a straight, accessible section of pipe near where the main line enters your home.
- Measure the length of the shut-off valve body and mark the pipe accordingly.
- Using the pipe cutter, carefully cut out the marked section. Use a deburring tool to smooth edges and remove burrs.
- Dry-fit the valve to ensure proper alignment and fit.
3. Install the Smart Shut-Off Valve
- Apply Teflon tape or thread sealant to all threaded connections.
- Attach the valve according to the manufacturer’s instructions. This may involve compression fittings, push-fit connectors, or unions depending on your pipe type.
- Tighten all connections securely but avoid over-tightening, which can damage threads or fittings.
- If your system includes a controller box, mount it nearby using screws and anchors, ensuring access to power and Wi-Fi.
4. Restore Water and Test for Leaks
- Slowly open the main water supply.
- Check all new connections for leaks with a dry towel or paper towel.
- Address any drips by tightening fittings or reapplying sealant as needed.
5. Connect to Wi-Fi and Configure the App
- Download the manufacturer’s app on your smartphone or tablet.
- Follow the in-app instructions to connect the valve to your Wi-Fi network.
- Assign the device a name and location for easy identification.
- Set up alerts, notifications, and routines for automatic shut-off in case of leaks.
- Integrate with smart home assistants if desired.
6. Optional: Pair Additional Leak Sensors
- Place wireless leak sensors near appliances, water heaters, or in basements for enhanced protection.
- Test sensors to ensure they trigger valve closure and send alerts as expected.
Troubleshooting Common Installation Issues
- Wi-Fi Connection Problems: Move the router closer or use a Wi-Fi extender. Ensure your 2.4GHz network is enabled if required.
- Valve Not Closing Fully: Check for debris or obstructions in the valve body. Reinstall if necessary and ensure proper alignment.
- Persistent Leaks: Re-tighten fittings, check for damaged O-rings, and ensure pipes are cut square and deburred.
- App Not Detecting Valve: Reset the device and repeat pairing process. Ensure Bluetooth or location services are enabled during setup.
Maintenance Best Practices
Monthly Checks
- Test the shut-off function using the app or manual button to ensure the valve operates smoothly.
- Inspect for any leaks around the valve and connections.
Annual Service
- Check battery backup (if present) and replace batteries as needed.
- Update the device firmware via the app to ensure the latest features and security patches.
- Clean the valve exterior and make sure the sensor area is free of dust or debris.
After Power Outages or Internet Changes
- Verify the valve is online in the app and reconnect to Wi-Fi if needed.
- Test the system to ensure remote shut-off is functional.
Cost Breakdown and Budgeting Tips
Typical Device Costs
- Smart water shut-off valve kits range from $150 to $400 depending on brand and features.
- Additional leak sensors: $30–$60 each.
- Optional professional installation: $200–$500 depending on local rates and plumbing complexity.
Saving Money on Your Project
- Look for manufacturer rebates or discounts from your home insurance provider.
- Purchase bundled kits that include multiple leak sensors.
- Opt for a DIY-friendly model to avoid installation fees if you have basic plumbing skills.
Frequently Asked Questions
Will a smart shut-off valve work during a power outage?
Many models offer battery backup for continued operation when the power is out. Always check the specs before buying and ensure batteries are maintained.
Can I install a smart valve on any type of pipe?
Most valves are compatible with copper, PEX, and PVC pipes. Check your pipe diameter (usually 3/4″ or 1″) and ensure the kit matches. Some specialty pipes may require adapters.
What if I have a water softener or filtration system?
Install the smart valve upstream (before) any water softener or filter to ensure the entire home is protected from leaks.
Conclusion: Protect Your Home—The Smart Way
Water damage is a risk that most homeowners underestimate until it’s too late. By installing a smart water shut-off valve, you take proactive control over your home’s safety, avoiding not only costly repairs but also the emotional stress of dealing with leaks and insurance claims. This upgrade is among the most effective DIY projects for modern homes, combining straightforward installation with powerful, real-time protection. With ongoing advancements in smart home technology, you gain additional benefits like water usage monitoring, seamless integration with your favorite voice assistants, and the ability to automate emergency responses even when you’re away on vacation or at work.
Remember, the investment in a quality smart water shut-off valve pays for itself many times over with just one prevented leak. By following the detailed steps, tips, and maintenance practices outlined in this guide, you ensure your device operates reliably for years to come. Don’t wait for a disaster—empower yourself with the right tools, knowledge, and technology to protect your home, your wallet, and your peace of mind. Ready to start? Gather your tools, pick the perfect valve, and make your home smarter and safer today.


Can you elaborate on how these valves handle power outages? I noticed the mention of battery backup, but I want to be sure the valve will still work if my home loses electricity.
Smart water shut-off valves typically include a battery backup system that allows the valve to operate even during power outages. This means if your home loses electricity, the battery ensures the valve can still detect leaks and automatically shut off your water supply. It’s important to regularly check and replace the backup batteries to maintain reliable operation during outages.
If my home’s main water shut-off valve is pretty old and tricky to access, do you have any tips for making the installation of a smart shut-off valve easier? Should I hire a plumber or can someone with basic DIY skills handle this?
If your main shut-off valve is old and hard to reach, installing a smart shut-off valve could be more challenging. In this case, it’s often best to hire a plumber, especially if the existing valve needs to be replaced or if pipe modifications are needed. A plumber can ensure a proper, leak-free installation and help relocate the valve if accessibility is an issue. For basic installations on accessible, newer valves, confident DIYers can sometimes handle it, but safety and water damage prevention are key considerations.
For someone who travels frequently and wants to control the shut-off remotely, could you clarify how reliable these valves are if the home Wi-Fi goes down? Is there a backup system in place for alerts or manual shut-off?
Smart water shut-off valves rely on your home Wi-Fi for remote control and real-time alerts. If your Wi-Fi goes down, you won’t be able to control the valve remotely or receive alerts through the app. However, most models can still be operated manually at the device itself. Some advanced valves offer cellular backup as an optional feature, but this depends on the brand, so it’s worth checking before purchase if backup connectivity is important to you.
For someone interested in integrating a smart water shut-off valve with a smart home system like Alexa or Google Assistant, are there compatibility issues to be aware of during installation, or do most products work seamlessly with these platforms out of the box?
When choosing a smart water shut-off valve, it’s important to check if the product specifically lists compatibility with Alexa or Google Assistant, as not all models support both platforms out of the box. Some valves may require you to use an additional smart hub or their own app for integration. Always review the manufacturer’s compatibility details before purchasing and follow any setup instructions for connecting to your smart home system during installation.
Does installing a smart water shut-off valve require shutting off water to the whole house for several hours, or is it a fairly quick process once you have the right tools?
Installing a smart water shut-off valve does require shutting off the main water supply, but the actual installation is usually quick if you have the right tools and fittings ready. For most homes, the water needs to be off for about 30 minutes to an hour, depending on your plumbing experience and any unexpected issues. Be sure to check for leaks thoroughly before turning the water back on.
If my home already has some smart devices like Alexa and smart thermostats, are there any compatibility issues I should be aware of when choosing a smart water shut-off valve? I want to make sure everything will work together smoothly.
It’s a good idea to check compatibility before buying a smart water shut-off valve. Many popular valves work with Alexa and other smart home ecosystems, but some may require their own app or a separate hub. Look for a valve that specifically mentions integration with your existing platforms. Also, check if it supports routines or automation, so you can control it alongside your thermostats and other devices for a seamless experience.
You mention that some valves connect with Alexa, Google Assistant, or Apple HomeKit. Are there specific brands that work best with each of those platforms, or are most valves cross-compatible?
Many smart water shut-off valves are designed to work with multiple platforms, but compatibility can vary by brand and model. For example, Moen Flo is popular for Alexa and Google Assistant, while Phyn Plus supports Alexa and Google but not Apple HomeKit. The Eve Aqua is a good choice for Apple HomeKit users. Always check the product specs to ensure it supports your preferred smart home system.
The article mentions integration with Alexa and Google Assistant—do you have to buy a specific model for that, or can most shut-off valves connect with smart home systems out of the box? I’m also wondering how tricky it is to actually set that up.
Not all smart water shut-off valves support Alexa or Google Assistant, so you’ll want to check the product specs before buying. Look for models that specifically mention compatibility with your chosen smart home system. Setup usually involves connecting the valve to your home Wi-Fi and linking it through the manufacturer’s app, then enabling the appropriate Alexa or Google integration, which is typically straightforward but may require following a few guided steps.
For ongoing leak prevention, how often does the battery backup in these valves need to be replaced or checked, and are there any recommended maintenance routines to ensure consistent operation?
For most smart water shut-off valves, it’s recommended to check the battery backup every 6 to 12 months, depending on the manufacturer’s instructions. Replace the batteries as soon as the low-battery indicator appears or during your routine checks. Additionally, test the valve’s operation periodically and inspect for debris or mineral buildup to keep the system responsive and reliable.
On the installation side, do I need any special plumbing tools or skills to set up a smart water shut-off valve, or is it something a homeowner with basic DIY experience could realistically handle without calling a pro?
Installing a smart water shut-off valve usually requires some basic plumbing skills, like shutting off your main water supply and cutting and reconnecting pipes. You’ll need a pipe cutter, adjustable wrench, and possibly Teflon tape or pipe sealant. If you’re comfortable with minor plumbing tasks and following instructions, you can likely handle it yourself. However, if your home’s plumbing is old or you feel uncertain, it might be safer to consult a professional.
Can you elaborate on what to do if the smart valve loses Wi-Fi connectivity or the battery backup runs out during an emergency, and how to manually operate the shut-off in such situations?
If your smart valve loses Wi-Fi or battery power during an emergency, you can still operate it manually. Most smart water shut-off valves have a manual override lever or knob. Locate the valve (usually near your main water line), then turn the lever or knob according to the manufacturer’s instructions to shut off the water supply. This manual option ensures you can control the flow even if the smart functions aren’t available.
You mention battery backup as a key feature—how long do these systems typically operate on battery alone, and what happens if the battery runs out during a leak?
Smart water shut-off valves with battery backup generally operate for 12 to 24 hours on battery power, though this can vary by model. If the battery runs out while a leak is detected, most units will stay in their last position—so if the valve is already closed, your water remains off, but if it’s open, it may not be able to shut off the water until power is restored or the battery is replaced.
You mentioned battery backup as a key feature—how long do these backups typically last during a power outage, and is it possible to replace or recharge the batteries easily, or does that require a service call?
Battery backups in smart water shut-off valves usually last anywhere from 6 to 24 hours during a power outage, depending on the model and how often the device is activated. Most models use standard batteries that you can easily replace yourself—typically AA or rechargeable lithium-ion packs. You shouldn’t need a service call for battery maintenance; just follow the manufacturer’s instructions for accessing and swapping the batteries.
I’m curious about the installation process for someone who isn’t very experienced with DIY plumbing projects. Are there common mistakes to watch out for or steps where hiring a professional might be safer?
Installing a smart water shut-off valve can be manageable, but certain steps—like cutting into your main water line and ensuring watertight connections—can be tricky for beginners. Common mistakes include improper pipe cuts, loose fittings, or incorrect valve orientation. If you’re unsure about shutting off your main water supply or working with plumbing tools, hiring a professional is a safer option to prevent leaks or water damage.
The article talks about leak detection and remote control, but I’m wondering about costs. Is installing a smart shut-off valve generally something a small business owner could do without a professional, and if so, what’s a realistic budget for the installation, including any required tools?
Installing a smart water shut-off valve can sometimes be a DIY project, especially if you’re comfortable working with plumbing and basic electrical connections. For a small business owner, expect the valve itself to cost between $150 and $400. If you need tools like a pipe wrench, Teflon tape, and perhaps a pipe cutter, you might spend an extra $30–$75. If your plumbing is complex or you’re unsure, hiring a professional could add $150–$300 for installation.
You mention battery backup as a key feature—how long do these batteries usually last, and what happens if the power and battery both go out during a leak? Would the valve stay open or closed?
Battery backup life for smart water shut-off valves typically ranges from 6 months to 2 years, depending on usage and model. If both the main power and battery fail during a leak, most valves will remain in their last position—so if the valve was open, it stays open; if it was closed, it stays closed. It’s important to check your specific model’s behavior and keep batteries fresh for reliable protection.
I’m curious about the battery backup feature you mentioned—how long should I expect the backup to last during a power outage, and are there certain models better suited for areas with frequent outages?
The battery backup for most smart water shut-off valves typically lasts between 6 to 24 hours, depending on the model and battery size. If you live in an area with frequent power outages, it’s best to look for models that offer extended battery life or support external battery packs. Some advanced models are specifically designed for reliability during longer outages, so checking the manufacturer’s specifications can help you choose the best fit.
When it comes to battery backup, do you recommend a model with a built-in battery or an option for external backup, especially in areas with frequent power outages? How long does the typical backup last during an outage?
In areas with frequent power outages, a model that supports an external battery backup is usually more flexible, as you can use larger or replaceable batteries for extended coverage. Built-in batteries are convenient but may only last a few hours—typically between 4 to 12 hours depending on the brand. External backup solutions can sometimes provide power for 24 hours or more, depending on the battery capacity.
I saw you mentioned some valves need integration with separate leak detectors in high-risk areas. Is it better to get a model with built-in sensors or go for separate detectors for different rooms?
Choosing between built-in sensors and separate leak detectors depends on your home’s needs. Built-in sensors are convenient but usually only monitor the valve area. Separate detectors placed in different rooms or high-risk spots like bathrooms, laundry rooms, and kitchens provide broader coverage and faster leak detection throughout your home. For larger spaces or multiple risk areas, separate detectors offer better protection.
I have a pretty old main water line in my house. Are there any special considerations or compatibility issues I should watch out for before installing a smart shut-off valve like the ones described here?
With an older main water line, it’s important to check the pipe material and diameter before purchasing a smart shut-off valve. Some valves may not fit or seal properly on corroded or non-standard pipes. Also, watch for signs of rust or fragile connections that could complicate installation. If you’re unsure about compatibility, consider consulting a plumber to assess your setup before proceeding.
How difficult is the installation process for someone with basic DIY experience? Are there any plumbing steps in your tutorial where it would be safer to hire a professional instead of attempting it solo?
If you have basic DIY skills, you should find most of the installation manageable, especially the mounting and connecting of the smart valve. The most challenging part is temporarily shutting off your main water supply and cutting into your main water line to fit the valve. If you’re not comfortable with pipe cutting or working with water lines—especially if your home uses older or complex plumbing—it’s wise to hire a professional for that step to avoid leaks or water damage.
You mentioned that some valves work with Alexa, Google Assistant, or Apple HomeKit. Is there any difference in the way these valves interact with each platform, or should I expect similar functionality regardless of the smart system I use?
The core functionality—turning the valve on or off remotely—will be similar across Alexa, Google Assistant, and Apple HomeKit. However, differences can appear in setup processes, compatibility with routines or automations, and the depth of voice control. For example, HomeKit may offer tighter integration with other Apple devices, while Alexa and Google Assistant might support broader third-party routines. It’s worth checking the valve’s documentation for any unique features or limitations on your preferred platform.
The article explains how these valves use sensors to detect leaks or changes in pressure. What happens if the valve accidentally shuts off due to normal fluctuations in water use, like running multiple appliances at once? Is there a way to adjust the sensitivity or get alerts before it shuts off water to the whole house?
Modern smart water shut-off valves are designed to minimize false alarms, but occasional sensitivity issues can happen if water use spikes suddenly. Many models allow you to adjust the sensitivity settings through their smartphone app or control panel. You can often set thresholds for flow rate or pressure changes. Additionally, most systems offer real-time alerts, so you’ll receive notifications before or when the valve is about to shut off, giving you a chance to respond or override the action if needed.
I see that most smart water shut-off valves connect to Wi-Fi and integrate with platforms like Alexa or Google Assistant. Are there any brands you’d recommend for someone with only basic smart home devices, or should I be concerned about compatibility issues?
If you have basic smart home devices, brands like Moen, Flo by Moen, and Phyn are solid choices because they’re user-friendly and designed for easy integration with Alexa and Google Assistant. Most leading valves work well with Wi-Fi and mainstream platforms, but it’s good to double-check that your smart speaker or hub is listed as compatible before buying. Typically, setup is straightforward, and you shouldn’t face major compatibility issues with common devices.
I saw that some valves can integrate with platforms like Alexa or Google Assistant. If I already have a smart home system, do you recommend hardwiring the smart valve or sticking with Wi-Fi only for easier installation and maintenance?
If you want the easiest installation and future maintenance, a Wi-Fi only smart valve is usually the best choice. These models integrate well with platforms like Alexa and Google Assistant, and you can set them up without running new wires. Hardwired options are more reliable and never need battery changes, but they require more work to install and can be harder to move or replace later.
I see the article mentions that most smart water shut-off valves can integrate with systems like Alexa or Google Assistant. If I already have a smart home hub set up with Z-Wave devices, do these valves work with Z-Wave too, or would I need a different setup?
Most smart water shut-off valves commonly support Wi-Fi or Zigbee for integration with platforms like Alexa and Google Assistant. Z-Wave compatibility is less common, so you’ll need to check the product specifications of the valve you’re interested in. If you specifically want Z-Wave integration, look for a model that lists Z-Wave support, or consider adding a compatible bridge that can connect your valve to your hub.
In the section about installation, do you recommend hiring a plumber for cutting into the main line, or is this a realistic DIY job for someone with basic plumbing tools? Any specific tips for avoiding leaks when reassembling everything?
Cutting into the main water line can be a manageable DIY project if you have experience with basic plumbing tasks and feel comfortable working with your home’s water system. However, if you have any doubts or if your plumbing is older or unusually configured, hiring a plumber is the safer choice. To avoid leaks during reassembly, make sure all fittings are clean and free of debris, use plenty of plumber’s tape (Teflon tape) on threaded connections, and tighten everything securely but not overly tight to prevent damage.
You mentioned some valves have battery backups. How long does the battery typically last during a power outage, and will the shut-off function and leak detection still work if the main power is out for several hours?
Most smart water shut-off valves with battery backup can operate for 6 to 24 hours during a power outage, depending on the model and battery type. During this time, both the shut-off and leak detection features should remain functional. However, continuous battery performance can vary, especially if the device sends alerts or operates frequently, so it’s a good idea to check the manufacturer’s specifications for your specific model.
I’m doing my first big plumbing project and I’m a bit confused about the installation process. Does putting in a smart water shut-off valve require turning off the water main to the whole house, and if so, how do I handle water that’s still left in the pipes when I remove the old valve?
Yes, you’ll need to turn off the water main to the whole house before installing a smart water shut-off valve. After shutting off the main, open the lowest faucet in your house—often a basement sink or outdoor spigot—to drain any remaining water from the pipes. Keep some towels and a bucket handy for any leftover drips when you remove the old valve.
For someone with limited plumbing experience, how difficult is the installation process, and are there any common mistakes to watch out for that could compromise the effectiveness of the leak detection or automatic shut-off features?
The installation is manageable for beginners, especially if you follow the step-by-step instructions and have basic tools. The most common mistakes are not tightening connections enough, which can cause leaks, or incorrectly positioning the sensors, which may prevent accurate leak detection. Also, double-check that the valve is installed in the right direction according to the water flow, as reversing it can affect the automatic shut-off function.
Does installing a smart water shut-off valve require shutting off the main water supply for an extended period, and if so, how long should I expect to be without water during the process?
Yes, you’ll need to shut off the main water supply while installing a smart water shut-off valve. The actual time without water typically ranges from 1 to 2 hours, depending on your experience and whether you encounter any complications. It’s a good idea to gather all tools and materials beforehand to help minimize the downtime.
I see that some systems can work with Alexa, Google Assistant, or Apple HomeKit. Are there major differences in functionality or ease of integration between brands, or should I be looking for a particular compatibility feature if I already use one of those platforms extensively?
If you already use Alexa, Google Assistant, or Apple HomeKit a lot, it makes sense to pick a smart shut-off valve that is officially compatible with your preferred platform. While most functions (like remote shut-off and leak alerts) are similar, HomeKit devices often require Apple TV or HomePod for automations, and setup can be simpler with Apple devices. Alexa and Google compatibility tends to offer more flexible voice commands and routines. Check for official certification and user reviews to ensure smooth integration with your system.
Is installing a smart water shut-off valve something a homeowner with limited plumbing experience can actually handle alone, or would you recommend hiring a professional for certain steps? Are there any risks to DIY installation, especially when dealing with the main water line?
Installing a smart water shut-off valve often involves cutting into the main water line, which can be challenging and risky for someone with limited plumbing experience. Mistakes might lead to leaks or water damage. If you’re not comfortable turning off the main valve, using pipe cutters, or ensuring watertight fittings, it’s safer to hire a professional for at least those steps. DIY is possible, but only if you feel confident with basic plumbing tools and procedures.
What kind of ongoing maintenance do these smart shut-off valves require? For example, do the sensors or the valve mechanism itself need to be tested or serviced regularly to make sure they still work properly after installation?
Ongoing maintenance for smart water shut-off valves is generally straightforward. It’s a good idea to test the valve mechanism and sensors every few months to confirm they respond as expected. Check the battery or power source on wireless models, clear away any dust or debris from sensors, and make sure your app or firmware is up to date. Many manufacturers also recommend performing a manual shut-off test at least twice a year.
You listed battery backup as a key feature—how long do these backups usually last during a power outage, and do they still allow for remote app control when there’s no electricity?
Battery backups in smart water shut-off valves typically last anywhere from 6 to 24 hours during a power outage, depending on the specific model and how frequently the valve is operated. While the battery keeps the valve functional for manual or automatic shut-off, most systems lose remote app control if your home’s Wi-Fi and router lose power too. In that case, you can operate the valve locally, but remote features may be unavailable until power is restored.
I’m interested in installing a smart water shut-off valve myself, but I’m wondering how complicated it is to integrate it with existing smart home systems like Alexa or Google Assistant. Are there certain brands that are easier to set up for someone who isn’t super tech-savvy?
Integrating a smart water shut-off valve with systems like Alexa or Google Assistant is generally straightforward, especially with brands designed for easy setup. Models like Moen Flo or Phyn Plus have user-friendly apps and step-by-step guides for connecting to major platforms. If you prefer a simpler process, look for valves that specifically mention native Alexa or Google Assistant compatibility—these usually require just a few taps in their app to connect.
You mention that some valves integrate with smart home platforms like Alexa or Apple HomeKit. Are there differences in reliability or ease of setup between models that use different smart home systems?
Yes, there can be differences in both reliability and ease of setup depending on which smart home system a valve supports. Generally, HomeKit-compatible valves require a bit more setup but offer strong privacy and reliability, while Alexa-compatible models tend to be easier to install and more widely supported. It’s best to choose a valve that matches the smart home platform you’re already using for the smoothest experience.
Could you give a ballpark idea of how much the typical installation ends up costing for a first-timer, including any extra tools I might need beyond what’s usually in a basic toolbox?
The overall cost for a first-time installation usually ranges from $150 to $400, depending on the brand of smart shut-off valve you choose. Most valves cost between $100 and $300. If you already have a basic toolbox, you may only need a pipe cutter or wrench, Teflon tape, and possibly a few pipe fittings or adapters, which might add $20 to $40. If you prefer professional installation, labor can add another $150 to $300.
The article mentions integration with smart platforms like Alexa or Apple HomeKit. Are there specific models that work better with certain ecosystems, or is compatibility usually the same across different brands?
Compatibility can vary quite a bit between brands and smart ecosystems. Some smart water shut-off valves are designed specifically for Alexa or Google Home, while others offer deeper integration with Apple HomeKit. For example, the Flo by Moen works well with Alexa and Google, but HomeKit compatibility is limited. Always check the product specs to ensure it supports the ecosystem you prefer.
If my Wi-Fi goes down or I lose connection to my smart home system, will the shut-off valve still work and protect against leaks? Or do these systems only function when connected to the internet?
Most smart water shut-off valves are designed to detect leaks and automatically shut off water even without a Wi-Fi or smart home connection. They typically use built-in sensors and can operate independently for basic leak prevention. However, you may lose remote monitoring or app notifications until connectivity is restored, but the core safety feature should still function.
Could you clarify what kinds of tools and plumbing skills are required for installation? I want to try doing this myself but I’m not sure if I’ll need to hire a plumber or buy special equipment beyond what’s already in a typical toolbox.
To install a smart water shut-off valve, you’ll usually need basic tools like an adjustable wrench, pipe cutter or hacksaw (if you need to cut pipe), screwdriver, and possibly Teflon tape for sealing threads. Basic plumbing skills—like turning off the water main, cutting pipe, and making watertight connections—are helpful. If you’re comfortable with these tasks, DIY installation is possible. If your plumbing setup is unusual or you’re not confident with pipe cutting, hiring a plumber is a good idea.
Is it possible to use a smart shut-off valve if I only want basic leak detection and not full integration with Alexa or Google Assistant? I’m not super into smart home stuff and just want to keep it simple and reliable.
You can definitely use a smart water shut-off valve just for basic leak detection without integrating it with Alexa or Google Assistant. Most smart valves work with their own dedicated app that lets you monitor for leaks and control the valve manually. You don’t have to set up any voice assistants or smart home routines—just use the app for notifications and control, keeping things simple and reliable.
How reliable are the automatic leak detection features in real-world use? Have you found that false alarms or connectivity problems are common with these types of valves?
Automatic leak detection in smart water shut-off valves is generally quite reliable, but real-world performance can vary based on factors like your plumbing system and Wi-Fi stability. Most users find false alarms are rare, especially after proper installation and calibration. Connectivity problems can occur if your Wi-Fi signal is weak near the valve, but placing your router nearby or using a Wi-Fi extender usually resolves this. Regularly checking the device’s app can also help ensure everything is working smoothly.