


Introduction: The Overlooked Importance of Tool Calibration in Home DIY
Many DIY enthusiasts and homeowners invest in quality tools and gadgets, expecting reliable results for repairs, maintenance, and upgrades. But even the best tools can fall short if their accuracy drifts over time—a common issue known as miscalibration. Whether you’re hanging shelves, adjusting door frames, assembling furniture, or tackling intricate woodworking, precision matters more than most realize. Miscalibrated tools can lead to uneven cuts, misaligned installations, faulty measurements, and costly rework. Yet, tool calibration is often misunderstood or neglected altogether outside of professional trades.
This comprehensive guide demystifies tool calibration for the home DIYer. We’ll explore why calibration is crucial, which tools require it, how to spot issues, and step-by-step methods for tuning up your most-used equipment. From tape measures and torque wrenches to digital calipers and levels, you’ll learn how to protect accuracy, ensure project success, and get the most value from your investment. Let’s put calibration front and center in your home toolkit—and see just how simple and impactful it can be.
Why Tool Calibration Matters for Homeowners and DIYers
Accurate Results Every Time
A slight error in measurement or alignment can quickly escalate into larger issues. For instance, a tape measure that’s off by just a few millimeters can lead to poorly fitting shelves or gaps in cabinetry. Proper calibration ensures your tools provide consistent, trustworthy results—critical for both safety and aesthetics.
Protecting Your Investment
Quality tools can last decades, but only if maintained. Calibration is a key aspect of tool care, preventing subtle wear and tear from undermining performance. Regularly checked and adjusted tools deliver better value, reducing waste and the need for premature replacements.
Safety Considerations
Miscalibrated tools can be dangerous. Over-tightening fasteners with an inaccurate torque wrench, or relying on a faulty stud finder, could compromise structural integrity or create hazards. Calibration keeps your work safe and up to code.
Which Home Tools Need Calibration?
While not every tool requires calibration, several commonly used gadgets and instruments do benefit from periodic checks. Here’s a breakdown:
- Measuring Tools: Tape measures, rulers, squares, digital calipers, and laser distance measurers.
- Alignment Tools: Spirit/bubble levels, digital levels, angle finders, and protractors.
- Torque Tools: Torque wrenches, screwdrivers with torque settings.
- Electrical Testers: Voltage testers, multimeters.
- Stud Finders and Sensors: Wall scanners, electronic stud finders.
Hand tools like hammers and screwdrivers don’t require calibration, but any tool designed to measure, align, or apply a specific force does.
Common Signs Your Tools Need Calibration
- Inconsistent Results: Repeated measurements yield different values for the same object.
- Poor Fit: Parts cut or assembled using your tools don’t align or fit as expected.
- Visible Wear: Faded markings, worn edges, or loose components.
- Project Issues: Frequent re-dos or adjustments required after using a specific tool.
- Time Since Last Calibration: Many tools recommend annual or bi-annual calibration.
Don’t wait for mistakes to pile up. Regularly inspect and test your tools, especially before starting critical projects.
How Often Should You Calibrate Home Tools?
Calibration frequency depends on several factors:
- Usage Rate: Heavily used tools need more frequent checks.
- Tool Type: Digital and precision tools (like calipers) may require annual calibration; basic tape measures may be checked less often unless dropped or damaged.
- Environment: Exposure to moisture, dust, or extreme temperatures affects tool accuracy.
- Manufacturer Recommendations: Always consult your tool’s manual.
As a general rule, check calibration annually or before beginning major home projects. For tools used in critical applications (e.g., torque wrenches for safety-related repairs), consider more frequent checks.
Step-by-Step Guide: Calibrating the Most Common Home Tools
1. Tape Measures & Rulers
- Check Against a Standard: Use a certified ruler or calibration block as your reference. Lay both flat and compare measurements at several intervals.
- Inspect Hook End: A bent or loose hook can add or subtract millimeters. Replace or tighten if needed.
- Test Multiple Lengths: Pull out the tape in 1 ft/30 cm increments and compare each to your reference.
- Recalibration: Most tape measures cannot be recalibrated but should be replaced if inaccurate.
2. Spirit Levels & Digital Levels
- Bubble Levels (Manual): Place the level on a flat surface and note the bubble’s position. Rotate 180 degrees and check again. If the bubble shifts, the level is off.
- Adjustment: Some levels have adjustable vials; consult the manual. If not, replacement is necessary.
- Digital Levels: Calibrate per manufacturer instructions, typically involving placing on a known level surface and following button prompts.
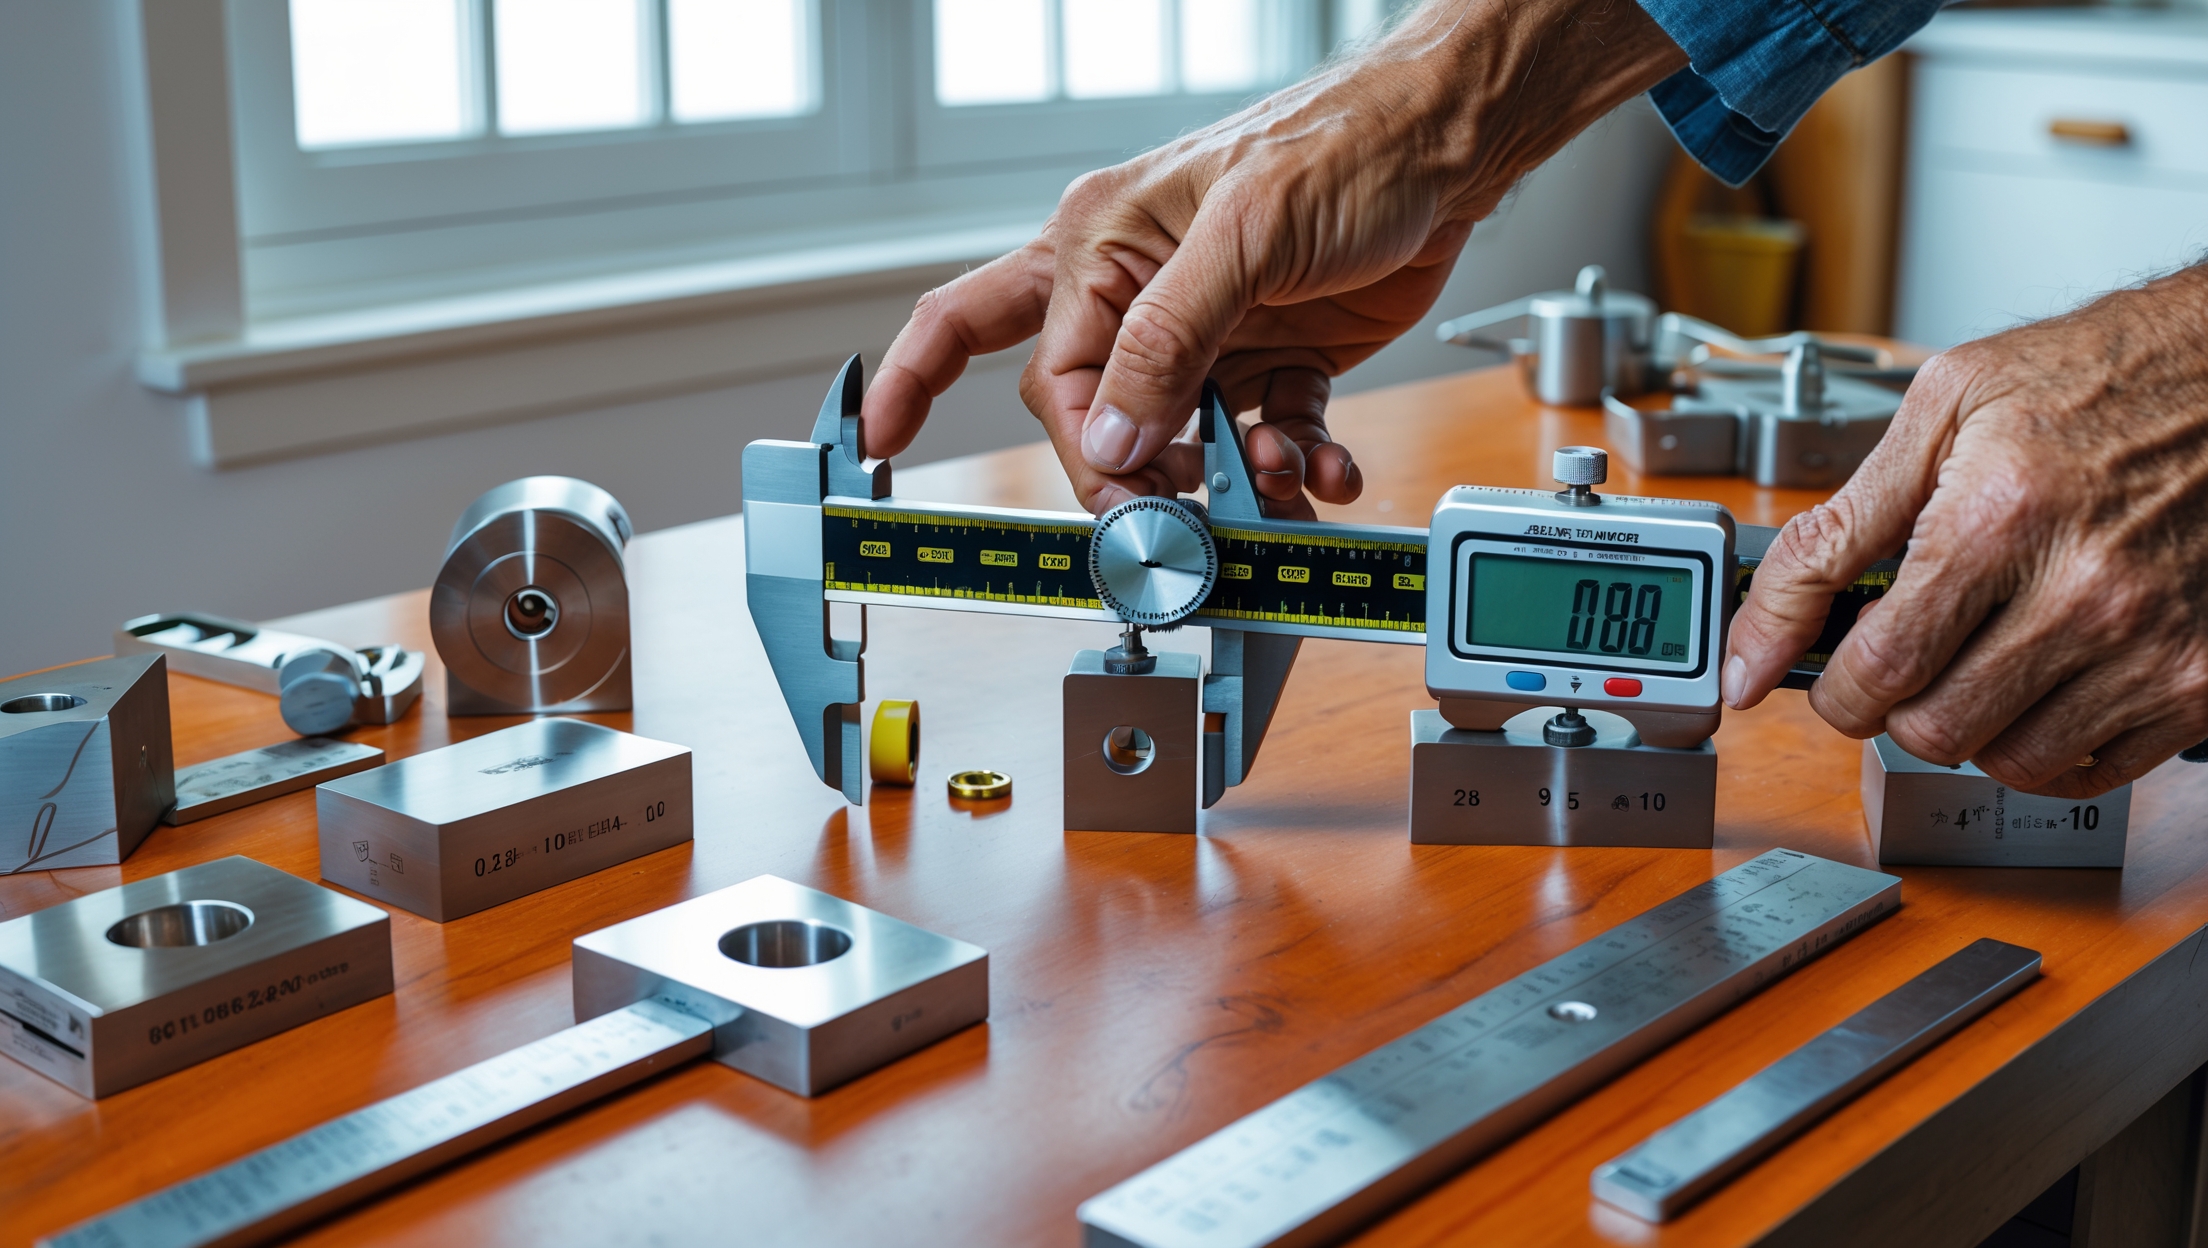
3. Digital Calipers
- Zero Check: Close the jaws and press “zero.”
- Reference Block Test: Use a certified gauge block or coin of known thickness. Measure and compare to the actual value.
- Repeatability: Open and close several times to ensure consistent readings.
- Recalibration: If readings drift, check for debris, clean the jaws, and repeat. Persistent errors may require professional calibration or replacement.
4. Torque Wrenches
- Torque Tester: Use a torque calibration device or test with a known weight and lever arm (DIY method: hang a weight at a set distance and calculate the applied force).
- Click-Style Wrenches: Test at several settings (e.g., 10, 50, 100 Nm) and compare to reference values.
- Adjustment: Some wrenches allow internal adjustment—consult the manual or seek professional calibration for critical accuracy.
5. Laser Distance Measurers
- Reference Test: Measure a known distance (e.g., the length of a certified board or marked wall section).
- Multiple Tests: Repeat from different angles and heights to check consistency.
- Calibration Mode: Many lasers include a self-calibration mode—follow manufacturer instructions.
6. Multimeters & Voltage Testers
- Reference Source: Use known voltage sources (batteries, calibration blocks) to verify readings.
- Zero Check: Confirm the device reads zero when not connected.
- Adjustment: Most home models don’t offer user calibration; if readings are off, consider professional service or replacement.
Essential Calibration Tools and Reference Equipment for Home Use
- Certified Ruler or Steel Rule: Provides a trustworthy standard for measuring tools.
- Gauge Blocks: Precision blocks for calibrating calipers and micrometers.
- Leveling Surface: A known flat surface for spirit and digital levels.
- Torque Tester: For torque wrenches, a basic tester is sufficient for home use.
- Reference Batteries or Voltage Source: For multimeters and testers.
Consider investing in a small calibration kit tailored to your most-used tools. Many can be found online or at specialty hardware stores.
Best Practices for Maintaining Calibration
- Handle with Care: Dropping or banging tools can throw off calibration. Always store and transport tools securely.
- Clean Regularly: Dust, debris, and moisture can affect moving parts and sensors. Clean tools after each use.
- Store Properly: Keep tools in a dry, temperature-controlled environment. Use cases or foam inserts for delicate instruments.
- Document Calibration Dates: Mark calibration or check dates on the tool or in a notebook.
- Follow Manufacturer Guidance: Always review the manual for specific calibration and maintenance advice.
DIY vs. Professional Calibration: When to Seek Help
Most home tool calibration can be performed with basic reference equipment and careful attention. However, some situations warrant professional service:
- Critical Accuracy Needed: For tools used in structural, electrical, or safety-critical applications.
- Persistent Errors: If a tool remains inaccurate after DIY calibration and cleaning.
- Complex Digital Tools: Some advanced devices require manufacturer-specific calibration tools and software.
Professional calibration labs provide certified accuracy and documentation—valuable for high-stakes repairs or if you plan to rent or sell your tools.
Cost Breakdown: DIY Calibration vs. Professional Services
- DIY Calibration: Most home calibration kits cost $20–$80, depending on the number and type of reference standards needed. Time investment is typically 15–30 minutes per tool.
- Professional Calibration: Expect to pay $30–$100 per tool, often with a certificate of accuracy. Turnaround times range from same-day to several weeks.
For most non-commercial users, DIY calibration is cost-effective and sufficient. Invest in professional services for specialized, high-value, or safety-critical tools.
Common Calibration Myths Debunked
- “Calibration is only for pros.” Not true—anyone relying on accurate results needs calibrated tools, especially for home repairs and upgrades.
- “Digital tools never need calibration.” All tools drift over time, regardless of technology. Digital readouts can be especially misleading if not verified.
- “If it’s new, it’s accurate.” Even brand-new tools can be off due to manufacturing tolerances or shipping damage. Always check before use.
Case Study: How Calibration Saved a DIY Project
Sarah, a homeowner, set out to install floating shelves in her living room. Using her trusty tape measure and spirit level, she marked and drilled holes. But when mounting the shelves, she discovered a persistent tilt, even after rechecking her work. After reading about tool calibration, Sarah compared her tape measure to a certified ruler and found it was off by nearly 1/8 inch over 3 feet. Her spirit level, when reversed, showed a significant bubble shift—a sign of miscalibration. After replacing both tools and double-checking calibration, her next attempt resulted in perfectly aligned shelves.
This real-life example highlights how small calibration errors can lead to big frustrations—and how easy it is to correct the problem once you know what to look for.
Conclusion: Make Calibration a Habit for DIY Success
Tool calibration is one of the most overlooked yet essential practices for homeowners and DIYers aiming for professional-quality results. Accurate tools not only make projects easier and more predictable, but they also ensure safety, reduce waste, and extend the life of your investment. Whether you’re a weekend warrior or a seasoned fixer-upper, integrating regular calibration checks into your home maintenance routine is a small step with big payoffs.
Start by identifying which tools you rely on most, invest in basic reference equipment, and set a schedule—perhaps tied to your seasonal maintenance checklist or before major projects. With the simple methods outlined above, most calibration can be handled at home in just a few minutes. For specialized or high-stakes tools, don’t hesitate to seek professional help.
Remember, the confidence of knowing your measurements and adjustments are spot-on is invaluable—especially when it comes to repairs, upgrades, and creative projects. By making calibration a core part of your DIY toolkit, you’ll enjoy smoother workflows, better outcomes, and the satisfaction of a job truly well done.


You mention that even tape measures can drift out of calibration over time. How often should I actually be checking and calibrating basic tools like tape measures or levels if I’m just a weekend DIYer?
For weekend DIY projects, checking and calibrating basic tools like tape measures and levels once or twice a year is usually enough. It’s also wise to do a quick check if you’ve dropped them, notice any damage, or before starting a project where accuracy really matters. This way, you’ll keep your results reliable without spending too much time on maintenance.
If I’m mostly working with simple furniture assembly and the occasional shelf, are there specific tools you find need calibration more often at home, or can I get by with just visual checks unless I notice problems?
For basic tasks like furniture assembly or putting up shelves, most tools such as screwdrivers, hammers, and basic wrenches don’t require regular calibration. If you use a tape measure, level, or cordless drill, just check them visually or with a quick test before each project. Only consider calibration if you start noticing measurements are off or fasteners aren’t fitting properly.
For someone who doesn’t want to buy a lot of extra equipment, are there budget-friendly methods or household items that can help with calibrating basic tools accurately?
Absolutely, you can calibrate many basic tools using everyday household items. For example, a metal ruler or measuring tape can help check the accuracy of tape measures or squares. Use a level app on your smartphone for spirit levels. For small scales, coins often have standard weights and can be handy. While these methods may not be perfect, they provide a practical way to check tool accuracy without extra investment.
You mentioned the risk of safety issues with miscalibrated tools. If I suspect my level or square is off, are there any simple DIY methods to confirm and fix this, or should I invest in professional calibration tools?
If you think your level or square might be off, you can use some easy DIY checks before considering professional calibration. For a level, place it on a flat surface, note the bubble’s position, then rotate it 180 degrees—if the bubble stays centered, it’s accurate. For a square, place it against a straight edge and draw a line, then flip the square and check if a second line matches the first. Minor adjustments can be made carefully, but for precise work or if corrections don’t help, professional calibration is worthwhile.
I get why calibration is important, but do you have recommendations for affordable calibration tools or methods that work for someone just starting out with DIY projects at home? I’m wondering if I need to invest in professional equipment, or if there are good DIY alternatives.
You don’t need professional equipment when you’re just starting out. For most DIY projects, basic tools like a good quality ruler, a reliable level, and inexpensive calibration weights for scales are usually enough. For power tools, you can use reference objects, like a known straight edge or a carpenter’s square, to check and adjust accuracy. Many everyday household items can serve as calibration aids until you decide if more advanced tools are worth the investment for your needs.
Your guide covers a range of tools from digital calipers to basic levels, but are there any affordable calibration tools or kits you’d recommend for someone on a budget? I’d love to get started without spending too much right away.
Absolutely, there are several budget-friendly calibration tools to help you get started. For digital calipers and micrometers, inexpensive gauge blocks or calibration rods can often be found online. For levels, a simple spirit level vial checker is useful. Multi-purpose calibration kits that include a selection of reference standards are also available at hardware stores and online retailers, and these are usually quite affordable. Starting with these basics will let you calibrate most of your common hand tools without a big investment.
You mentioned that miscalibrated tools can be a safety issue. Can you give examples of which DIY tasks might actually become unsafe if I’m using measurements that are slightly off?
Absolutely, some DIY tasks really rely on precise measurements for safety. If you’re building shelves or furniture, even small miscalculations can make structures unstable and prone to collapsing. In electrical work, inaccurate wire stripping or cutting could expose live wires. Cutting lumber or metal with power tools using miscalibrated guides might lead to slips or jams, increasing the risk of injury. Always double-check your tool calibration before starting projects where stability or fit matters.
I’m interested in trying to calibrate my torque wrench at home, but I’m on a budget. Are there any low-cost or DIY methods for calibration that still give accurate results, or do I really need special equipment?
You can calibrate a torque wrench at home using some basic tools like a sturdy vise, a known weight, and a tape measure. The idea is to apply a known force at a specific distance from the handle and see if the wrench clicks at the correct torque. While this DIY method isn’t as precise as professional calibration, it can be accurate enough for many home projects if you measure carefully. Just make sure your setup is secure and your measurements are as exact as possible.
You mention that even a small miscalibration in something like a tape measure can lead to bigger problems down the line. How often should basic household tools like tape measures and levels actually be recalibrated for typical DIY use?
For typical DIY use, it’s a good idea to check your tape measures and levels for accuracy every six months or before starting any major project. You don’t need professional equipment—simply compare your tool against a known accurate reference or another trusted tool. If you notice any discrepancies or damage, recalibrate or replace the tool as needed to ensure reliable results.
If I find that some of my tools are already miscalibrated, is it possible to recalibrate them myself at home, or does it make more sense to bring them to a professional? Would love some guidance on which tools are safe for DIY calibration.
You can safely recalibrate many hand tools at home, such as tape measures, levels, and basic torque wrenches, using household items or simple reference objects. However, for more complex or sensitive tools like digital calipers, multimeters, and precision measuring devices, professional calibration is recommended to ensure accuracy. Always consult your tool’s manual for specific instructions and safety tips before attempting recalibration yourself.
When calibrating a level or torque wrench at home, how often should I repeat the process to make sure the measurements stay accurate? Is there a general rule for how frequently to check calibration on commonly used DIY tools?
For most DIY tools like levels and torque wrenches, it’s a good idea to check calibration every 6 to 12 months if you’re using them regularly. If the tool is dropped, used heavily, or exposed to temperature extremes, recalibrate sooner. Consistent accuracy depends on both frequency of use and how carefully the tool is handled.
You mention that even tape measures can become miscalibrated over time. What are some telltale signs that a common tool like a tape measure or level is out of calibration before it causes a noticeable error in a project?
For a tape measure, watch for a loose or bent hook, faded markings, or a tape that doesn’t retract smoothly—these are signs it may be miscalibrated. With a level, check if the bubble is slow to move, the vial is cracked, or the level sits unevenly on a truly flat surface. Regular visual checks and comparing with a known accurate tool can help catch issues early.
The guide mentions that calibration helps tools last longer and prevents waste. For someone on a tight budget, is there a priority list of which household tools should get calibrated first, in case I can’t do them all at once?
If you need to prioritize, start with tools that directly affect safety and accuracy. This usually means focusing first on measuring tools like tape measures, kitchen scales, and thermometers. Next, consider power tools that require precision, such as drills or saws. Hand tools like wrenches or screwdrivers can follow, especially if you use them for important repairs. Regular calibration of these essentials will give you the most benefit for your budget.
The article talks about calibrating digital calipers and torque wrenches, but are there any inexpensive calibration tools or kits you recommend for someone just starting out? I’m not sure how much I should budget for this kind of maintenance.
For beginners, you don’t need to spend much on calibration tools. For digital calipers, a basic set of gauge blocks or a precision ruler can help, often available for under $30. For torque wrenches, a simple torque checker or a beam-style torque wrench can verify accuracy and usually costs between $20 and $50. These options are sufficient for home use and routine checks.
You mentioned that miscalibrated tools can be a safety concern. What are some warning signs I should look out for that indicate my torque wrench or other equipment might be putting me at risk?
If your torque wrench gives inconsistent readings, feels loose or sticky during use, or if fasteners seem to loosen or over-tighten unexpectedly, those are all warning signs of miscalibration. For other tools, look for unusual noises, physical wear, or results that don’t match expected measurements. Regularly inspecting and testing your equipment can help catch these issues before they become safety risks.
For those of us who use our tools for both hobby projects and occasional home repairs, how often would you suggest calibrating things like torque wrenches or laser levels to avoid overkill but still maintain safety and precision?
For hobbyists and occasional home repairs, calibrating torque wrenches and laser levels once a year is usually sufficient, unless you drop the tool or notice accuracy issues. If you use them more heavily or for critical tasks, consider checking them every six months. Always store tools properly and do a quick accuracy check before important projects to ensure ongoing precision.
In the section about tuning up digital calipers at home, do you suggest homeowners invest in calibration blocks, or are there reliable DIY alternatives for those on a tight budget?
In the article, it’s mentioned that calibration blocks are ideal for checking the accuracy of digital calipers, but they aren’t strictly necessary for homeowners on a budget. You can use reliable DIY alternatives, such as using known objects like coins with standard thickness or gauge blocks from household items, as long as their measurements are verified. This can help you calibrate your calipers effectively without a major investment.
I’m curious about maintaining digital tools like calipers or laser levels. Are there any special calibration steps or precautions with electronic measuring devices compared to more traditional hand tools?
Digital tools like calipers and laser levels do require some extra care during calibration compared to traditional tools. Always check and replace batteries as low power can affect accuracy. Make sure the surfaces are clean and free from dust. For digital calipers, close the jaws completely and zero the display before use. With laser levels, place them on a stable, level surface and use their self-leveling feature if available. Avoid exposing these devices to moisture or extreme temperatures, as electronics can be more sensitive than manual tools.
I’m on a tight budget and can’t afford fancy calibration equipment. Are there simple or affordable methods for calibrating things like levels, tape measures, or torque wrenches at home, especially for someone who isn’t super technical?
Absolutely, you can calibrate many common tools at home without expensive gear. For levels, place the level on a flat surface, note the bubble’s position, then rotate it 180 degrees—if the bubble sits in the same spot, it’s accurate. Tape measures can be checked against a metal ruler or another tape you trust. For torque wrenches, you can use a known weight and a measured lever arm to get a rough check. These methods are simple and mostly require only what you already have at home.
You mention that calibration protects tool investment and accuracy, which makes sense, but how often should most homeowners actually recalibrate their commonly used tools? Is there a general schedule or does it depend on how often they’re used?
How often you should recalibrate your tools depends mostly on how frequently you use them and the type of tool. For homeowners, checking and calibrating measurement tools like levels, tape measures, or stud finders once or twice a year is usually sufficient if they’re used occasionally. For tools you use more often or for precise projects, a quick calibration check every few months is a good habit. Always recalibrate after dropping a tool or noticing inconsistent results.
I’m curious about torque wrenches specifically – if I mostly use mine for occasional home repairs, do I need to follow a different calibration schedule than someone using theirs regularly? Are there DIY calibration methods that are reliable, or do I need to pay for professional service?
If you only use your torque wrench occasionally for home repairs, you can generally calibrate it less often—about once a year is usually sufficient. However, if you’re doing work where precision is critical or if the wrench is dropped, check it sooner. DIY calibration methods exist, like using a known weight and a measured distance, but they aren’t always as precise as professional calibration. For the best accuracy, especially for important tasks, occasional professional calibration is recommended.
If I notice my digital caliper is giving slightly inconsistent readings, what’s the best way to determine whether it just needs calibration or if it might be damaged beyond a simple fix?
To figure out if your digital caliper just needs calibration or might be damaged, start by measuring a known reference object, like a gauge block or a coin with a verified thickness, several times. If the readings are inconsistent but close, calibration may help. However, if the numbers fluctuate wildly or the caliper won’t zero properly, there could be internal damage or an issue with the electronics, and professional repair or replacement may be needed.
I see you mention calibrating tools like tape measures and digital calipers. Are there any easy ways to tell when a tool at home has lost accuracy, especially for those of us who don’t have professional calibration equipment?
You can spot accuracy issues with common tools by comparing them to a known standard. For tape measures, lay them next to a trusted ruler and check if the markings align at several points. For digital calipers, close them fully and see if they read zero—if not, they may need resetting. Also, notice if measurements aren’t consistent when you repeat them; that’s a sign recalibration or replacement may be needed.
If I suspect my tools are already giving faulty measurements, do you recommend recalibrating them myself right away, or are there cases when it’s safer or smarter to replace them entirely—especially when safety is a concern around kids?
If your tools are giving inaccurate measurements, it’s often a good idea to try recalibrating them first, especially if the error is minor. However, if the tool is damaged, worn out, or crucial for safety—like a faulty stud finder or gas detector—it’s usually safer to replace it. When kids are involved, err on the side of caution and replace any tool you can’t trust completely.
Could you elaborate on how to recognize early signs that a tool is miscalibrated, especially for those of us who may not notice small errors until they impact a project?
Absolutely. Early signs of miscalibrated tools can include inconsistent results, having to repeat measurements, or noticing parts not fitting as they should. For tools like levels or tape measures, check periodically by measuring known references or comparing results to another reliable tool. If your results start to vary when performing the same task, that’s often a clue something is off. Regularly checking tools before starting a new project can help you catch these signs early.
When calibrating something simple like a tape measure or spirit level at home, what should I look out for to know if it actually needs recalibrating, or is it safe just to check it every few months?
For basic tools like tape measures and spirit levels, check for visible damage, wear, or if measurements start to seem off compared to trusted references. If your tape measure doesn’t retract smoothly or the markings have faded, it might not be accurate. With spirit levels, if the bubble isn’t centered when placed on a known flat surface, recalibration is needed. Regular checks every few months are usually enough unless you drop or damage the tool.
In the section about protecting your investment, you mention subtle wear affecting tool performance. What are some early warning signs that a tool has gone out of calibration before it causes major project problems? Any troubleshooting tips for identifying these issues early?
Subtle signs that a tool is losing calibration include measurements consistently just a bit off, parts not fitting together as expected, or noticeable changes in the tool’s usual sound or feel. You can spot these issues early by regularly checking your tool’s accuracy against a known reference and watching for repeat inconsistencies. If you notice even small deviations, recalibrating right away helps prevent bigger project setbacks.
I understand why calibration is important, but how often should common tools like tape measures or levels actually be checked or recalibrated for regular DIY projects? Does frequency change depending on how often they’re used?
For common tools like tape measures and levels, checking their accuracy about once every 6 to 12 months is usually enough for regular DIY projects. If you use them heavily or drop them often, it’s a good idea to check them more frequently—maybe every few months. The more you use a tool, the more likely it is to get out of calibration, so adjust your schedule based on usage.
If a tool has never been calibrated before, how can I tell whether it’s actually miscalibrated, especially if it seems to be working fine during small projects?
Even if a tool appears to work fine, it might still be slightly off, which can create bigger problems in precision tasks. To check for miscalibration, compare your tool’s measurements or outputs with a trusted reference tool or a known standard. For example, measure a known length or weight and see if your tool matches. Subtle errors may not show up in small projects but can become an issue over time.
The article says regular calibration prevents unnecessary tool replacement. For someone on a budget, do you recommend prioritizing certain tools for calibration, or should all tools get equal attention? If I can only focus on a couple, which ones really matter most?
If you’re on a budget and need to prioritize, focus on calibrating the tools that most affect safety and measurement accuracy, like torque wrenches, multimeters, and levels. These tools can directly impact the quality and safety of your work if they’re off. Less critical tools can be checked less frequently or as needed.
You mention torque wrenches need calibration—does that mean I need any special equipment to do it at home, or are there simple DIY methods you recommend for someone on a budget?
You don’t necessarily need expensive equipment to calibrate a torque wrench at home. A simple DIY method involves using some weights, a sturdy bench vice, and a ruler or tape measure. By securing the wrench in the vice, measuring the correct length, and applying known weights at the handle, you can check if the wrench clicks at the right torque. This homemade approach is budget-friendly and works well for most non-professional needs.
If someone is just starting to set up a home workshop on a tight budget, which tools do you think are most critical to calibrate first, and are there any DIY methods you recommend for those initial calibrations?
For a new home workshop, focus on calibrating your measuring tools first—like tape measures, levels, and squares—since accuracy here affects every project. You can check a square by flipping it along a straight edge and seeing if the lines match. For levels, place them on a flat surface, note the bubble’s position, then rotate 180 degrees; the bubble should be in the same spot. These simple checks help ensure reliable measurements without extra cost.
When checking and adjusting the calibration of a tape measure, how can I tell if wear and tear has made it unreliable, especially around the hook? Do you recommend replacing a tape that’s slightly off, or is there a way to fix minor inaccuracies?
To check for wear on a tape measure, inspect the hook for looseness, bending, or missing rivets. If the hook wiggles too much or its edge is noticeably worn, your measurements can be off. For minor issues, you might gently tighten the rivets or carefully bend the hook back, but if the tape is still inaccurate after these fixes, it’s best to replace it to ensure precise measurements.
For tools like digital calipers or torque wrenches, how often should calibration be checked if they’re only used occasionally for home projects? Is there a recommended schedule or does it depend more on frequency of use?
For occasional home use, digital calipers and torque wrenches generally only need calibration checked once a year, or whenever you notice questionable readings or after a drop or mishap. While frequent professional use might require more regular checks, light use at home means an annual schedule is usually sufficient. Always follow the manufacturer’s guidelines if they provide a specific recommendation.
You mention that miscalibrated tools can cause safety issues, especially with things like torque wrenches. If I’m using my tools just a few times a year, is calibration still necessary, or is it only a concern for frequent users?
Calibration is important even if you only use your tools occasionally. Tools like torque wrenches can lose accuracy over time just from being stored, not only from frequent use. For safety and reliable results, it’s a good idea to check their calibration at least once a year, no matter how often you use them.
For someone on a tight budget, are there affordable tools or calibration methods that can still provide reliable results for typical DIY projects like assembling furniture or hanging shelves? Or is professional calibration equipment necessary?
You don’t need expensive professional equipment for most DIY projects like assembling furniture or hanging shelves. Affordable tools such as bubble levels, basic tape measures, and manual torque wrenches work well and can be checked for accuracy using simple household items. For example, you can verify a level’s accuracy by flipping it over and seeing if the bubble stays consistent. These practical methods will keep your projects precise without breaking the bank.
If I notice my cuts or assemblies keep coming out uneven even after calibrating my tools as described, what are some troubleshooting steps or possible mistakes I should look for before assuming my tools are faulty?
If your results are still uneven after calibrating, double-check the accuracy of your measuring tools first—sometimes rulers or squares can be slightly off. Make sure your workpieces are securely clamped and that you’re using consistent technique. Also, inspect your blades or bits for wear or damage, and confirm your materials are flat and true. Small errors in setup or material can cause ongoing issues even if your tools are calibrated correctly.
If I suspect my torque wrench is slightly off but I only use it for occasional home repairs, how often should I recalibrate it to avoid safety issues without overdoing it?
For occasional home use, recalibrating your torque wrench every one to two years is usually sufficient, unless you notice inaccurate readings or it has been dropped. Store it at its lowest setting and avoid exceeding its maximum rating to help maintain accuracy. If you use it for critical tasks like automotive repairs, err on the side of annual calibration for safety.
The article mentions tuning up equipment like tape measures and torque wrenches at home. Are there any signs or symptoms I should look for that indicate a tool urgently needs calibration, or is it more of a routine thing?
There are some clear signs a tool may urgently need calibration. For tape measures, look for loose or damaged end hooks, faded markings, or inconsistent readings when compared to another tape. With torque wrenches, if bolts seem too tight or not tight enough despite following settings, it’s time to check calibration. While routine calibration is important, noticing these symptoms means you should act sooner to maintain accuracy and safety.
When calibrating digital calipers or levels at home, is there a way to know if they’re still out of spec if I don’t have any professional-grade reference tools? I want to make sure I’m not just introducing new errors.
Without professional reference tools, you can still get a reasonable check by comparing your digital calipers or levels against trusted household items. For calipers, measure objects with known standard measurements, like coins or gauge blocks if you have them. For levels, place them on a flat surface, take a reading, then rotate 180 degrees and check if the reading matches. While not as precise as using certified tools, these methods can help you spot obvious errors.
If I’ve invested in mid-range tools rather than high-end brands, does that change how I should approach calibration or maintenance? I’m concerned about protecting my investment without spending a lot on professional calibration services.
Using mid-range tools doesn’t mean you need to approach calibration or maintenance all that differently compared to high-end brands, but regular attention is still important. Follow the manufacturer’s guidelines for calibration, and make use of simple, accurate reference standards at home. Routine cleaning, proper storage, and periodic checks can extend tool life and accuracy without expensive professional services. You’ll protect your investment well by being consistent and careful.
If I’m trying to prioritize tool care on a small business budget, which tools should get calibrated first to prevent the most costly or dangerous mistakes in home repairs?
For a small business focused on home repairs, prioritize calibrating tools that directly impact safety and accuracy. Start with torque wrenches, electrical testers, and stud finders, as mistakes with these can cause costly damage or create dangerous situations. Next, focus on laser levels and measuring tapes, since precise measurements are essential for quality work. Keeping these tools calibrated helps you avoid expensive errors and keeps your repairs safe.
Could you expand on how frequently homeowners should calibrate less obvious tools like levels or digital calipers? Is there a recommended interval, or does it depend more on usage patterns and the type of projects typically undertaken?
Calibration frequency for tools like levels or digital calipers often depends on how often and intensively they’re used. For light, occasional home projects, checking accuracy once or twice a year is usually sufficient. However, if you’re working on precise or critical tasks, or if your tools are dropped or exposed to harsh conditions, calibrate them before each major project. Always inspect for visible damage and double-check accuracy if your results seem off.
As a parent with limited time for home projects, how often should I actually be calibrating common tools like levels and torque wrenches? Is there a general schedule you recommend or certain warning signs to look out for?
For busy parents, calibrating tools like levels and torque wrenches once a year is usually sufficient if they’re used occasionally. However, if you notice inaccurate results—like a level not showing the same reading in both directions, or bolts not tightening as expected with your wrench—it’s a good idea to recalibrate sooner. Always check after any drops or rough handling, as this can throw tools out of alignment.
The article mentions digital calipers and torque wrenches—are there big differences in how you calibrate electronic tools compared to manual ones? Also, do the steps change if you’re on a budget and don’t have professional calibration equipment?
Electronic tools like digital calipers often have built-in reset or zeroing functions, making home calibration a bit simpler than with manual tools. For torque wrenches or manual calipers, you typically use reference objects or weights to check accuracy. If you’re on a budget, you can use household items—like coins for thickness or simple weights for torque—as reference points, but be sure to research their exact values to ensure reasonable accuracy.
You mention calibrating tools like tape measures and torque wrenches at home, but I’m wondering how often this should be done for a typical DIYer who does projects on weekends. Is there a general schedule to follow, or does it depend on how much the tool is used?
For a weekend DIYer, calibrating tools like tape measures and torque wrenches once or twice a year is usually sufficient if they’re not used heavily. However, if you notice unusual readings or if a tool is dropped or exposed to extreme conditions, it’s a good idea to check calibration sooner. Frequency really depends on how often and how critically you use each tool.
You mention calibrating digital calipers and torque wrenches—do I need special equipment or can I do this with items most parents already have at home? I’d love a basic step-by-step for calibrating these tools without investing in pricey gadgets.
You can calibrate digital calipers and torque wrenches with household items. For digital calipers, use objects with a known width, like coins or a metal ruler, to check accuracy. For torque wrenches, a simple method is to use a known weight and a measuring tape to create a lever arm, then see if the wrench clicks at the expected force. This approach doesn’t require buying special equipment and offers decent accuracy for most home uses.
For someone just starting out, what are the most cost-effective ways to keep essential tools calibrated without investing in expensive gear? Are there DIY calibration methods that are accurate enough for typical home projects?
You can keep essential tools calibrated at home without spending much by using simple DIY methods. For example, a basic level can be checked by placing it on a flat surface, noting the reading, then rotating it 180 degrees to see if the bubble is centered both times. For tape measures and rulers, compare them against a known accurate reference, like a metal ruler or even a printed scale from a reputable source. These methods are usually accurate enough for most home projects and help you avoid costly calibration equipment.
I get why calibration is important for stuff like torque wrenches, but how often do you really need to recalibrate basic hand tools at home? Is there a general rule for how frequently this should be done?
For most basic hand tools like tape measures, levels, or squares, recalibration isn’t needed as often as with more sensitive tools like torque wrenches. Generally, it’s a good idea to check their accuracy once or twice a year, or whenever you notice questionable results or after a tool has been dropped or damaged. Regular visual checks and occasional verification against a trusted reference are usually sufficient for home use.
I get the importance of calibration, but some tools, like digital calipers, seem really technical. Are there basic signs I should look for that tell me a tool is out of calibration before I try to fix it myself?
With digital calipers and similar tools, watch for signs like inconsistent readings when measuring the same object multiple times, numbers that jump or flicker on the display, or the tool displaying a value other than zero when fully closed. If you notice any of these, it’s a good indication the tool needs calibration or possibly a battery check before you proceed further.
If I already messed up a woodworking project and suspect my level or tape measure was off, what’s the best way to check which tool is miscalibrated? Also, is it possible to recalibrate them myself or should I replace them?
To check which tool is off, compare your tape measure and level with others you trust or know are accurate. For the tape measure, measure a known length (like a ruler or yardstick); for the level, place it on a flat surface, note the bubble position, then rotate it 180 degrees—if the bubble changes, it’s off. Most levels and tape measures can’t be recalibrated accurately at home, so if they’re unreliable, replacing them is usually the best solution.
You mention how miscalibrated tools can cause safety issues. Can you share some tips for quickly spotting if a tool, like a torque wrench or level, is giving inaccurate readings before a project goes sideways?
Absolutely! For a torque wrench, check if it returns smoothly to zero and compare its reading against a known weight or another calibrated wrench. For a level, place it on a flat surface, note the bubble position, then flip it 180 degrees; the bubble should stay centered if it’s accurate. Quick checks like these before starting can help catch major miscalibrations and prevent problems during your project.
When calibrating digital calipers at home, what should I watch out for to make sure I don’t accidentally make things worse? Are there common mistakes beginners tend to make during the process?
When calibrating digital calipers at home, be sure to clean the jaws and surfaces thoroughly before starting, as dirt can affect accuracy. Always zero the calipers with them completely closed. Avoid using excessive force when closing the jaws, since that can bend or misalign them. Beginners often forget to check the calipers against a known standard (like a gauge block) after calibration, so double-check your results to ensure accuracy.
When it comes to recalibrating tools like torque wrenches or digital calipers at home, are there affordable methods or basic equipment that you recommend for someone just starting out? I want to avoid making things worse or wasting money on unnecessary gadgets.
For beginners, you can recalibrate a torque wrench using a simple vise, some weights, and a ruler to measure force, while digital calipers can be checked with a known standard like a feeler gauge or gauge block. Stick to these basic tools and follow your tool’s manual for calibration procedures. There’s no need for expensive gadgets—just accuracy and patience are key.
You mentioned that even a small miscalibration in a tape measure can throw off a whole project. For basic home use, how often should items like tape measures and levels actually be checked or recalibrated? Is there a general rule of thumb or does it depend on frequency of use?
For basic home use, it’s a good idea to check your tape measures and levels for accuracy about once a year, or whenever you notice any drops, dents, or exposure to extreme conditions. If you use them more frequently, like for multiple projects each month, checking every few months is wise. The main thing is to inspect them if you suspect any damage or if precise measurements really matter for your current project.
Could you clarify how often homeowners should calibrate common tools like tape measures or levels during regular DIY projects? Is there a general guideline or does it depend more on how frequently the tools are used?
For most homeowners, calibrating tools like tape measures and levels once or twice a year is usually enough—especially if they’re used for regular DIY tasks. However, if you use them heavily or for precision work, it’s wise to check them more often, maybe every few months. Always recalibrate if a tool has been dropped or seems off during use.
If a DIYer discovers that their digital caliper or torque wrench is significantly out of calibration, are there affordable solutions for recalibrating at home, or does it usually require professional servicing?
For digital calipers, some models allow you to reset or zero them, which can resolve minor calibration issues; check your manual for instructions. However, if they’re still inaccurate or if your torque wrench isn’t holding proper readings, home fixes are limited. Professional recalibration is often recommended to ensure accuracy and safety, especially for torque wrenches. DIY calibration tools exist, but results may not match professional standards.
I’m curious about how often you recommend calibrating tools like tape measures or digital calipers for someone who only does occasional home projects. Is there a rule of thumb for frequency, or does it depend on how often each tool gets used?
For occasional home projects, calibrating tools like tape measures or digital calipers once or twice a year is usually enough. If you notice any drops, rough handling, or inaccurate readings, it’s a good idea to check calibration sooner. Overall, frequency depends on both usage and how important precision is for your projects.
I get why keeping tools calibrated is important, but how often should a regular homeowner revisit calibration for things like torque wrenches or digital calipers? Is there a schedule you recommend, or does it depend on how much you use them?
How often you should calibrate tools like torque wrenches or digital calipers depends mainly on how frequently you use them and the precision you need. For most homeowners, calibrating these tools once a year is a good rule of thumb if you use them occasionally. However, if you use them heavily or for critical tasks, check calibration every six months or after any accidental drops.
You talk about proper calibration for getting the most value from quality tools. Are there any affordable at-home calibration tools or DIY methods that don’t require investing in professional equipment?
Yes, there are several affordable ways to calibrate your tools at home. For example, you can use reference objects like a metal ruler or carpenter’s square to check for accuracy in measuring tools. Bubble levels and feeler gauges are inexpensive and useful for alignment checks. DIY calibration often involves using known straight edges, level surfaces, or reliable household items to compare against your tool, which usually works well for most non-industrial needs.
You mentioned calibrating tools like tape measures and torque wrenches at home, but I’m not sure how often this should be done. Is there a general rule for how frequently DIY homeowners should check and recalibrate their most commonly used tools?
For most DIY homeowners, checking and recalibrating commonly used tools like tape measures and torque wrenches once or twice a year is usually enough. If you use a tool heavily or for precise projects, consider checking it more often, such as every few months. Always recalibrate after any accidental drops or damage, as this can affect accuracy.
If I want to start calibrating my tools like levels and digital calipers at home, is there affordable equipment I should invest in, or are there reliable DIY methods using household items for basic calibration checks?
For basic calibration of levels and digital calipers, you can start with some reliable DIY methods using household items. For levels, use a flat surface, mark the bubble position, rotate the level 180 degrees, and check for consistency. For digital calipers, use gauge blocks if you have them, or try stacking coins of known thickness. If you want extra precision, inexpensive calibration blocks or a small reference level can be a smart investment.
I usually buy budget tools for DIY home projects. Is at-home calibration just as effective for less expensive tools, or do you recommend investing in professional calibration for better accuracy? Curious how big the difference really is.
For most budget DIY tools, at-home calibration is usually sufficient, especially if you follow the recommended techniques in the article. While professional calibration does offer higher accuracy, the difference isn’t always significant for general home projects. Unless you need extremely precise measurements, you likely won’t notice much of a gap. Regular at-home calibration keeps your tools reliable for everyday use.
Could you clarify how often common home tools like tape measures or levels should be calibrated if they’re only used occasionally? I want to make sure I’m not overlooking something but also avoid unnecessary checks.
For tools like tape measures or levels that are only used occasionally at home, calibrating them once a year is generally sufficient. However, it’s a good idea to do a quick check for accuracy before starting any important project, especially if the tool has been dropped or exposed to extreme conditions. This approach keeps things simple without unnecessary inspections.
The article mentions that miscalibration can be subtle and sometimes hard to spot—what are some common warning signs on tools like tape measures or levels that homeowners should look out for during regular use?
For tape measures, look for worn or bent end hooks, faded markings, or numbers that don’t align precisely at zero. With levels, check if the bubble sits off-center even when placed on flat surfaces, or if readings change when you flip the level over. If you notice inconsistent results or tools that no longer match up with others, those are good signs calibration is off.
I have some older levels and a torque wrench that I use for most DIY projects. How often should I be calibrating these kinds of tools to make sure they’re still accurate? Is there a rule of thumb for how frequently to check them?
For levels and torque wrenches used regularly in DIY projects, it’s a good idea to check their accuracy at least once a year. If you notice inconsistent results or if the tools are dropped or exposed to harsh conditions, test them sooner. For torque wrenches, more frequent calibration (every 6 months) is recommended with frequent use. Always follow the manufacturer’s guidelines if available.
You mention that even a small miscalibration in a tape measure can cause gaps or poor fits in DIY projects. How can I quickly check whether my existing tape measures are still accurate, and is there a reliable way to recalibrate them at home?
To check your tape measure’s accuracy, compare it against a known standard, like a metal ruler or carpenter’s square with precise markings. Line up both at zero and check several key points (like 1 ft and 3 ft) to spot discrepancies. Tape measures can’t really be recalibrated at home—if you notice any errors or worn markings, it’s best to replace the tape for reliable results.
When calibrating tape measures or digital calipers at home, are there reliable methods or household items you recommend for checking their accuracy, especially if I don’t have fancy calibration tools? Would love some practical tips for a typical DIYer.
You can use common items like coins, credit cards, or printer paper with known dimensions to check the accuracy of your tape measure or calipers. For example, a standard US quarter is about 0.955 inches in diameter, and printer paper is typically 8.5 by 11 inches. Measure these items and compare the result to their standard size; if there’s a consistent difference, you’ll know how your tool might be off.
You mentioned digital calipers and torque wrenches needing regular calibration for accuracy. If I’m mostly doing basic home repairs and furniture assembly, is it really necessary to invest the extra time or money in calibrating these tools, or can I get by with occasional basic checks?
For basic home repairs and assembling furniture, you typically don’t need to worry about professional calibration for digital calipers or torque wrenches. Occasional basic checks—like comparing your caliper against a ruler or using your torque wrench as the manufacturer suggests—should be enough. Detailed calibration is mainly important for precision work or safety-critical tasks, so for your needs, simple checks will do.
For someone on a tight budget, are there affordable calibration tools or tricks for common household items like digital calipers and levels? I want to maintain my tools, but professional services and equipment can get expensive.
Absolutely, you can calibrate common household tools without spending much. For digital calipers, use coins or gauge blocks with known thicknesses as reference standards. For spirit levels, place the level on a flat surface, mark the bubble position, then rotate it 180 degrees to check for consistency. These DIY checks aren’t as precise as professional calibration, but they’re effective for regular home use and help maintain your tools’ accuracy.
I usually work with a mix of both analog and digital measuring tools for home projects. Based on your guide, do digital tools like calipers require different calibration techniques compared to traditional ones, and is one type generally more prone to miscalibration?
Digital tools like calipers often have built-in zeroing functions and sometimes come with reference standards, making their calibration process a bit different from analog tools, which rely more on manual adjustments and visual alignment. While digital tools can drift due to battery or electronic issues, analog tools are more prone to wear and mechanical misalignment. Both types need routine checks, but the specific methods and issues to watch for will differ.
I do a lot of woodworking and sometimes notice things are just slightly off even when my tools seem new. Are there simple ways to check if a tool is miscalibrated before starting a big project, or should I just recalibrate everything routinely?
It’s a good idea to do quick checks before each project so you catch any issues early. For example, use a reliable square to check your saws, or compare tape measures against a trusted ruler. Routine recalibration is helpful, but these spot checks can save you time and prevent mistakes—especially if you notice things are a bit off even with newer tools.
I noticed you mentioned miscalibrated tools can be a safety risk, especially with something like a torque wrench. How often should torque wrenches be calibrated for typical home use, and are there any signs that tell you they’re out of spec before it becomes a problem?
For typical home use, calibrating a torque wrench once a year is a good rule of thumb, especially if it’s not used heavily. Signs that a wrench may be out of spec include bolts not tightening as expected, the wrench feeling loose or inconsistent when clicking, or visible wear on the tool. If you drop the wrench or use it frequently, consider calibrating it sooner.
If I’m on a tight budget and can’t afford specialized calibration equipment, are there any reliable DIY hacks for calibrating common household tools like torque wrenches or tape measures?
Absolutely, you can calibrate many household tools with some DIY methods. For tape measures, compare yours against a trusted ruler or measuring tape. For torque wrenches, use a known weight and a lever arm to check the torque setting (there are online guides for this). Consistency and careful measurement are key. While DIY methods aren’t as precise as professional calibration, they can help you maintain reasonable accuracy on a budget.
You mention that calibration can help tools last decades and prevent costly mistakes, but are there any tools in a typical DIY toolkit that really don’t need regular calibration, or is this something I should be doing for everything I use?
Not every tool in a typical DIY kit needs regular calibration. Hand tools like hammers, screwdrivers, pliers, and wrenches generally don’t require calibration at all. Calibration is mainly important for tools that measure or set specific values, such as tape measures, spirit levels, torque wrenches, or electronic devices like multimeters. For basic hand tools, regular cleaning and inspection for wear are usually enough.
You mentioned that even high-quality tools can lose accuracy over time. Are there any noticeable signs or simple tests I can do at home to spot miscalibration before it causes bigger issues with my projects?
You can spot miscalibration by checking for things like inconsistent measurements, loose parts, or unexpected results in your work. For simple tests at home, try comparing your tool’s results with a known accurate reference, such as a reliable ruler or level. Also, tools that don’t align or return to zero easily often need recalibration. Regularly checking and comparing can help you catch issues early.
The article points out that subtle wear can undermine tool accuracy over time. How often should common home tools be checked or recalibrated to ensure they remain reliable, especially if they’re only used occasionally?
Even with occasional use, it’s wise to check and recalibrate common home tools like tape measures, levels, and torque wrenches at least once a year. If you notice any drops, rough handling, or visible wear, inspect them sooner. Regular checks help catch small inaccuracies before they affect your work.
I have mostly older tools that have been in my family for years, like vintage tape measures and hand levels. Are there any special calibration steps or issues I should watch out for with tools that have seen a lot of use compared to newer ones?
With older tools, wear and tear can affect their accuracy more than with new ones. For vintage tape measures, check for stretched or worn tape and faded markings. Hand levels may have bubbles that stick or vials that drift out of alignment. Clean all moving parts, check for damage, and compare measurements against a known accurate reference. If you notice significant inaccuracies, it might be time to repair or retire the tool to ensure reliable results.
After calibrating a torque wrench at home, how often should it be checked again if I only use it for occasional car repairs and furniture assembly? The article mentions regular checks, but I’m wondering what’s actually necessary for non-professional use.
For occasional use like car repairs and assembling furniture, checking your torque wrench’s calibration once a year is generally sufficient. If you accidentally drop the wrench or notice inconsistent readings, it’s a good idea to check it sooner. Frequent calibration is more critical for heavy or professional use, so for your needs, annual checks should keep your tool reliable.
When it comes to calibrating less expensive tools versus high-end ones, is there a point where it’s more cost-effective to replace instead of calibrate? I run a small workshop and want to make sure I’m investing time and money wisely.
For less expensive tools, especially those where calibration costs approach or exceed the price of a new tool, it’s often more cost-effective to replace them rather than calibrate. High-end or specialty tools, however, usually justify the time and expense of calibration due to their precision and higher replacement cost. In a small workshop, regularly assess your tools’ value and function—replace budget ones when accuracy drops and reserve calibration efforts for tools that truly need it.
I’m curious how often you recommend calibrating common household tools like tape measures or levels for someone who just does occasional DIY projects. Is there a general timeframe, or does it depend on how often they’re used?
For occasional DIY use, it’s usually enough to check and calibrate tools like tape measures and levels once or twice a year, or anytime you notice inaccurate results. If a tool gets dropped or exposed to rough conditions, it’s a good idea to check it right afterward. Regular quick checks before big projects also help ensure your measurements stay reliable.
I’m wondering how often you actually need to calibrate common home tools like tape measures and levels. Is there a general schedule you recommend, or does it depend more on how frequently the tools are used?
The frequency of calibrating home tools like tape measures and levels depends mostly on how often you use them and the accuracy you need. For light use, checking them once or twice a year is usually enough. If you use them frequently or for precise work, check every few months. Also, recalibrate after any drops or noticeable damage to ensure accuracy.
When calibrating tape measures or levels at home, how often should I actually check them for accuracy if I only use them a couple of times a month? Is there a recommended schedule for DIYers who aren’t using tools every day?
For tape measures and levels that you use just a few times each month, checking their accuracy every 6 to 12 months is usually enough. However, if you drop them or notice any unusual results while using them, it’s a good idea to check them right away. Regular visual inspections and occasional accuracy checks help ensure your measurements stay reliable for your DIY projects.
What would you recommend for someone on a tight budget who needs to calibrate several tools? Are there affordable calibration kits, or is it possible to get good results without buying extra equipment?
If you’re working with a tight budget, you can often achieve decent calibration using basic, household reference items—like a ruler for measuring tapes or a known weight for scales. For more accuracy, affordable calibration kits are available for common tools, but they’re not essential for simple checks. Just be sure to document your reference points and perform calibrations regularly for the best results.
You talked about tuning up digital calipers and other precise tools, but are there affordable calibration options for people on a tight budget, or do you need to buy expensive specialized equipment for this at home?
You don’t have to buy expensive calibration equipment for basic tool calibration at home. For digital calipers, using inexpensive gauge blocks or even feeler gauges can help check accuracy. Household items like a quality steel ruler can serve for quick checks. While professional standards are ideal, these affordable options can keep your tools reliable enough for most DIY or hobby projects.
For someone on a tight budget, are there affordable ways or DIY tricks for calibrating tools accurately at home, or do most methods require buying specialized calibration gear?
You can definitely calibrate many tools at home without expensive equipment. Simple tricks include using household items with known measurements, like a ruler or measuring tape, to check accuracy. For leveling tools, a glass of water can help identify true level. While precision may not match professional standards, these DIY methods offer good accuracy for most home projects and help you avoid costly calibration gear.
You mentioned that miscalibrated tools can be a safety issue. Specifically for torque wrenches, what are the signs that they’re out of calibration, and how often should homeowners recalibrate them compared to professionals?
For torque wrenches, signs of being out of calibration include bolts not tightening to the expected level, inconsistent torque readings, or the wrench slipping or clicking at the wrong point. Homeowners who use a torque wrench occasionally should recalibrate it every 1-2 years, or after about 5,000 cycles. Professionals, who use them more frequently, should recalibrate every 6 months or even more often depending on usage.
You mention digital calipers and torque wrenches as tools that need regular calibration at home. How can I tell if these kinds of measuring tools are actually out of calibration if I don’t have specialized equipment to check them against?
You can check your digital calipers by measuring objects with known sizes, such as gauge blocks, coins, or a precision ruler, and comparing the readings. For torque wrenches, try tightening bolts to a specific torque and see if they match the expected resistance, or compare with a new, trusted wrench. If your results are inconsistent or noticeably off, it’s a sign calibration might be needed.