


Introduction: Why Your First DIY Workshop Matters
Setting up a dedicated DIY home workshop is a rite of passage for any homeowner or hobbyist looking to take control of repairs, maintenance, and home upgrades. The excitement of buying shiny new tools and imagining all the projects ahead is contagious—but it’s also the perfect moment to make costly mistakes. Whether you’re carving out space in your garage, basement, or a spare room, the decisions you make early on will shape your DIY experience for years. Mistakes at this stage can lead to wasted money, unsafe conditions, frustration, and underused equipment. In this comprehensive guide, we’ll spotlight the most common beginner mistakes in home workshop setup, providing actionable advice on tool selection, workspace layout, safety essentials, and smart budgeting. If you want your workshop to be efficient, safe, and enjoyable—not a cluttered headache—read on for the expert insights that will help you avoid the pitfalls and build a space you’ll love to use.
Common Beginner Mistakes When Setting Up a DIY Home Workshop
1. Overbuying or Underbuying Tools
One of the biggest mistakes new DIYers make is rushing to purchase either too many tools or too few. It’s easy to be tempted by flashy marketing and bundled tool sets, but not every tool is necessary right away. Conversely, going too minimalist can leave you unprepared for even basic repairs.
- Overbuying: Buying specialized tools you rarely need eats up your budget and storage space. For example, a biscuit joiner sounds useful but isn’t essential for most home repairs.
- Underbuying: Settling for a single screwdriver and a cheap hammer might get you through some tasks, but you’ll quickly find yourself limited when facing even simple projects, like hanging shelves or assembling furniture.
Expert Tip: Make a prioritized list of likely projects and research which tools are truly required for those tasks. Buy quality basics first—such as a cordless drill, measuring tape, claw hammer, utility knife, and a set of screwdrivers—then gradually expand as you take on more complex work.
2. Poor Workshop Layout Planning
A cluttered, cramped, or poorly organized workshop will slow you down and create hazards. Many beginners simply park a workbench in a corner and start piling up tools, but this approach quickly leads to frustration.
- Ignoring Workflow: Tools should be arranged according to frequency of use and proximity to your primary workspace. Walking back and forth across the garage to grab a wrench wastes time and energy.
- Insufficient Work Surface: A tiny or unstable workbench will make even small projects difficult. Don’t underestimate the value of a sturdy, properly sized work surface.
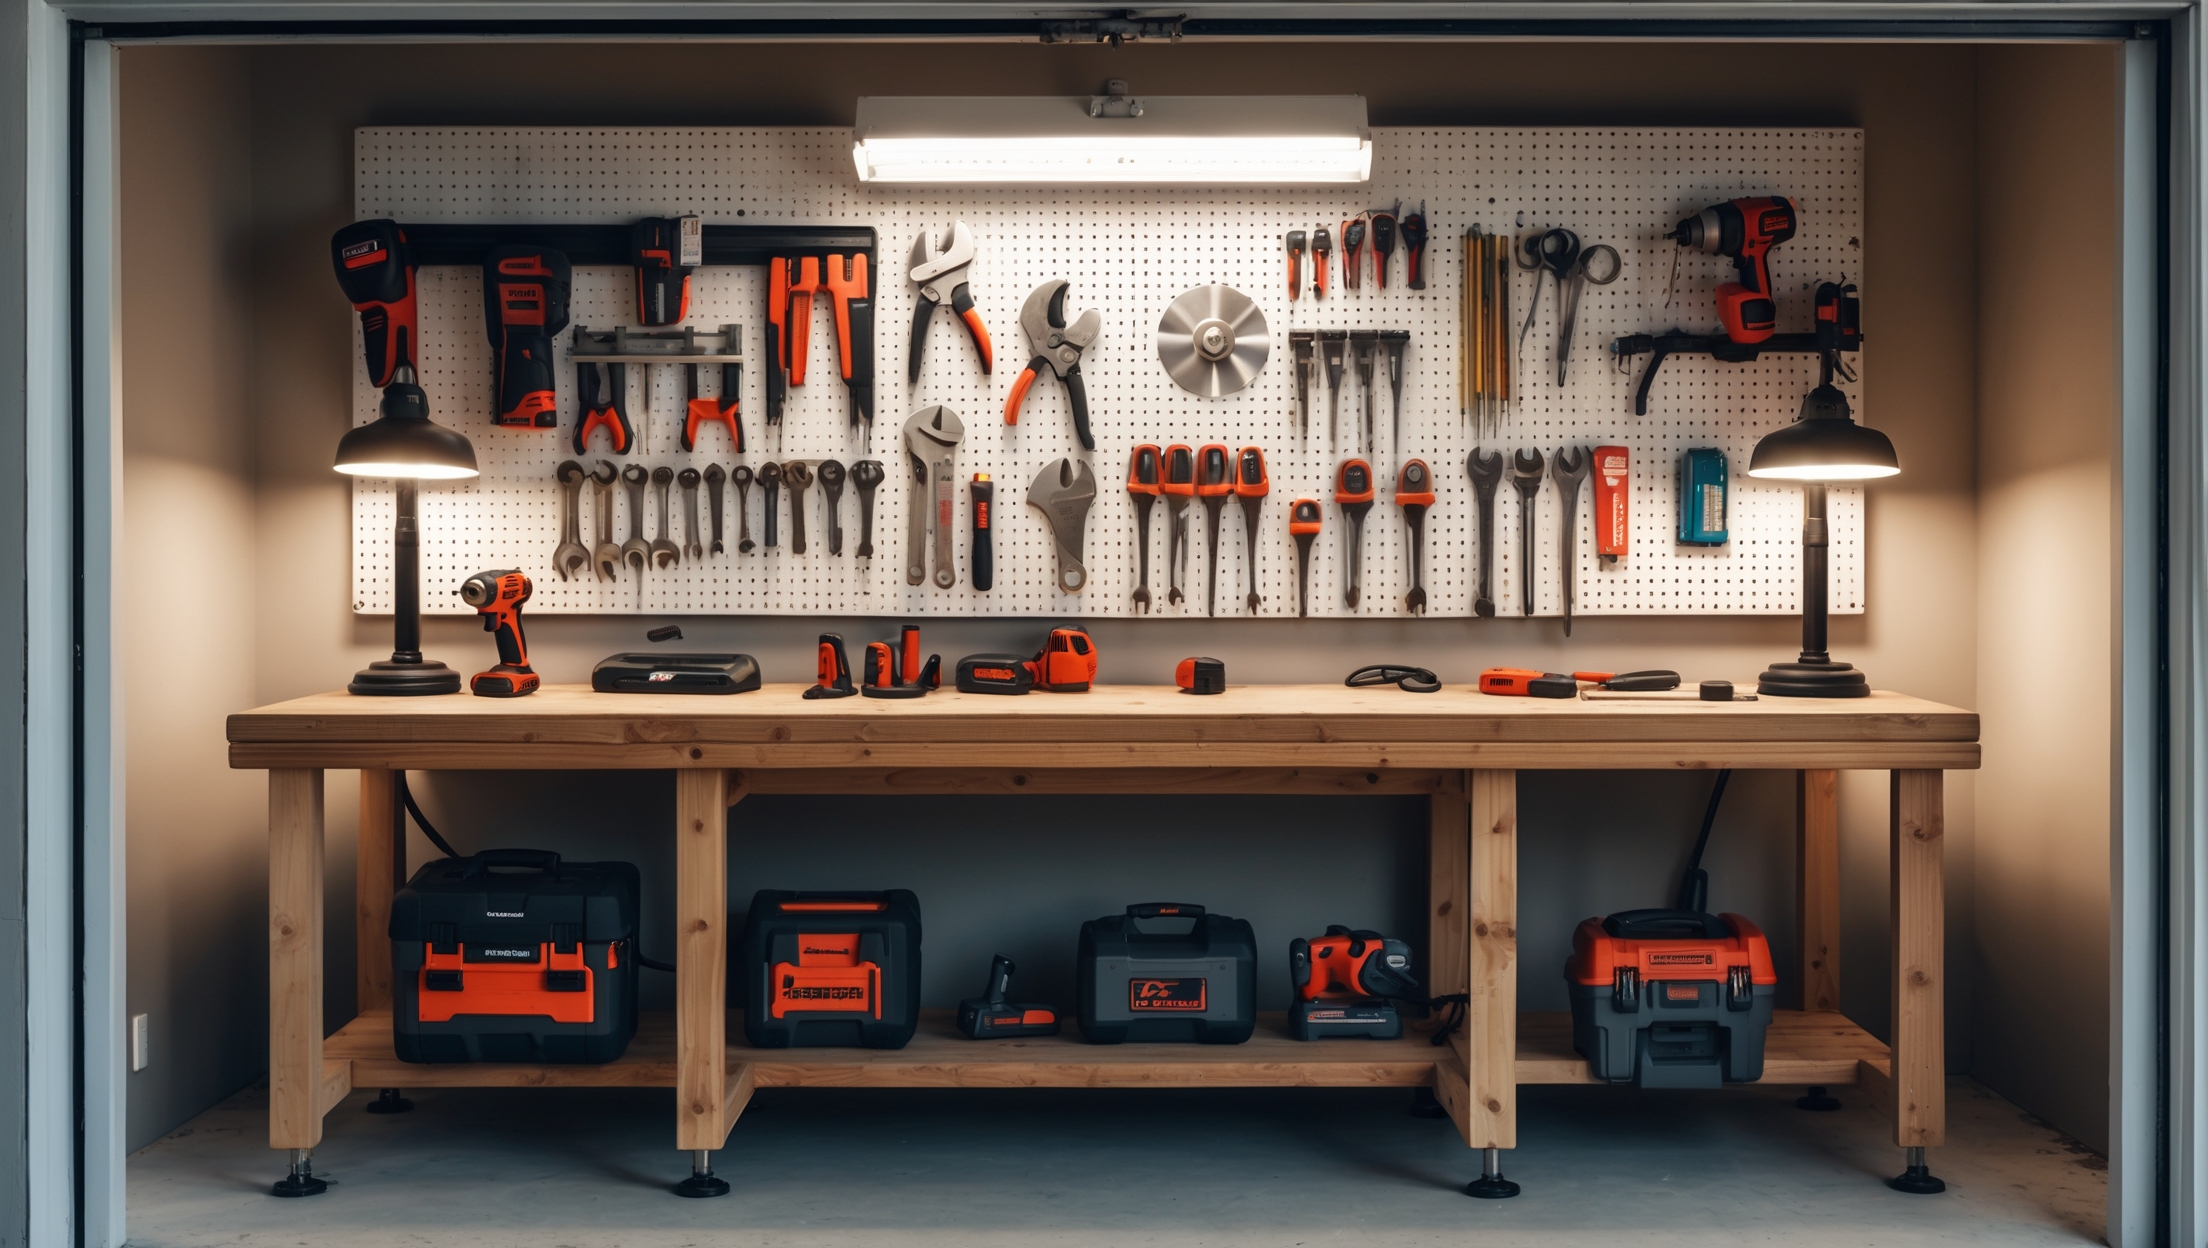
- Neglecting Storage: Piling tools on the bench or floor leads to lost items and potential injuries. Storage should be planned from the outset, with wall-mounted racks, shelves, or pegboards for easy access.
Expert Tip: Sketch a basic floor plan before moving anything in. Consider the “triangle” workflow concept: position your main workbench, tool storage, and material storage so you move efficiently between them. Use vertical space for storage to keep the floor clear and maximize your usable area.
3. Skipping Safety Essentials
Nothing derails a DIY journey like an avoidable injury. Many new workshop owners focus on tools but neglect the safety basics. This can lead to dangerous situations, especially when power tools and chemicals are involved.
- Lack of Personal Protective Equipment (PPE): Always have safety glasses, ear protection, dust masks, and gloves on hand. These are non-negotiable for most tasks.
- Improper Electrical Setup: Using overloaded extension cords instead of dedicated circuits can cause fires. Ensure your workspace has sufficient grounded outlets and consider a surge protector for sensitive tools.
- Poor Ventilation: Many DIY projects create dust or fumes. Basements and garages often lack airflow. Install a fan, open windows, or use a portable air purifier when necessary.
Expert Tip: Make safety gear just as accessible as your tools. Hang PPE on hooks at eye level near the entrance. Post a simple safety checklist on your wall as a reminder before each project.
4. Underestimating Lighting Needs
Good lighting is essential for accuracy and safety. Yet, many first-time workshop builders rely on a single overhead bulb or window, resulting in eye strain and missed details.
- Inadequate Ambient Lighting: Dim workspaces increase the risk of accidents and make precision tasks nearly impossible.
- Lack of Task Lighting: Certain jobs, like soldering or cutting, need focused, shadow-free lighting.
Expert Tip: Use a mix of overhead LED fixtures for even, bright ambient light, and add adjustable task lights with flexible necks over your workbench. Plug-in strip lights under shelves can illuminate shadowy areas.
5. Forgetting About Dust and Noise Control
Dust and noise are more than nuisances—they can damage your health and your home. Many beginners overlook this until they’re sneezing or disturbing the household and neighbors.
- Dust Build-Up: Sawdust and debris can clog tools, create slip hazards, and lead to respiratory issues.
- Noise Complaints: Hammering and sawing can carry through walls, especially in shared or attached structures.
Expert Tip: Invest in a shop vacuum or dust collection system. Use door sweeps and weatherstripping to minimize sound transmission. Schedule noisy work during reasonable hours and let housemates know your plans.
6. Not Budgeting Realistically
It’s easy to lose track of expenses when outfitting a new workshop. Some DIYers go overboard, while others cheap out and pay more later to replace worn-out tools or fix slapdash setups.
- Ignoring Hidden Costs: Accessories, safety gear, storage solutions, and materials can add up quickly.
- Buying on Impulse: Flash sales and bundled deals can lead to purchases you don’t need or can’t use yet.
Expert Tip: Prepare a detailed budget that accounts for must-have tools, safety equipment, lighting, storage, and a small contingency fund for surprises. Start with the essentials. Quality over quantity pays off in the long run.
7. Overlooking Climate and Moisture Issues
Basements and garages—popular workshop locations—can be damp or uninsulated. Moisture rusts tools, spoils materials, and creates an uncomfortable work environment.
- No Moisture Control: Tools left in damp spaces corrode quickly. Wood warps or molds. Paints and adhesives may not cure properly.
- Uncomfortable Temperatures: Extreme cold or heat discourages you from tackling projects and can damage sensitive equipment.
Expert Tip: Use a hygrometer to monitor humidity. Install a dehumidifier if needed. For cold climates, add a portable heater (with tip-over protection). Insulate doors and windows for better temperature control.
8. Failing to Plan for Tool Maintenance and Organization
Even the best tools won’t last long if they’re neglected. Beginners often overlook sharpening, cleaning, and lubricating gear, leading to poor performance and early breakdowns. Disorganization compounds the problem, making it easy to lose or damage tools.
- No Maintenance Routine: Blunt blades and gummed-up mechanisms are inefficient and unsafe.
- Messy Storage: Tools tossed in drawers or buckets get lost or broken.
Expert Tip: Set a regular schedule for maintenance—monthly for cleaning and lubricating, quarterly for sharpening or calibration. Use labeled bins, magnetic strips, and pegboards to keep everything visible and within reach.
9. Ignoring Future Expansion
It’s tempting to make do with a cramped corner, but your ambitions (and tool collection) will likely grow. Planning only for the present can mean costly rework or outgrowing your space too quickly.
- No Room for New Tools or Projects: As you gain skills, you’ll want more advanced equipment or to take on larger builds.
- Poor Power Access: One or two outlets might suffice now, but larger tools or dust collection systems need more power.
Expert Tip: Leave at least 20% of your storage and floor space open. Run extra outlets (with professional help if needed) and keep your layout modular so you can rearrange as your needs change.
Step-by-Step: Setting Up Your Home Workshop the Right Way
Step 1: Define Your Workshop Purpose and Core Projects
List the kinds of repairs, builds, or hobbies you plan to tackle. Your needs for woodworking differ from electronics or automotive work. This will drive your tool and layout decisions.
Step 2: Choose the Right Space
- Consider size, ventilation, electrical access, and proximity to living areas.
- Clear out clutter and measure your available area.
Step 3: Plan Your Layout
- Sketch your space. Mark workbench, tool storage, power outlets, and material shelves.
- Ensure at least 3 feet of clear floor space around your main work area.
- Use wall-mounted storage to open up floor space.
Step 4: Budget and Prioritize Purchases
- Break your budget into categories: tools, safety, lighting, storage, consumables.
- Buy must-haves first. Add nice-to-haves as you go.
Step 5: Install Lighting and Electrical
- Use bright, energy-efficient LED fixtures for ambient light.
- Add task lights over benches and stations.
- Ensure enough grounded outlets for current and future tools.
Step 6: Set Up Storage and Organization
- Install pegboards, shelves, and drawer organizers.
- Label bins for fast access to screws, nails, and consumables.
- Mount magnetic strips for metal hand tools—no more digging in drawers.
Step 7: Stock Safety and Maintenance Supplies
- Place PPE (glasses, masks, gloves) at the entrance or workbench.
- Keep a fire extinguisher within arm’s reach.
- Store first-aid supplies in a visible, accessible spot.
- Set up a simple maintenance station: rags, lubricants, tool sharpeners.
Step 8: Address Comfort and Environment
- Add a fan or small air purifier if dust is an issue.
- Use a dehumidifier for damp basements or garages.
- Insulate cold spaces and add a portable heater if needed.
Step 9: Test, Tweak, and Expand
- Try out your workspace on a small project.
- Adjust tool placement and workflow as needed.
- Keep a running list of future improvements or additions.
Workshop Setup: Frequently Asked Questions
How much should I expect to spend on a basic home workshop?
Expect to spend $300–$700 for a quality starter setup, including essential hand tools, a cordless drill, a sturdy workbench (DIY or store-bought), basic storage, and safety gear. Lighting and electrical upgrades may add $100–$300. Don’t forget to budget for consumables like screws, sandpaper, and adhesives.
Is it better to buy individual tools or a starter toolkit?
Starter toolkits can save money but often include filler tools of mediocre quality. For most DIYers, it’s smarter to buy core tools individually in brands known for reliability—especially for items you’ll use frequently, like drills or wrenches.
What are the most commonly overlooked safety items?
Aside from PPE, many workshops lack a fire extinguisher, first aid kit, and surge protectors. These items aren’t glamorous but are vital for safe DIY work.
How can I deal with limited space?
Use fold-down workbenches, wall-mounted racks, and mobile tool carts. Stackable bins and vertical pegboards make the most of tight quarters. Prioritize tools with multiple uses, like an oscillating multi-tool or an adjustable wrench.
Conclusion: Build Smart, Stay Safe, and Enjoy Your DIY Journey
Setting up a home workshop is more than just arranging tools—it’s an investment in your skills, safety, and future home projects. Avoiding common beginner mistakes will spare you frustration, wasted money, and potential hazards. Start with a clear vision of your workshop’s purpose, invest in quality essentials, and give equal attention to layout, storage, lighting, and safety. Remember, a well-organized, comfortable, and safe workspace not only makes projects easier but also inspires creativity and confidence. Don’t be afraid to start small and expand as your needs and skills grow—modularity is your friend. Most importantly, make safety a habit, not an afterthought. With a smart setup, you’ll spend less time searching for tools or cleaning up messes, and more time bringing your DIY dreams to life. Your workshop is the foundation for years of satisfying repairs, creative builds, and hands-on learning. Build it wisely, and enjoy the journey—one well-planned project at a time.


I noticed the article talks about not overbuying or underbuying tools when setting up a workshop. Do you have any tips for figuring out which specialty tools can actually save time versus ones that will just collect dust?
To figure out which specialty tools are worth the investment, start by listing the specific projects you plan to tackle in your workshop. If a tool will be used for multiple tasks or regularly speeds up your workflow, it’s likely worth getting. For rarely used or highly specialized tools, consider borrowing first to see if you really need them long-term. This helps avoid clutter and unnecessary expenses.
I’m struggling with deciding which basic tools to buy for general home repairs without overspending. Can you give some examples of quality basics that would cover most first-time DIY projects, especially if I’m working with a small budget?
To start a basic DIY toolkit without overspending, focus on versatile essentials: a claw hammer, a set of screwdrivers (flathead and Phillips), adjustable wrench, tape measure, utility knife, pliers, and a cordless drill with bits. These cover most common repairs and projects. Look for reputable but affordable brands—mid-range options often balance price and durability well.
When making a prioritized tool list as you suggest, are there certain brands or features that are especially important to consider for those first essential tools like a cordless drill or measuring tape?
When choosing your first essential tools, it’s wise to look for reputable brands known for durability and reliability, especially for items like cordless drills. Features to consider include battery life, comfortable grip, and variable speed for drills, and clear, easy-to-read markings and sturdy housing for measuring tapes. Brands like DeWalt, Makita, and Stanley are often recommended, but always balance quality with your budget and needs.
The article mentions that making mistakes early on can lead to unsafe conditions. What are some must-have safety essentials you would recommend for someone setting up a workshop in a small basement with limited ventilation?
For a small basement workshop with limited ventilation, it’s important to have a good-quality dust mask or respirator to protect against airborne particles and fumes. Also, make sure to use safety goggles and hearing protection when operating power tools. Keep a fire extinguisher rated for electrical and wood fires nearby, and a first aid kit within easy reach. To improve air quality, consider a portable fan or small air purifier. Always ensure you have proper lighting to avoid accidents.
You mention safety essentials as a common pitfall—what are the minimum safety items I should set up before tackling my first projects? I want to make sure I’m not overlooking anything critical, especially with kids occasionally in the workshop.
For a safe DIY workshop, start with safety glasses, hearing protection, and dust masks or respirators. Keep a first aid kit and fire extinguisher within easy reach. Use proper lighting and non-slip mats to reduce accidents. Store sharp tools out of children’s reach and install childproof locks if needed. Also, make sure your workspace has clear, clutter-free walkways and an emergency exit route. These basics will help protect both you and any kids who might visit.
I’m a beginner trying to set up a small workshop in my basement and I’m worried about buying the wrong tools. The article mentions making a prioritized project list—could you give an example of how detailed this list should be or suggest a simple way to plan it?
A good project list doesn’t have to be complicated. Start by jotting down specific projects you want to tackle, like “build a bookshelf” or “fix the leaky faucet.” For each project, note the basic steps and the tools required for each step. This way, you can see which tools are needed most often and avoid buying things you won’t use. It helps keep your purchases practical and focused.
Budget is tight for me and I’m setting up my workshop in a small basement space. Do you have advice on how to balance the need for safety essentials with not overspending or running out of room for basics?
Focus first on the most important safety essentials: a basic fire extinguisher, good ventilation (like a small fan), and safety glasses. These don’t take up much space or cost much. For tools, buy only what you’ll use most often and look for quality used options. Wall-mounted storage or pegboards can help keep your space organized without clutter.
You mention starting with quality basics like a cordless drill and measuring tape. For someone on a really tight budget, are there any particular brands or tool types that hit a good balance between price and durability for a first-time buyer?
For those on a tight budget, brands like Black+Decker and Stanley often provide reliable tools at a reasonable price. For cordless drills and measuring tapes, look for combo kits or sales at big box stores, as these can offer better value. Prioritize tools with solid reviews for durability, even if they’re entry-level models, and consider buying only the immediate essentials to start.
The article mentions accidents from under-equipped workshops. Could you give some specific examples of safety essentials I shouldn’t skip, especially if my workspace is in a basement with limited ventilation?
Absolutely. For a basement workshop with limited ventilation, some key safety essentials include a high-quality dust mask or respirator, a portable air purifier, and an exhaust fan to help manage fumes and dust. Also, make sure you have a first aid kit, a fire extinguisher rated for electrical and chemical fires, and adequate task lighting. Avoid using flammable chemicals unless absolutely necessary, and store them in sealed containers. These steps can greatly reduce accident risks in a compact, enclosed space.
You talk about the risks of underbuying, but I’m curious—what are the absolute minimum safety essentials I should have from day one, and are there any affordable brands or products you suggest for beginners?
For day one, make sure you have safety glasses, hearing protection, a dust mask or respirator, sturdy work gloves, and a basic first-aid kit. For beginners, affordable and reliable brands include 3M for masks and earplugs, DEWALT or Honeywell for safety glasses, and CLC for gloves. These essentials cover most basic workshop hazards without breaking the bank.
If budget is a big concern, do you have any advice for sourcing reliable basic tools without having to go for the cheapest options out there? I want to make smart choices on my initial purchases.
When working with a tight budget, consider buying quality used tools from garage sales, local classifieds, or reputable pawn shops. Look for well-known brands, as they often last longer even when secondhand. Another good option is to buy starter sets, which offer essential tools at a better value. Prioritize versatile tools that can handle multiple tasks, and gradually add more specialized equipment as needed.
You mentioned smart budgeting and avoiding buying specialized tools like a biscuit joiner for beginners. If I want to focus mostly on furniture assembly and minor repairs, which tools can I skip right now to keep my setup affordable?
For furniture assembly and minor repairs, you can skip specialized woodworking tools like biscuit joiners, dovetail jigs, and router tables for now. Focus on basics such as a cordless drill, screwdriver set, measuring tape, hammer, and adjustable wrench. These essentials will cover most common tasks and help you stay within budget while you gain experience.
If I only have space in my basement for a small workshop, do you have any layout suggestions to maximize both safety and efficiency? I’m worried about things getting cluttered, especially if I add new tools over time.
In a small basement workshop, keeping things organized is key. Start by using wall-mounted storage like pegboards and shelves to free up floor space. Arrange tools by frequency of use, keeping essential items within easy reach. Make sure there’s a clear path for movement and never block exits. Consider mobile workbenches or carts for flexibility. Regularly review and reorganize as you add new tools to prevent clutter and maintain a safe, efficient workspace.
If my available space is pretty limited, do you have any tips for designing a layout that keeps things safe and organized but still allows me to take on a variety of DIY projects?
With limited space, focus on multi-purpose tools and foldable workbenches to maximize flexibility. Use vertical storage like pegboards and shelves for tools and supplies, keeping pathways clear to avoid tripping hazards. Arrange your most-used items within easy reach, and make sure there’s enough room to move safely around your workspace. Regularly tidy up to maintain organization and safety.
You mention the risk of overbuying specialized tools like a biscuit joiner that most people won’t need for basic home repairs. Are there any other common tools that beginners often waste money on and could skip when first setting up their workshop?
Absolutely—beginners often buy tools like power planers, dovetail jigs, or oscillating multi-tools right away, but these are rarely essential for basic DIY home repairs. Stick to versatile basics like a drill, circular saw, measuring tape, and hand tools at first. As you take on more complex projects, you can add specialized tools if you find you truly need them.
I’m a little tight on space and budget, so I’m worried about getting stuck with tools I rarely use. In your experience, what are the top three tools that beginners often think they need but end up collecting dust?
Many beginners quickly buy specialized tools that don’t see much use. Three common examples are the miter saw (when a circular saw with a guide will do for most cuts), a table router (rarely used unless you’re into advanced woodworking), and a bench grinder (mostly needed for metalwork or sharpening). It’s wise to start with versatile, multi-use tools and only add more as your projects demand them.
If my first few projects mostly involve furniture assembly and basic wall repairs, would it be better to buy only the suggested essentials right away, or should I consider some all-in-one starter kits? I’m trying to avoid both overspending and missing something important.
For furniture assembly and basic wall repairs, starting with the essentials listed in the article is usually enough. Many all-in-one starter kits include tools you might not need right away, which can lead to overspending. Focus on buying quality basics first, like a screwdriver set, hammer, measuring tape, and level. You can always add more specialized tools later as your projects expand.
When setting up my first workshop, is there any advice for updating or upgrading tools later as my skill level grows? I’m worried about underbuying now and then having to repurchase everything once I tackle more advanced projects.
It’s smart to think ahead about tool upgrades. Start with a few quality, versatile tools that are suitable for many tasks instead of buying a full set right away. As your skills develop, you’ll have a better idea of what specialized tools you really need. Resist buying cheap tools just to save money—well-made basics can serve you well even as your projects become more complex.
Could you give some more specific guidelines or a sample list for which quality basics are worth investing in at the beginning? I’m trying to avoid cheap tools that won’t last, but don’t want to overspend on equipment I rarely use.
To start your DIY workshop, focus on versatile, high-use tools where quality matters most. For power tools, consider investing in a reliable cordless drill, circular saw, and a quality sander. For hand tools, look for solid hammers, a set of screwdrivers, tape measure, and sturdy pliers. Prioritize brands with good warranties and user reviews. Hold off on specialty or rarely used items until you need them—renting or borrowing can help you decide if they’re worth buying later.
When it comes to budgeting, how do you recommend balancing the cost between quality basic tools and setting up a safe workspace? Should I invest more in tools first or make sure the workshop layout is dialed in before upgrading equipment?
It’s wise to prioritize a safe, functional workspace before investing heavily in top-tier tools. Start by ensuring good lighting, ventilation, and clear organization—this creates a safer and more efficient environment. Once you have those basics in place, allocate your budget toward essential quality tools, upgrading over time as needed. This approach helps you avoid accidents and frustration while gradually building your tool collection.
The article mentions overbuying or underbuying tools being a common mistake. Is there a minimum starter tool list you recommend for absolute beginners who mainly want to handle general home repairs, but might try furniture assembly later on?
Absolutely, a basic starter tool list for general home repairs and furniture assembly could include a claw hammer, a set of screwdrivers (both flathead and Phillips), a tape measure, adjustable wrench, pliers, utility knife, level, and a cordless drill with bits. As you take on more projects, you can add items like a stud finder or a small handsaw. This covers most basic tasks without overwhelming you or your budget.
If I want to start my workshop on a tight budget, which basic tools would you absolutely not skip, and which ones can safely wait until I’ve figured out what I really need? I’m worried about buying either too many or too few essentials up front.
If you’re starting on a tight budget, prioritize basics like a tape measure, hammer, screwdrivers (both flat and Phillips), a utility knife, adjustable wrench, and a cordless drill. These will cover most beginner projects. Saws, sanders, and specialty tools can wait until you know your specific needs. This approach prevents overspending and helps you learn what you’ll really use.
I’m new to DIY and saw you mention that overbuying tools can waste money and space. Are there any basic tools you’d recommend prioritizing for someone who mostly wants to handle simple repairs and small furniture builds?
For simple repairs and small furniture projects, start with a reliable hammer, a set of screwdrivers (both flat-head and Phillips), a tape measure, a handsaw, pliers, a utility knife, and a cordless drill with bits. A square and level are helpful for furniture builds. These basics will cover most tasks without cluttering your space or stretching your budget.
The article suggests making a prioritized list of likely projects and buying only the basics first. Could you give some examples of what those essential starter tools would be for someone mainly doing home repairs and furniture assembly?
For basic home repairs and furniture assembly, start with a claw hammer, a set of screwdrivers (both flathead and Phillips), an adjustable wrench, a tape measure, pliers, a utility knife, and a cordless drill with drill bits. These versatile tools will cover most tasks like tightening hardware, assembling furniture, hanging shelves, or making small fixes around the house. As your projects grow, you can add specialized tools as needed.
You mention that overbuying tools is a common mistake and that it’s best to make a prioritized list based on likely projects. Could you give a few concrete examples of what you would consider essential starter tools for someone mainly interested in carpentry versus someone focused on general home repairs?
For someone interested in carpentry, essential starter tools would include a circular saw, a good quality hammer, tape measure, carpenter’s square, chisels, and a set of clamps. If your focus is general home repairs, a claw hammer, adjustable wrench, screwdrivers (both flat-head and Phillips), measuring tape, utility knife, and pliers make a solid foundation. Tailor your initial purchases to the types of tasks you expect to tackle most often.
When prioritizing that first set of quality basic tools, do you recommend allocating most of the budget to a few high-quality items or spreading it out across a wider variety of mid-range tools? I want to avoid both overbuying and being underprepared.
For a first workshop, it’s usually better to invest in a handful of high-quality tools you’ll use most often, like a cordless drill, measuring tape, and a reliable saw. These make daily tasks easier and last longer. You can gradually add more specialized or mid-range tools as you discover what projects you enjoy and what’s actually needed, helping you avoid unnecessary purchases.
I’m trying to avoid overspending when setting up my first workshop, but I also want to be prepared for most home repairs. Could you provide a short list of what you consider absolute must-have tools for a beginner, beyond the basics like a drill and measuring tape?
To help you stay ready for most repairs without overspending, consider adding these essentials: a good set of screwdrivers (both flathead and Phillips), adjustable wrench, pliers, utility knife, level, hammer, and a set of Allen wrenches. These tools cover a wide range of basic tasks and can be found at reasonable prices. As you gain experience, you can add more specialized tools as needed.
You talk about the danger of overbuying tools that might not get much use. Are there any specific tools you see beginners purchasing most often that end up collecting dust, besides the biscuit joiner you mentioned?
Absolutely, some tools commonly end up underused by beginners. For example, specialized saws like miter saws or scroll saws are often bought early but may not see much action unless you have specific projects. Power sanders, router tables, and large sets of drill bits can also end up sitting idle. It’s usually best to start with basic hand tools and only add more specialized equipment as your needs grow.
Could you share some examples of tools that seem ‘basic’ but often end up underused by beginners? I want to avoid buying stuff that will just take up storage space, but it’s hard to tell which essentials are really necessary for most home repairs.
Some tools that often seem essential but can go underused by beginners include specialty pliers, pipe wrenches, and extra-large adjustable spanners. Multi-tools with lots of attachments sometimes end up gathering dust too. For most home repairs, a basic hammer, screwdrivers (flat and Phillips), a tape measure, utility knife, and pliers cover most needs. Start with those basics and add others only as a project truly requires them.
I’m just starting to plan out my workshop in the basement and I’m worried about accidentally buying a bunch of tools I won’t really use. Are there certain basic tools that you recommend every DIYer start with, no matter what, before branching out into more specialized gear?
It’s smart to start with the essentials before adding more specialized tools. A good starter kit would include a quality tape measure, hammer, screwdrivers (both flathead and Phillips), pliers, a utility knife, a level, and a cordless drill with bits. These basics cover most beginner DIY projects. As your skills and interests grow, you can gradually add tools that fit your specific needs.
Could you give some examples of what you’d consider the absolute essentials for someone mostly interested in home repairs and furniture assembly, like you mentioned? I don’t want to overbuy, but I’m afraid of being stuck without what I need.
For basic home repairs and furniture assembly, your essentials should include a claw hammer, a set of screwdrivers (both flathead and Phillips), a tape measure, an adjustable wrench, needle-nose pliers, a utility knife, and a cordless drill with some drill and screwdriver bits. Having a level and a set of hex keys (Allen wrenches) is also very helpful. These tools cover most common tasks without cluttering your workspace.
If my budget is pretty tight, should I focus on getting a basic cordless drill, or is it better to spend a little more on a set that includes several hand tools, even if they’re lower quality?
If you’re on a tight budget, it’s often more practical to start with a reliable basic cordless drill, since it’s versatile and can handle many tasks. Lower-quality tool sets may not last or perform well, which could end up costing more over time. You can gradually add quality hand tools as you need them.
I noticed the article warns against blowing your budget on specialized tools like biscuit joiners. Is it smarter to invest in higher quality versions of the basic tools first, and then add the specialized ones over time as specific projects come up?
You’re absolutely on the right track. Investing in higher quality versions of essential tools—like a good drill, saw, and measuring tools—will serve you well for most projects and last longer. As you gain experience and encounter specific tasks that require specialized tools, you can then add those as needed. This approach keeps your budget under control and ensures you have what you truly need.
If space is a concern and I only have a small area to set up my workshop, what are some layout tips to keep things organized and safe without making it feel overcrowded?
To make the most of a small workshop space, use vertical storage like wall-mounted racks or pegboards for tools and supplies. Choose compact or multi-purpose tools where possible, and keep your workbench clear by storing items underneath or in drawers. Ensure clear walkways and keep floors free from clutter to maintain safety. Good lighting and organizing tools by frequency of use also help your space feel less crowded and more efficient.
I’m trying to set up my workshop in a small spare room instead of a garage or basement. Do you have any specific layout or safety tips for limited spaces to avoid clutter and keep things organized?
Setting up a workshop in a small room can work well with the right approach. Use wall-mounted shelves and pegboards to store tools vertically and free up floor space. Opt for foldable workbenches or carts on wheels that you can move or tuck away as needed. Keep electrical cords organized with cable clips, and make sure there’s good ventilation, especially if you use paints or adhesives. Always maintain a clear walkway and store hazardous materials out of reach of children or pets.
I noticed you mentioned the risk of overbuying or underbuying tools. Can you give some examples of which specific tools are usually best to purchase first for basic home repairs, especially if someone is on a tight budget?
For basic home repairs on a budget, focus on getting versatile tools you’ll use most often. Essential starters include a claw hammer, a set of screwdrivers (flathead and Phillips), an adjustable wrench, pliers, a tape measure, a utility knife, and a cordless drill. These cover most simple fixes and projects without overspending. You can always add specialty tools as your needs grow.
If I’m setting up my workshop in a small apartment room instead of a garage or basement, do you have any tips for avoiding clutter while still having enough basics to handle typical home repairs?
In a small apartment room, focus on multi-purpose tools like a good cordless drill, a set of screwdrivers, pliers, and a compact toolbox to store them. Use vertical space with wall-mounted shelves or pegboards for organization. Consider foldable or stackable storage and a small workbench that can double as a table. Only keep tools you use regularly to keep clutter in check.
If I already accidentally bought a couple of specialized tools I don’t actually need, what’s the best way to repurpose or sell them so I can re-invest in more useful basics for my workshop?
You can try selling your unused specialized tools through local marketplaces, online platforms, or community groups to recoup some of your investment. Alternatively, see if they can serve a different function in your workshop or be traded with friends or fellow DIYers for more essential items. This way, you can free up space and funds for the basics you really need.
The article talks about setting up workshops in garages, basements, or spare rooms. Are there particular safety essentials or layout considerations that change depending on which space I choose for my workshop?
Yes, your workshop location does affect safety and layout. Garages often need good ventilation, especially if you’ll use chemicals or power tools, while basements may require extra moisture control and fire safety since exits can be limited. Spare rooms in the house need extra focus on dust control and noise reduction to avoid disturbing others. Regardless of space, keep walkways clear, tools organized, and ensure you have accessible exits and fire extinguishers.