


Introduction: The DIYer’s Dilemma with Drywall Repair Kits
Nearly everyone faces a ding, hole, or crack in their drywall at some point. Whether it’s a doorknob mishap, settling foundation, or a less-than-graceful furniture move, drywall damage is part of home life. For DIYers, the challenge isn’t just fixing the damage—it’s choosing the right tools and materials to make the repair blend in seamlessly. That’s where drywall repair kits come in. With dozens of brands and styles on the market, ranging from simple spackle tubs to all-in-one patching systems, the choice can be overwhelming. Do you need mesh or metal patches? Is pre-mixed compound worth the premium? Should you splurge on a kit with every accessory, or grab the basics and save?
This in-depth guide compares the most popular drywall repair kits, breaking down the types, components, costs, and suitability for different repair jobs. Whether you’re patching a nail hole or tackling a fist-sized crater, we’ll help you skip the trial-and-error and select the best kit for your needs—saving time, money, and frustration. Let’s dive into the components that matter and the real-world performance you can expect from leading kits.
Understanding Drywall Damage: Types and Repair Needs
Common Types of Drywall Damage
- Small Holes: Nail or screw holes, minor dings, and picture-hanging marks.
- Medium Holes: Doorknob impacts, accidental tool damage (1–4 inches).
- Large Holes: Plumbing/electrical repairs, heavy impacts, or water damage (over 4 inches).
- Cracks: Settling cracks, seam splits, or tape failures.
Matching Repair Kits to Damage
Not all repair kits are created equal. The right kit depends on the size and type of damage:
- Small holes need quick-drying spackle or lightweight compound.
- Medium holes benefit from mesh or metal-backed patches plus compound.
- Large holes may require rigid backing, joint tape, and a multi-step approach.
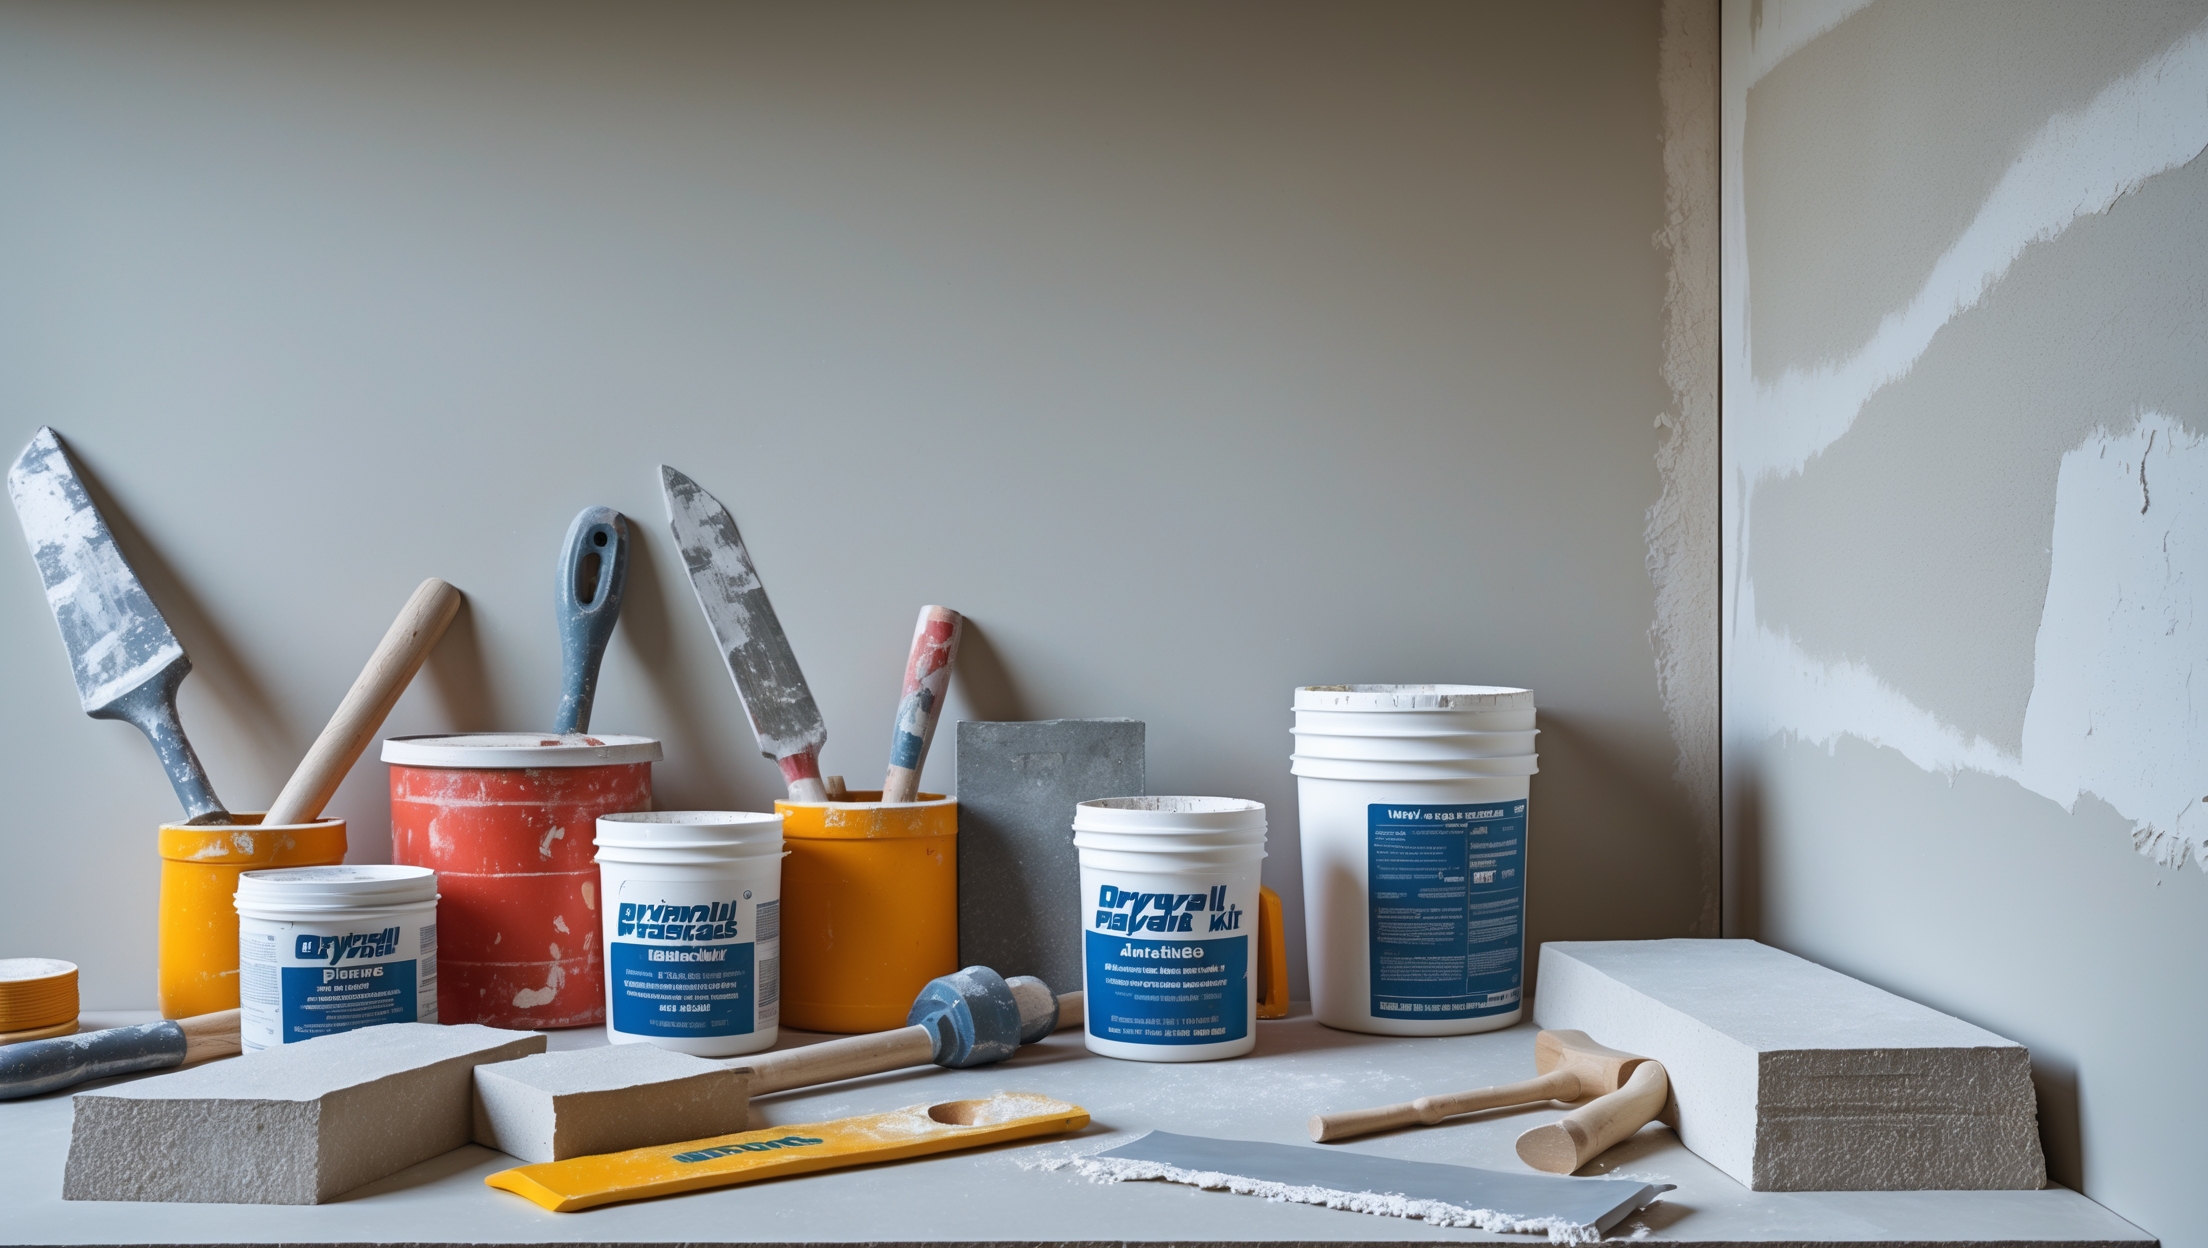
What’s Inside a Drywall Repair Kit? Essential Components Explained
- Patching Material: Spackle, joint compound, or lightweight filler. Pre-mixed for convenience or powder for budget/long storage.
- Patches: Self-adhesive mesh, metal plates, or paper tape. Sizing and rigidity vary.
- Application Tools: Putty knives (plastic or metal), spreaders, or mini trowels.
- Sanding Accessories: Sanding blocks, pads, or sheets (grit varies).
- Extras: Primer, touch-up paint, dust masks, or gloves in premium kits.
Evaluate what’s included—especially if this is your first repair and you don’t already own putty knives or sanding tools.
Reviewing Popular Drywall Repair Kits: Side-by-Side Comparison
1. 3M High Strength Small Hole Repair Kit
- Includes: 3 oz pre-mixed spackle, 4” self-adhesive patch, putty knife, sanding pad
- Best for: Small to medium holes (up to 3 inches)
- Pros: Fast-drying (repairs paintable in 30 minutes), ultra-smooth finish, minimal shrinkage
- Cons: Patch size limits use for larger holes, spackle dries out if not resealed tightly
- Cost Range: $10–$14
2. Red Devil Onetime Patch & Repair Kit
- Includes: 8 oz lightweight spackle, 6” x 6” fiber patch, putty knife, sandpaper
- Best for: Medium to large holes (up to 6 inches)
- Pros: Generous filler quantity, large patch, easy for beginners
- Cons: Longer dry time (up to 2 hours), fiber patch more visible under paint if not feathered well
- Cost Range: $9–$12
3. DAP Wall Repair Patch Kit
- Includes: 4” metal-reinforced patch, 8 oz DryDex spackle (color-change), putty knife, sanding sponge
- Best for: High-traffic areas, medium holes
- Pros: Color indicator shows when dry, strong patch resists future damage
- Cons: Metal can feel bulky under thin drywall, not suitable for tiny holes
- Cost Range: $11–$15
4. Homax Wall Patch & Repair Kit
- Includes: 6” mesh patch, 3 oz spackling, plastic putty knife, sanding pad
- Best for: Quick fixes, renters, or temporary repairs
- Pros: Lightweight, easy for first-time users, great for apartments
- Cons: Limited filler, patch flexes on larger holes, not for structural repairs
- Cost Range: $7–$11
5. Rust-Oleum Zinsser Ready Patch Professional Kit
- Includes: 1 lb Ready Patch, 4” metal patch, professional-grade putty knife, sandpaper
- Best for: Larger repairs, surfaces needing durability
- Pros: Heavy-duty patch, large compound quantity, strong adhesion
- Cons: Not as beginner-friendly (thicker compound, longer setup), more sanding required
- Cost Range: $14–$18
Cost Breakdown: What Are You Really Paying For?
- Patch Quality: Metal patches cost more but offer better durability.
- Compound Type: Pre-mixed is pricier but saves time; powder mixes are cheaper for bulk jobs.
- Accessories: Kits with tools (putty knives, sanders) save on initial outlay if you don’t own them.
- Brand Premiums: Recognized names cost $2–$4 more but often deliver more consistent results.
On average, expect to pay $8–$20 for a kit that covers 1–3 small/medium repairs. For multiple large holes, buying a bigger tub of joint compound and patches separately might be more cost-effective.
DIY vs. Kit: When to Build Your Own Repair Bundle
Why Go Custom?
- You already own tools (putty knife, sandpaper)
- You need to fix several holes of different sizes
- You want more control over patch material and compound type
- You’re working on a tight budget
DIY Bundle Suggestions
- 8–16 oz joint compound or spackle ($4–$7)
- Self-adhesive mesh patches (multi-pack, $4–$8)
- Quality 2–4” putty knife ($2–$6)
- 120–220 grit sanding sponge or sheets ($2–$5)
Total cost: $12–$26, but enough for 5+ repairs and more flexibility.
Step-by-Step: Using a Drywall Repair Kit for Best Results
1. Prepare the Area
- Use a utility knife to trim loose or broken drywall edges.
- Wipe away dust with a damp cloth.
- For cracks, widen slightly to allow compound penetration.
2. Apply the Patch
- Center the patch over the hole. For mesh, smooth out bubbles; for metal, press firmly to ensure adhesion.
- Feather patch edges to minimize bumpiness when covering with compound.
3. Apply the Compound
- Spread a thin, even layer over the patch, extending 1–2 inches beyond the edges.
- Let dry fully (follow kit instructions—anywhere from 30 minutes to 2 hours).
- Apply a second coat as needed, feathering further out for a seamless blend.
4. Sand Smooth
- Sand lightly with a fine-grit pad. Use a circular motion and avoid over-sanding, which can expose the patch.
- Wipe clean with a dry or slightly damp cloth.
5. Prime and Paint
- Prime the area to seal the repair and prevent flashing (uneven paint sheen).
- Touch up with matching paint for an invisible repair.
Beginner Pitfalls: Common Mistakes with Drywall Repair Kits
- Skipping Surface Prep: Not cleaning or trimming damaged edges leads to poor adhesion.
- Applying Too Much Compound: Thick layers take longer to dry and crack more easily.
- Insufficient Sanding: Lumpy repairs stand out even after painting.
- Using Wrong Patch Size: Too small a patch won’t support the repair, too large makes feathering difficult.
- Not Priming: Paint can absorb unevenly, making the repair obvious.
Expert Tips: Getting a Professional Finish from a DIY Kit
- Use a wide putty knife for the final layer to feather edges smoothly.
- For deep holes, fill in layers—allowing each to dry fully to prevent sagging or shrinkage.
- Sand between coats for ultra-smooth results.
- Always prime, even if the compound claims to be paint-ready.
- Choose a patch with a slightly smaller footprint than the damage, then feather out the compound for best blending.
- Store unused compound tightly sealed and upside down to extend shelf life.
When to Call a Professional
While most small and medium drywall repairs are DIY-friendly, certain situations are best left to pros:
- Extensive water damage or mold
- Cracks indicating structural issues
- Large holes requiring new framing or electrical re-routing
- Repairs on textured or specialty finishes
For these scenarios, a repair kit is only a temporary fix. Professional assessment ensures safety and lasting results.
Conclusion: Picking the Best Drywall Repair Kit for Your Home
Choosing a drywall repair kit isn’t just about patching a hole—it’s about making your wall look like nothing ever happened. With a market full of options, the best kit for you depends on the size and type of damage, your existing tool collection, and your comfort level with DIY repairs. For quick fixes and first-timers, all-in-one kits like the 3M or DAP are hard to beat. They offer step-by-step instructions and everything you need to tackle nail holes, minor cracks, or accidental dings. If your home has seen a bit more action, opt for kits with larger, stronger patches and enough compound for multiple repairs.
Budget-conscious DIYers, or those with several different holes to fix, might find assembling their own kit is more economical and versatile. Just remember: prep work, thin coats, and careful sanding are key to a professional-looking repair. Don’t skimp on primer, and match your paint as closely as possible for invisible results.
Ultimately, the right drywall repair kit saves time, money, and frustration—letting you restore your walls with confidence. By understanding what each kit offers and how to use it, you’ll be ready for anything life (or a wayward doorknob) throws at your drywall. Happy repairing!


When dealing with medium-sized holes caused by doorknob impacts, do you find mesh patches work better than metal-backed ones in terms of blending with the wall texture and overall durability? I want to avoid obvious patch marks once painted.
For medium-sized holes from doorknob impacts, mesh patches usually blend more smoothly with wall texture after proper feathering and sanding, making patch marks less noticeable once painted. However, metal-backed patches offer extra durability and strength, especially for areas prone to repeated impacts. If you prioritize seamless appearance, mesh patches are generally easier to conceal, but for added reinforcement, consider using a thin skim coat over a metal patch to minimize visible edges.
After patching a larger hole using one of these kits, what are the recommended next steps to make sure the repair blends in with the rest of the wall? Should I expect to do a lot of sanding and painting afterward?
Once you’ve patched a larger hole, it’s important to let the patch fully dry before moving on. Light sanding is usually needed to smooth the edges and make the repair flush with the surrounding wall—don’t be surprised if you need to sand more than once for a seamless finish. After sanding, wipe away any dust and apply primer, then paint to match your wall. Taking your time with these steps will help your repair blend in nicely.
If I go with a more basic kit to save money, what additional tools or materials should I keep on hand in case the included items aren’t enough for a medium hole repair? Are there any must-have accessories that a beginner might overlook?
If you choose a basic drywall repair kit, it’s smart to have a few extras ready. For medium holes, keep a putty knife (at least 6 inches), extra joint compound, sandpaper or a sanding sponge, and a utility knife nearby. Mesh tape or a drywall patch may be necessary if the hole is too big for the small patch that comes in some kits. Don’t forget a dust mask and drop cloth to keep your workspace clean.
I noticed you mentioned both mesh and metal patches for fixing medium holes. Is there a situation where one works better than the other, or does it mostly come down to personal preference?
Mesh patches are typically easier to use and blend into the wall, making them a good choice for most standard repairs. Metal patches are sturdier and provide extra support, so they work best for areas that might be bumped or need added strength, like near doors. The choice depends on how much durability you need and your comfort with smoothing out the patch.
For someone on a tight budget, is it better to buy a basic drywall kit and purchase extra joint tape or compound separately, or do all-in-one kits generally offer more value even if they include things you might not need for every repair?
If you’re watching your budget, buying a basic drywall kit and adding joint tape or compound separately can be more cost-effective, especially if you already have some tools or supplies at home. All-in-one kits are convenient but sometimes include extras you might not need, which can drive up the price. Comparing prices for individual items versus kits at your local hardware store is a smart way to decide.
How do you know when a large drywall hole is too big for even the best repair kit before you need to actually replace a whole section of drywall? Is there a size limit or other signs to watch out for?
Generally, if a drywall hole is larger than 6-8 inches across, most repair kits won’t provide enough support and strength. If the hole is near a stud or includes damaged framing, that’s another sign a kit won’t be sufficient. Crumbling or cracked surrounding drywall also means a full section replacement is the better choice. For anything bigger than a standard patch, replacing the drywall panel gives a much stronger, longer-lasting result.
When dealing with a larger hole, like one caused by a plumbing repair, is it usually necessary to buy a kit with joint tape and rigid backing, or can a standard mesh patch kit be made to work if I layer it properly?
For larger holes, especially those left after plumbing repairs, it’s generally better to use a kit that includes joint tape and a rigid backing panel. Standard mesh patch kits are great for small to medium holes, but they often lack the support needed for bigger openings, leading to sagging or cracking over time. The rigid backing helps stabilize the repair and joint tape ensures a seamless finish.
For medium-sized holes, is there a significant difference in durability between mesh patches and metal-backed patches over time? I want to avoid future cracking or sagging, so any advice on which holds up better for busy households would be helpful.
For medium-sized holes, metal-backed patches generally offer better durability than mesh patches, especially in high-traffic or busy areas. Metal backing provides extra support, which helps prevent future cracking or sagging. Mesh patches can work for smaller repairs but may flex more over time, leading to potential issues. If you want a long-lasting repair in a busy household, a metal-backed patch is the safer choice.
I noticed you mentioned both mesh and metal patches for medium holes. Is there a significant difference in how well each type holds up over time? I want to avoid having to redo repairs in high-traffic areas if possible.
Mesh patches are easy to use and blend well with drywall, but in high-traffic areas or spots prone to impact, metal patches tend to hold up better over time. Metal patches are sturdier and less likely to crack or dent with repeated bumps, making them the safer choice if you want a long-lasting repair in busy spots.
I’m curious about pre-mixed compounds in these repair kits. Do they really save that much time, or do they end up cracking more easily compared to mixing your own? Is it worth paying more for pre-mixed just for a quicker fix?
Pre-mixed compounds do save time since you can use them straight from the container, without any mixing or mess. For small repairs, they work well and are quite convenient. However, some people notice that pre-mixed options might shrink or crack a bit more than freshly mixed compound, especially if applied too thickly. If you value speed and are tackling minor holes, pre-mixed is worth the extra cost. For larger or more critical patches, mixing your own could give a stronger, longer-lasting result.
If I have several different types of drywall damage throughout my shop—everything from cracks to small and large holes—would you recommend getting multiple specialized repair kits or is there an all-in-one option that can handle every scenario efficiently?
For a shop with a variety of drywall issues, an all-in-one repair kit is likely the most efficient choice. These kits typically include a mix of tools, joint compound, patch materials, and sometimes even sanding sponges, so you’re prepared for cracks, small holes, and even larger patches. Specialized kits work well for specific problems, but an all-in-one kit should cover most typical DIY repairs and keep things simple.
I’ve noticed some kits come with pre-mixed compound while others use powder you mix yourself. Have you found a big difference in the finish or ease of use between these options, especially for beginners? Does the pre-mixed really justify paying a higher price?
Pre-mixed compounds are definitely easier and more convenient, especially for beginners. You can use them straight from the container, which saves time and avoids mixing mistakes. Powders can be messier and require careful mixing to get a smooth consistency. In terms of the final finish, both types can deliver good results, but pre-mixed options tend to be more forgiving. If you value convenience and a simpler process, the higher price of pre-mixed is usually worth it for small repairs.
I’m wondering if the all-in-one patching systems you mention are really necessary for larger holes, or if it’s just as effective (and cheaper) to buy mesh patches and joint compound separately. For a busy parent on a budget, what would you recommend?
For larger holes, buying mesh patches and joint compound separately can be just as effective as using all-in-one kits, and it’s usually more budget-friendly. All-in-one systems are more about convenience and speed. If you’re comfortable following a couple of extra steps, separate materials will save you money and still give a solid, durable repair, which is great for a busy parent.
After using a repair kit on a large hole with rigid backing, how long should I wait before painting over it to ensure the repair doesn’t show through later? Any tips for getting the patched area to blend in with existing wall texture?
After using a drywall repair kit on a large hole, it’s best to wait at least 24 hours for the patch to dry completely before painting, though some products may specify longer drying times. For the patch to blend in with your existing wall, gently sand the area smooth once dry, then use a dry sponge, brush, or texture spray to match the wall’s texture before priming and painting. Taking your time with these steps helps the repair disappear.
I’m looking to fix a medium-sized hole from a doorknob, and I noticed the article mentions both mesh and metal patches. Is there a noticeable difference in how easy they are to install or sand down for a smooth finish, especially for a beginner?
For a medium-sized hole like one made by a doorknob, mesh patches are usually a bit easier for beginners to install and blend into the wall. They stick directly over the hole and are generally easier to sand smooth after applying joint compound. Metal patches are sturdier but can be harder to cover seamlessly and sometimes require extra sanding to hide the edges.
For someone new to drywall repairs, how difficult is it to use an all-in-one kit versus buying each component separately? Are there any common mistakes first-timers make with either approach, especially when dealing with cracks or seam splits?
Using an all-in-one drywall repair kit is generally much easier for beginners because everything you need is included and the instructions are usually straightforward. If you buy components separately, it’s easy to miss something or choose incompatible materials. Common mistakes with both approaches include not cleaning or prepping the area well enough, using too much or too little compound, and not sanding smoothly once it dries. For cracks or seam splits, make sure to properly tape and feather out the compound for a seamless finish.
When it comes to repairing larger drywall holes from plumbing work, do most kits include enough joint tape and backing material, or will I need to buy extra supplies separately for a sturdy fix?
For larger drywall holes caused by plumbing work, most repair kits may not include sufficient joint tape or backing material for a truly sturdy repair. Kits are often designed for small- to medium-sized holes and offer limited supplies. For best results with bigger patches, you’ll likely need to buy extra joint tape and backing supports like wood or metal strips to ensure a strong, long-lasting fix.
When you mention that some kits come with pre-mixed compound while others require mixing, is there a noticeable difference in how well the patch blends in or holds up over time? I’m wondering if paying extra for pre-mixed is really worth it for medium-sized repairs.
Pre-mixed compounds are very convenient and save time, but for medium-sized repairs, there’s not a major difference in how well the patch blends or lasts if you apply both types correctly. Mixing your own gives you more control over consistency, which can help with blending, but it takes more effort. If you value ease and speed, pre-mixed is worth the extra cost, but for larger or multiple patches, mixing your own may be more economical.
Is it really necessary to buy a pricier kit with joint tape and rigid backing for larger holes, or could I get similar results piecing together affordable supplies from the hardware store? I’m on a tight budget and just want a solid fix.
You can definitely achieve a solid repair on a budget by piecing together your own supplies, especially if you’re comfortable with a bit of DIY. For larger holes, make sure you get some joint tape and a backing support like a scrap of wood or a metal patch. These items are usually inexpensive when bought separately and can give you results similar to pricier kits as long as you follow the correct steps.
You mention that some kits come with all the accessories while others are more basic. For a busy parent fixing doorknob holes and the occasional crack, is it worth investing in the fully loaded kit or can I get by with something simpler?
If you’re mostly tackling doorknob holes and minor cracks, a simpler kit should be enough. Basic kits usually include spackle, a putty knife, and a patch, which are all you need for small repairs. The fully loaded kits are convenient but often include extra tools you might not use. For occasional fixes, the simpler option can save you money and still get the job done.
After using these repair kits, how long should I typically wait before sanding and painting to ensure the patched area blends smoothly with the rest of the wall?
After applying a drywall repair kit, it’s best to wait until the patched area is completely dry before sanding or painting. Most kits require about 24 hours to dry, though some fast-drying compounds can be ready in as little as 2–6 hours. Check the product instructions for exact drying times, and make sure the patch feels hard and no longer cool to the touch before you proceed.
I noticed you mentioned pre-mixed compound can cost more. For someone on a tight budget, is it usually worth paying extra, or would a basic kit with separate powder compound be just as effective for small holes?
For small holes, a basic kit with separate powder compound should work just as well and is more budget-friendly. While pre-mixed compound is convenient and saves a bit of time, the powdered version is just as effective once mixed. If saving money is a priority and you don’t mind mixing it yourself, the powder option is a smart choice for small repairs.
For someone on a tight budget, do you think it’s better to buy a comprehensive drywall repair kit upfront, or would it be more economical to purchase just the main components separately for smaller patches?
For small drywall patches, buying the main components separately—like a small tub of spackle, a putty knife, and a sanding sponge—can be more economical than purchasing a comprehensive repair kit. Kits are convenient but often include extra items you might not need for minor repairs. If you plan to do several repairs or want everything in one package, a kit might make sense, but for just one or two small holes, buying individual items usually costs less.
I run a small business and we get a lot of minor dings in our office walls from moving furniture around. For frequent repairs like this, would you recommend buying individual spackle tubs or is it more cost-effective in the long run to invest in one of the all-in-one patching kits?
Since your business faces frequent minor wall dings, buying larger tubs of spackle and a separate set of tools will likely be more cost-effective over time. All-in-one kits are convenient, but they’re designed for occasional home use and can get expensive when used repeatedly. With bulk spackle and reusable tools, you’ll have enough material for multiple repairs and save money in the long run.
For someone on a tight budget, is there a particular kit or type of compound you’d recommend for large holes caused by plumbing repairs? Also, how much extra material should I plan to buy in case the first patch doesn’t hold up?
For large holes from plumbing repairs, a budget-friendly choice is a standard pre-mixed joint compound paired with a mesh patch or scrap drywall, rather than an all-in-one kit. Buy a little extra compound—about 25% more than your calculated need—so you have enough for a second layer or any touch-ups. This approach is usually cheaper and gives you flexibility if the first patch needs reinforcement.
If I just need to fix a few small nail holes from picture hangers, is it worth buying a full repair kit, or would a simple spackle tub work just as well? Curious about saving money on these smaller fixes.
For fixing just a few small nail holes, a simple tub of spackle is usually all you need—no need for a full drywall repair kit. A small tub is affordable and easy to apply, and you can use a putty knife or even a stiff card to smooth it over. This is a budget-friendly option for minor fixes like yours.
You mention that some drywall repair kits come with pre-mixed compound while others require mixing. For a first-time DIYer, how significant is the difference in application or finish quality between these two options? Are there situations where mixing your own compound is worth the extra effort?
For first-time DIYers, pre-mixed compound is usually easier to work with because it’s ready to use and reduces the risk of mistakes. The finish quality between pre-mixed and mix-yourself compounds can be very similar for small repairs. Mixing your own compound may be worth it for larger projects or if you want more control over texture and drying time, but for typical home fixes, pre-mixed is often the simplest and most convenient choice.
I’m a bit confused about the need for rigid backing and joint tape for larger holes you described. When is it really necessary to use joint tape, and will skipping it on a fist-sized hole make the repair less durable or noticeable?
For larger holes, like fist-sized ones, using rigid backing and joint tape is important for a strong, seamless repair. The backing supports the patch so it doesn’t sag or crack, while joint tape reinforces the seams and helps hide them under the compound. Skipping the tape can lead to cracks, visible seams, or a repair that doesn’t blend well with the rest of the wall.
You mentioned that large holes might need a multi-step approach with rigid backing. For someone with limited time and beginner skills, are there any kits that make the process as simple as possible, maybe by including everything pre-cut or pre-measured?
Yes, there are drywall repair kits designed for beginners that include everything you need, even for larger holes. Look for kits that feature a pre-cut metal or plastic patch, self-adhesive backing, and pre-measured amounts of compound. These kits often come with step-by-step instructions and tools like a putty knife, making the process much simpler and faster for someone with limited experience and time.
For a novice, how easy is it to use the all-in-one patching systems compared to the basic spackle tubs? I have a tight schedule and minimal tools at home, so I’m wondering which would actually save me time and frustration.
All-in-one patching systems are usually more convenient for beginners, especially if you have limited tools and time. These kits typically include the patch, spackle, and applicator, so you don’t have to buy or prep anything separately. Basic spackle tubs work well but often require extra items like putty knives and sandpaper. For a faster, less stressful repair, the all-in-one options are easier and more efficient.
If I’m only dealing with a couple of small nail holes but want the fix to match the wall texture, will a basic kit with pre-mixed spackle be enough, or do I need to look for something that includes a texturing tool?
A basic kit with pre-mixed spackle is usually fine for filling small nail holes, but if your wall has a noticeable texture, the repair might stand out unless you match it. Some kits include a simple texturing tool or sponge for this purpose. If matching texture is important to you, look for a kit that mentions texture matching or includes texturing tools.
When it comes to cost, is there a big difference in durability or finish between the cheaper basic drywall kits and the pricier all-in-one systems you talked about? I’m on a student budget so I’m trying to avoid buying extra materials later if possible.
If you’re on a student budget, a basic drywall kit can still give you a good result, especially for small holes or simple repairs. The main differences with pricier all-in-one systems are that they often include higher quality compounds, better patches, and sometimes finishing tools, which might make the repair more durable and the finish a bit smoother. However, with careful work, a basic kit should do the job and you likely won’t need extra materials unless your repair is large or in a high-traffic area.
If I only have occasional small holes to patch from picture hangers and don’t want to invest in a full kit, are the basic spackle tubs truly enough for a professional-looking result, or do you still recommend picking up a couple of extra tools for blending?
For small holes from picture hangers, a basic spackle tub is typically enough to achieve a neat, professional finish. However, using a small putty knife can help you spread and blend the spackle more smoothly than just using your finger. Lightly sanding after it dries will also give you the best result. These extra tools are inexpensive and can make your repair almost invisible.
Once you finish a repair using one of these kits, how long should you wait before painting over the area? The article mentions quick-drying spackle, but is there a standard timeframe to ensure the repair blends in smoothly with the rest of the wall?
After using a drywall repair kit, it’s important to let the patched area dry completely before painting. Quick-drying spackle can be ready for paint in as little as 30 to 60 minutes, but thicker repairs or traditional compounds might need several hours or even overnight. Always check the product’s instructions for exact drying times, and make sure to sand the area smooth for the best blend with your wall.
The article mentions mesh and metal patches for medium holes. In your experience, is there a big difference in durability or ease of use between those two, especially if I’ve never patched drywall before?
Mesh patches are generally easier for beginners to use—they’re lightweight, self-adhesive, and blend smoothly under joint compound. Metal patches provide a bit more strength, but can be trickier to cover seamlessly and may be more noticeable if not finished carefully. For your first project, a mesh patch is likely to be more forgiving and user-friendly.
When it comes to cost, is it usually more budget-friendly to buy a comprehensive drywall repair kit with all the accessories, or would it make sense to just get the basic items separately for small to medium jobs? I’m trying to avoid overspending on things I won’t need.
For small to medium drywall repairs, buying just the basic items separately can often save you money, especially if you already have some tools at home. Comprehensive kits are convenient and include everything, but they may come with extras you might not actually use. If you only need essentials like spackle, a putty knife, and sandpaper, picking them up individually is usually more budget-friendly.
I saw you mentioned mesh and metal patches for medium holes. Is there a noticeable difference in how well the patch blends in after painting, or does either type leave a bump or texture that’s hard to hide?
Both mesh and metal patches can repair medium holes, but there are some differences in the final look. Mesh patches tend to blend in more smoothly after painting if you apply joint compound carefully and sand between coats. Metal patches can sometimes leave a slight bump or texture because they’re thicker, especially if not feathered out well with compound. Taking time to sand thoroughly helps either type look more seamless.
For someone on a tight budget and not much DIY experience, how tricky is it to use one of the larger repair kits that require joint tape and rigid backing? Are there common mistakes beginners should watch out for?
Using larger drywall repair kits with joint tape and rigid backing can be a bit challenging for beginners, but it’s definitely doable if you take your time. Common issues include not applying enough joint compound, failing to feather the edges smoothly, or not letting each layer dry fully before sanding or painting. Carefully follow the instructions, use thin layers, and don’t rush the drying process to get a neater result.
When it comes to tackling larger holes from plumbing or electrical repairs, are most all-in-one kits truly sufficient, or would you recommend purchasing additional materials beyond what’s provided in these kits for a more seamless finish?
For larger holes caused by plumbing or electrical work, all-in-one drywall repair kits can be a good starting point, but they may not always provide everything needed for a professional, seamless finish. You might need extra joint compound, mesh tape, or sanding tools beyond what’s included. For the best results, consider purchasing separate finishing products and taking extra care with sanding and priming before painting.
I noticed you mentioned pre-mixed compound as a premium option in some kits. Is there a noticeable difference in finish quality or ease of use between the pre-mixed and the standard dry compound, especially for a beginner tackling medium-sized drywall holes?
Pre-mixed compound generally offers a smoother and more consistent texture right out of the container, which can make application easier for beginners and helps achieve a neater finish on medium-sized drywall holes. It saves time since you don’t have to mix it yourself, reducing the chance of lumps or incorrect consistency. Standard dry compound is more economical and stores longer but requires careful mixing to get the right texture, which can be tricky if you’re not experienced. For a beginner, pre-mixed compound usually provides better results with less hassle.
If I want to save a little money, can I get away with just buying basic spackle and patching tools instead of one of the all-in-one drywall repair kits? Are there must-have accessories in the pricier kits that actually make a big difference for first-timers?
You can definitely save money by buying just spackle and basic patching tools, especially for small holes or dents. For most simple repairs, these basics do the job. However, pricier all-in-one kits usually include extras like adhesive patches, sanding sponges, and applicators that can make the process smoother and help achieve a neater finish, especially if you’re new to drywall repair. If you already have some tools at home, basic supplies are fine; otherwise, a kit can be really convenient for beginners.
In the guide, you mention that medium holes require mesh or metal-backed patches plus compound. Could you clarify how the finished result compares between mesh and metal patches? I am concerned about visible seams or lumps after painting over the repair.
Mesh patches tend to blend better with the surrounding drywall, resulting in a smoother finish if you feather out the joint compound carefully. Metal-backed patches provide more strength but can sometimes leave a slightly raised area if not covered with enough compound and sanded well. To avoid visible seams or lumps, apply multiple thin layers of compound, sanding between each, regardless of patch type.
Do you find that mesh patches hold up just as well as metal-backed ones for door knob-sized holes? I’ve had mixed results with mesh in the past, especially on parts of the wall that get knocked into a lot. Would you recommend metal for those high-traffic spots?
For areas that get bumped often, like spots behind doors, metal-backed patches are usually more durable than mesh patches. Mesh can work for small holes, but on high-traffic walls or for door knob-sized holes, metal gives extra strength and resists cracking or popping out over time. For the most reliable, long-lasting repair in those locations, go with the metal-backed patch.
If I only have small nail holes and a few minor cracks, can I just use a basic spackle kit, or do the all-in-one kits actually make a noticeable difference for quick touch-ups? I’m trying to keep things budget-friendly.
For small nail holes and minor cracks, a basic spackle kit is usually all you need and will keep your costs low. All-in-one kits are handy if you have larger holes or need extras like sanding pads or putty knives, but for quick, simple touch-ups, spackle alone works just fine.
I noticed you mentioned mesh and metal patches for medium holes. Is there a significant difference in durability or finish between the two, especially if I’m planning to repaint the area right after patching?
Mesh patches are generally easier to blend into the wall and create a smoother finish, which is helpful if you plan to repaint soon. Metal patches offer a bit more strength, making them ideal for high-traffic areas or places that might get bumped. However, metal can sometimes show through if not feathered out with enough joint compound. For most repainting jobs, mesh provides a more seamless look.
For medium-sized holes about 2 or 3 inches wide, is there a big difference in end result or ease of use between mesh patches and metal-backed patches? I want to avoid visible seams and minimize sanding time if possible.
For 2 to 3-inch holes, both mesh and metal-backed patches can work, but mesh patches are typically easier to blend into the wall since they’re thinner and reduce the risk of raised seams. Metal-backed patches offer more strength but can be harder to feather out, which may mean a bit more sanding. For the smoothest finish and less sanding, a mesh patch is often the better choice for this size.
You discuss mesh versus metal patches for medium holes—are there any drawbacks in terms of finish quality or durability between the two materials, especially if the wall gets occasional bumps or vibration?
Mesh patches are easier to blend for a smoother finish, but they can be less durable if the wall gets bumped or vibrated, sometimes leading to hairline cracks over time. Metal patches are sturdier and better resist impacts, but they may be a bit harder to conceal perfectly under paint since the edges can sometimes show through unless feathered carefully with joint compound.
For medium-sized holes like those left by a doorknob, would you recommend mesh or metal-backed patches for someone with limited drywall experience? Are there situations where one is definitely better than the other in terms of ease and final appearance?
For medium-sized holes, mesh patches are generally easier for beginners to apply. They stick directly over the hole and blend well after you apply joint compound, making the repair less noticeable. Metal-backed patches are sturdier and better for larger or high-traffic areas, but they can be trickier to get smooth unless you have some drywall experience. For a first-time DIYer, mesh is usually your best bet for ease and a good finish.
If I have a large hole from a plumbing repair, is it possible to get a seamless look with a kit, or should I expect to still see some unevenness even after using the recommended multi-step approach mentioned in the article?
For larger holes, achieving a truly seamless look can be challenging, even with the best drywall repair kits and following all the recommended steps. Kits help minimize unevenness, but slight texture or blending differences may remain, especially if you’re new to drywall work. Careful sanding, priming, and matching paint will help, but for a completely flawless finish, professional help or more advanced techniques might be needed.
The article mentions that some kits come with every accessory while others are more basic. For someone on a budget doing a one-time fix, would it be smarter to just buy the essentials separately rather than a full kit?
If you’re only tackling a single repair and already own some basic tools, buying just the essentials like patch material and joint compound separately can be more cost-effective than purchasing a full kit. However, if you don’t have items like putty knives or sanding blocks, a budget-friendly kit with everything included might still save you time and hassle.
I run a small property management business, and we constantly deal with both nail holes and larger drywall damage after tenants move out. If I only have room in my toolkit for one type of repair kit, would you recommend going with a mesh patch system or a metal-backed one for versatility?
For your property management needs, a mesh patch system is generally more versatile. Mesh patches work well for both small holes like nail pops and larger damage up to several inches wide. They’re lightweight, easy to trim, and blend smoothly under paint. Metal-backed patches are sturdy but can be bulkier and are often overkill for minor repairs. A mesh kit should cover most situations you’ll encounter.
You mentioned that large holes might require a multi-step approach. Do most kits include everything needed for those bigger repairs, or will I need to pick up extra supplies separately?
Most drywall repair kits are designed for small to medium holes, so they may not include everything you need for larger repairs. For big holes, you’ll often need extra drywall pieces, joint tape, and possibly additional compound or tools not found in standard kits. It’s a good idea to review the kit contents before purchasing and be prepared to pick up a few extra supplies for best results.
For a medium-sized hole from a doorknob (about 2 inches wide), do you recommend using a mesh patch or is it worth upgrading to a metal-backed patch for better durability? I’m also curious if the pre-mixed compound really speeds things up for this kind of repair.
For a 2-inch hole, either a mesh or metal-backed patch can work, but a metal-backed patch offers a bit more strength and is less likely to crack over time, especially in high-traffic areas like behind a door. Pre-mixed compound does speed things up since you don’t have to mix it yourself—just open, apply, and smooth. It’s great for smaller repairs like this.
I noticed you mentioned both mesh and metal-backed patches for medium holes. Is one type significantly easier to use for someone who isn’t very handy, or do they offer different results in terms of durability or look after painting?
Mesh patches are generally easier for beginners because they stick directly over the hole and blend well with joint compound, making them simple to feather out and sand. Metal-backed patches are sturdier and offer better durability, especially for high-traffic areas, but they can be a bit trickier to hide perfectly under paint. If you’re new to repairs, mesh is likely the more user-friendly option, but both can yield smooth results with careful finishing.
I’m a little overwhelmed by the range of kits out there—do most all-in-one kits really include everything I’ll need, or should I expect to make extra trips for tools or compound, especially for bigger repairs like after plumbing work?
Most all-in-one drywall repair kits cover basic needs for small to medium holes, with items like patch material, joint compound, putty knife, and sanding pad. For larger repairs, such as those needed after plumbing work, you might need extra joint compound, larger patches, or specific tools like a drywall saw or tape. Double-check the kit’s contents for your repair size, and be prepared for a possible hardware store run if the job is bigger.
I’m trying to fix a medium-sized hole from a doorknob and noticed the article mentions both mesh and metal-backed patches. In terms of long-term durability and ease of getting a seamless finish, is one material generally better than the other?
For medium-sized holes, metal-backed patches tend to offer greater long-term durability since they provide a solid backing that resists future impacts. However, mesh patches are often easier to blend with the surrounding wall for a smooth, seamless finish, especially if you carefully feather the joint compound. If your priority is strength and you don’t mind a bit more sanding, metal patches are a solid choice. For the easiest seamless look, mesh patches might be preferable.
For someone on a pretty tight budget, is it actually worth it to buy the kits with all the extra tools included, or can you get similar results just by picking up separate spackle and a mesh patch?
If you already have basic tools like a putty knife at home, buying just spackle and a mesh patch can definitely save you money and still give good results for small repairs. The kits are convenient but often include tools you might not need. Just make sure your tools are clean and in good shape for a smooth finish.
For medium-sized holes, the article mentions both mesh and metal-backed patches. Is there a difference in durability or ease of finishing between the two, especially if I plan to paint over the repair soon after?
Mesh patches are generally easier to blend into the wall for a smooth finish, which is helpful if you want to paint shortly after the repair. Metal-backed patches tend to be a bit sturdier and provide more support for larger repairs, but they can sometimes be trickier to cover seamlessly and might require more joint compound and sanding. If a quick, paint-ready surface matters most, mesh is often the easier option.
If I only need to fix some small nail holes and a couple of deeper dings from moving furniture, would buying a more expensive, all-in-one repair kit really be worth it, or can I get away with just a basic spackle and save money?
For small nail holes and a few deeper dings, a basic spackle will usually do the job just fine and save you money. An all-in-one repair kit is handy for larger repairs or if you lack basic tools, but for minor fixes, spackle, a putty knife, and some sandpaper are often all you need.
I’m curious about the durability of repairs depending on the kit type. For medium holes, do mesh patches hold up as well as metal-backed ones over time, especially in high-traffic areas or spots where doors might hit the wall again?
Mesh patches can work well for medium holes, but in high-traffic areas or spots prone to impact, metal-backed patches generally provide better long-term durability. Metal adds extra strength, helping prevent cracking or denting if the wall gets bumped again. If you expect repeated contact, the metal-backed option is usually the more reliable choice.
The article mentioned that large drywall holes sometimes need a multi-step approach. Could you break down what extra tools or materials I’d need in addition to what usually comes in standard repair kits for bigger repairs like that?
For larger drywall holes, in addition to the usual repair kit materials like spackle or patching compound, you’ll likely need extra items such as a utility knife, drywall saw, replacement drywall pieces, joint tape, and screws. You may also want a drill or screwdriver, a putty knife, sanding block, and possibly a stud finder. These help you cut, secure, and blend the new drywall for a stronger, seamless repair.
You mentioned that pre-mixed compound might cost more than regular spackle. For someone on a student budget, is the convenience of pre-mixed compound really worth it, or would buying the basics save enough money without making the job harder?
If you’re on a student budget, buying regular spackle or dry mix and preparing it yourself will usually save you money. The pre-mixed compound is easier and quicker to use, but mixing your own isn’t too difficult and can be more cost-effective, especially for small repairs. As long as you follow directions and mix thoroughly, you shouldn’t find the process much harder.
The article breaks down kits with just the basics versus all-in-one kits with extra accessories. Did you find that the more comprehensive kits actually save time and effort, or do they include a lot of stuff most DIYers won’t end up using?
The article found that while all-in-one kits can be convenient, they often include extra tools or materials that many DIYers might not need for a simple patch job. For smaller repairs, basic kits usually save time because you aren’t sorting through unnecessary items. However, if you don’t already own common tools like a putty knife or sanding block, a comprehensive kit can be more efficient and prevent last-minute trips to the store.
When it comes to cost, do the pre-mixed compound kits really offer enough time savings or ease of use to justify spending more compared to buying the basic spackle tubs and doing the patching yourself?
Pre-mixed compound kits are usually more expensive than basic spackle tubs, but they can save you time since everything is included and ready to use. They’re especially helpful for beginners, as you don’t have to worry about mixing or gathering supplies. If you’re tackling just one or two small repairs, the convenience may be worth the extra cost. For larger projects or if you’re comfortable patching on your own, using basic spackle tubs can be more economical.
When dealing with cracks from settling or seam splits, would a standard repair kit be enough, or are there specialized products or techniques I should be aware of to prevent the crack from reappearing over time?
For cracks caused by settling or seam splits, it’s best to go beyond just a standard repair kit. Reinforcing the area with mesh tape before applying joint compound helps prevent future cracking. Make sure to feather out the compound over a wider area and allow for proper drying between coats. Some kits include mesh tape, but if not, it’s worth buying separately for a longer-lasting repair.
The article suggests that larger holes might need a more involved repair with rigid backing and joint tape. If I already have joint compound and tape at home, what essential components should I look for in a kit to handle a bigger repair without buying a whole redundant set?
If you already have joint compound and tape, focus on kits that include a wall patch or rigid backing material suitable for the hole size you need to repair. A metal or fiberglass mesh patch is often included for larger holes. Also, check for a putty knife or sanding pad if you don’t own those, as they make the job much easier. This way, you’ll avoid buying duplicates and still have what you need for a sturdier repair.
Does the article cover whether pre-mixed compounds in the kits dry significantly faster or slower than the traditional powder mixes? I need to do repairs in a bedroom and want to minimize downtime.
The article does mention drying times as a key factor when choosing between pre-mixed and powder drywall compounds. It explains that pre-mixed compounds in repair kits typically take longer to dry compared to most powder mixes, which often include quick-setting options. If minimizing downtime is important for your bedroom repairs, a powder mix labeled as ‘fast-set’ might be your best choice.
If I’m trying to stick to a tight budget, is it possible to assemble my own repair kit by buying individual components, or do the all-in-one kits offer better value when factoring in the tools and materials needed for medium to large repairs?
You can absolutely assemble your own drywall repair kit by purchasing joint compound, a putty knife, sandpaper, and mesh tape separately, which often saves money if you already have some tools. However, for medium to large repairs, all-in-one kits can offer better value since they bundle everything needed and ensure compatibility of materials. If you need to buy all tools and supplies from scratch, the kit may be more cost-effective and convenient.
For someone on a pretty tight budget, are there any affordable drywall repair kits that still handle large holes well, or is it better to buy the individual components separately to save money?
If you’re watching your budget, buying individual components like mesh patches, joint compound, and a putty knife separately can often be more cost-effective, especially for larger holes. Some basic kits for big repairs can be pricey, and the tools included are often minimal. Picking up only what you need lets you control quality and quantity, so you get the most for your money.
I noticed you mentioned both mesh and metal-backed patches for medium holes. Are there specific situations where one is better than the other, like for spots near corners or in high-traffic areas? I want to make sure I pick the right material for durability.
Mesh patches work well for flat, central wall areas and are easy to blend, but they can be less sturdy than metal-backed options. For corners, edges, or spots in high-traffic areas where bumps are common, metal-backed patches offer better durability and resistance to impact. If you need extra strength or are patching near a door or hallway, a metal-backed patch is often the safer choice.
After patching a fist-sized hole with one of these kits, how long should I expect to wait before sanding and painting to ensure a smooth finish that lasts? I want to make sure I’m not rushing the process and causing future cracks.
Once you’ve patched a fist-sized hole with a drywall repair kit, it’s important to let the compound dry completely before sanding or painting. Most kits recommend waiting at least 24 hours for the patch to fully cure, but drying times can vary based on humidity and thickness of the application. Check that the surface feels hard and dry to the touch before sanding. After sanding, wipe off the dust and apply primer before painting for the best, most durable results.
The article mentions some kits come with mesh or metal patches for medium holes, while bigger holes need rigid backing and more steps. How do you know when a hole is too big for a standard kit, and what should you do in that case?
A standard drywall repair kit usually works for holes up to about 6 inches across. If the hole is larger than that, especially if the patch sags or doesn’t feel secure with a mesh or metal patch alone, it’s too big for a basic kit. In those cases, you’ll need to add a rigid backing, like a piece of wood (furring strip), behind the hole before attaching new drywall and finishing the repair.
Are the more expensive all-in-one kits really worth the extra cost if I’m just patching a couple of screw holes and one small dent, or could I get by with just a basic spackle tub and a putty knife?
For just a couple of screw holes and a small dent, a basic spackle tub and putty knife will work perfectly fine. The pricier all-in-one kits are more useful if you’re dealing with larger holes or want everything (including patch material and sanding tools) in one pack. For your needs, sticking to the basics should save you money and still give a great result.
If I’m patching over a medium-sized hole from a doorknob, is it better to go with a mesh patch or a metal one? Does one blend in better once painted, or does it mostly come down to how careful I am with the compound?
For a medium-sized hole like one from a doorknob, both mesh and metal patches can work, but mesh patches are often easier to blend seamlessly with the wall after painting. The final look depends a lot on how smoothly you apply and sand the joint compound. Mesh patches sit flush and are less likely to create a visible bump, so you’ll likely get a smoother finish with them.
Does the article address whether mesh patches or metal-backed patches are more durable for medium-sized holes? I have some areas in a high-traffic part of my house that get bumped often, and I’m curious which option holds up better over time.
The article does compare mesh patches and metal-backed patches for durability. It notes that metal-backed patches generally offer stronger reinforcement for medium-sized holes, especially in areas that experience frequent bumps or impact. For high-traffic locations in your home, metal-backed patches are recommended because they resist flexing and cracking better over time than mesh patches.
When it comes to repairing medium holes, do you find mesh or metal-backed patches hold up better over time, especially in busy spots like hallways or around doors? I’ve had mixed results with mesh lifting over the years.
For medium holes in high-traffic areas like hallways or near doors, metal-backed patches usually hold up better over time. They offer more rigidity and are less likely to lift or crack with frequent bumps or door slams. Mesh patches can be convenient but sometimes peel at the edges if not applied perfectly or if the area gets a lot of contact.
If I have a larger hole from an old plumbing repair—over 4 inches—do most kits provide everything I need, or should I expect to make a separate run to the hardware store for things like rigid backing or extra joint tape?
For holes larger than 4 inches, most drywall repair kits may not include all the materials you’ll need. While some kits provide mesh patches and joint compound, they often lack rigid backing support (like wood or metal) and may not have enough joint tape. It’s wise to plan on getting backing material and possibly extra tape from the hardware store for a strong, lasting repair.
I noticed the article mentions both mesh and metal-backed patches for medium holes. Is one type better than the other when it comes to preventing future cracks or do they just come down to personal preference?
Mesh patches are usually easier to blend into the wall because they create a smooth surface, but they may be slightly less durable than metal-backed patches. Metal-backed patches are sturdier and provide more strength, which can help prevent future cracks, especially in high-traffic areas. If crack prevention is your main concern, metal-backed patches might be the better choice, but for most typical repairs, both types work well and personal preference often plays a role.
Do pre-mixed compounds really save much time for small nail or screw holes, or do they just add to the cost without much benefit for simple repairs? Would you recommend buying just a basic spackle tub instead of a full kit if budget matters?
For small nail or screw holes, a basic tub of pre-mixed spackle is usually all you need and is more budget-friendly than a full kit. Pre-mixed compounds do save some time since they’re ready to use, but for very simple repairs, a kit often includes extras you may not need. If cost is a concern, stick with just the spackle and use a putty knife you already have.
If I’m repairing a large hole from plumbing work, do the multi-step kits usually include everything for proper backing and taping, or should I plan on buying extra materials separately?
Most multi-step drywall repair kits are designed for small to medium holes and typically include patch panels, joint compound, and basic tools. For a large hole, especially from plumbing work, you’ll likely need to add your own backing support (like wood strips) and possibly extra joint tape or compound. It’s a good idea to check what’s in the kit and be ready to buy extra materials if the hole is bigger than a few inches across.
You talked about kits ranging from basic spackle tubs to those with a lot of accessories. For someone on a tight budget, is it really necessary to buy an all-in-one kit, or can I get good results with separate basic items for small holes and cracks?
For small holes and cracks, you don’t need to buy an all-in-one kit if your budget is limited. Purchasing separate basic items like a small tub of spackle, a putty knife, and some sandpaper can work just as well and often costs less. Just make sure you have the essentials, and you’ll be able to achieve neat, durable results for minor repairs.
You talked about pre-mixed compound sometimes costing more. From your testing, does the convenience actually justify paying extra, or do most DIYers find the regular compound just as easy to use once you get the hang of it?
From our testing, pre-mixed compound is definitely more convenient since it’s ready to use straight from the container, which saves time and mess. However, many DIYers find that once they’ve tried mixing regular compound a couple of times, the process becomes pretty straightforward and they don’t mind the extra step. So, the convenience of pre-mixed is helpful for small or occasional repairs, but for bigger jobs or frequent projects, regular compound usually offers better value.
My kids are rough on the walls, and we have a couple of doorknob holes and one spot from a plumbing repair. Based on your comparison, is it better to buy a single kit with all the bells and whistles, or purchase different kits for different sized holes?
If you have a variety of hole sizes to repair, a comprehensive kit with multiple patch sizes and all-in-one tools is likely the most convenient and cost-effective choice. This way, you won’t have to buy separate kits for each type of damage, and you’ll have everything you need for both small doorknob holes and larger plumbing repair spots.
Do most of these repair kits actually include everything you need for finishing, like sandpaper and a putty knife, or should I expect to still buy extra tools separately? I want to avoid last-minute trips to the hardware store while patching some settlement cracks around my house.
Most drywall repair kits do include the basic materials you need, such as joint compound, a patch, sandpaper, and a small putty knife. However, some kits may only offer the essentials for the actual patch and might leave out sanding tools or a larger putty knife for bigger jobs. It’s a good idea to check the contents listed on the package before buying, just in case. Having a utility knife and extra sandpaper on hand is also useful for a smoother finish.
When comparing repair kits for small versus medium holes, is there a noticeable difference in the finish or how easily the patch blends in with the surrounding wall texture? I want to avoid obvious repairs but don’t want to overcomplicate a simple fix.
Yes, there can be a noticeable difference. Kits for small holes (like nail or screw holes) often use lightweight spackle or filler, which usually blends easily and is almost invisible after sanding and painting. Medium-hole kits often include mesh patches, which may require more careful sanding and sometimes extra feathering with joint compound to blend smoothly with the wall texture. For the most seamless result, pay close attention to sanding and feathering the edges, regardless of kit size.
When dealing with a larger hole from a plumbing repair, is it realistic to expect a DIY kit to provide everything needed for a multi-step repair, or do you usually end up making extra trips to the hardware store for backing material or extra joint compound?
For larger holes, most standard drywall repair kits may not include enough joint compound or the necessary backing material like wood supports. While kits are convenient for small patches, tackling bigger repairs often means you’ll need to pick up extra supplies separately. It’s realistic to expect at least one additional trip to the hardware store for a more durable, seamless fix.