


Introduction: Why DIY Electrical Panel Maintenance Matters
When it comes to home maintenance, the electrical panel is often overlooked—until something goes wrong. Yet, this central hub is the heartbeat of your home’s electrical system. Regular inspection and light maintenance can prevent costly outages, reduce fire risk, and help you spot minor issues before they become big problems. For confident DIYers equipped with the right tools and knowledge, basic panel maintenance is both manageable and smart. This guide covers everything you need: essential tools, the safest DIY process, detailed step-by-step instructions, vital safety protocols, and key warning signs that mean it’s time to call a pro. Whether you want to extend your panel’s lifespan, prepare for future upgrades, or simply gain peace of mind, understanding how to care for your home’s electrical panel is a valuable—and empowering—skill. Let’s demystify the process, dispel the intimidation, and help you keep your home’s power running safely and smoothly.
Understanding Your Home Electrical Panel
What Is an Electrical Panel?
Your home’s electrical panel (also called a breaker box or load center) is where incoming utility power is distributed to individual circuits throughout your house. Inside, you’ll find circuit breakers (or sometimes fuses), which protect wiring and devices from overloads and short circuits. A well-maintained panel is crucial for both safety and reliability.
Common Panel Types and Locations
- Main panels: Typically found in basements, garages, or utility rooms. They control all household circuits.
- Subpanels: Smaller panels serving specific areas (like an addition or workshop). Maintenance concepts are similar.
When Should You Inspect or Maintain Your Panel?
- Annually, as part of your home’s safety routine
- After major electrical storms or power surges
- Before and after high-power upgrades (EV charger, HVAC, etc.)
- If you notice odd behavior: flickering lights, tripped breakers, or burnt smells
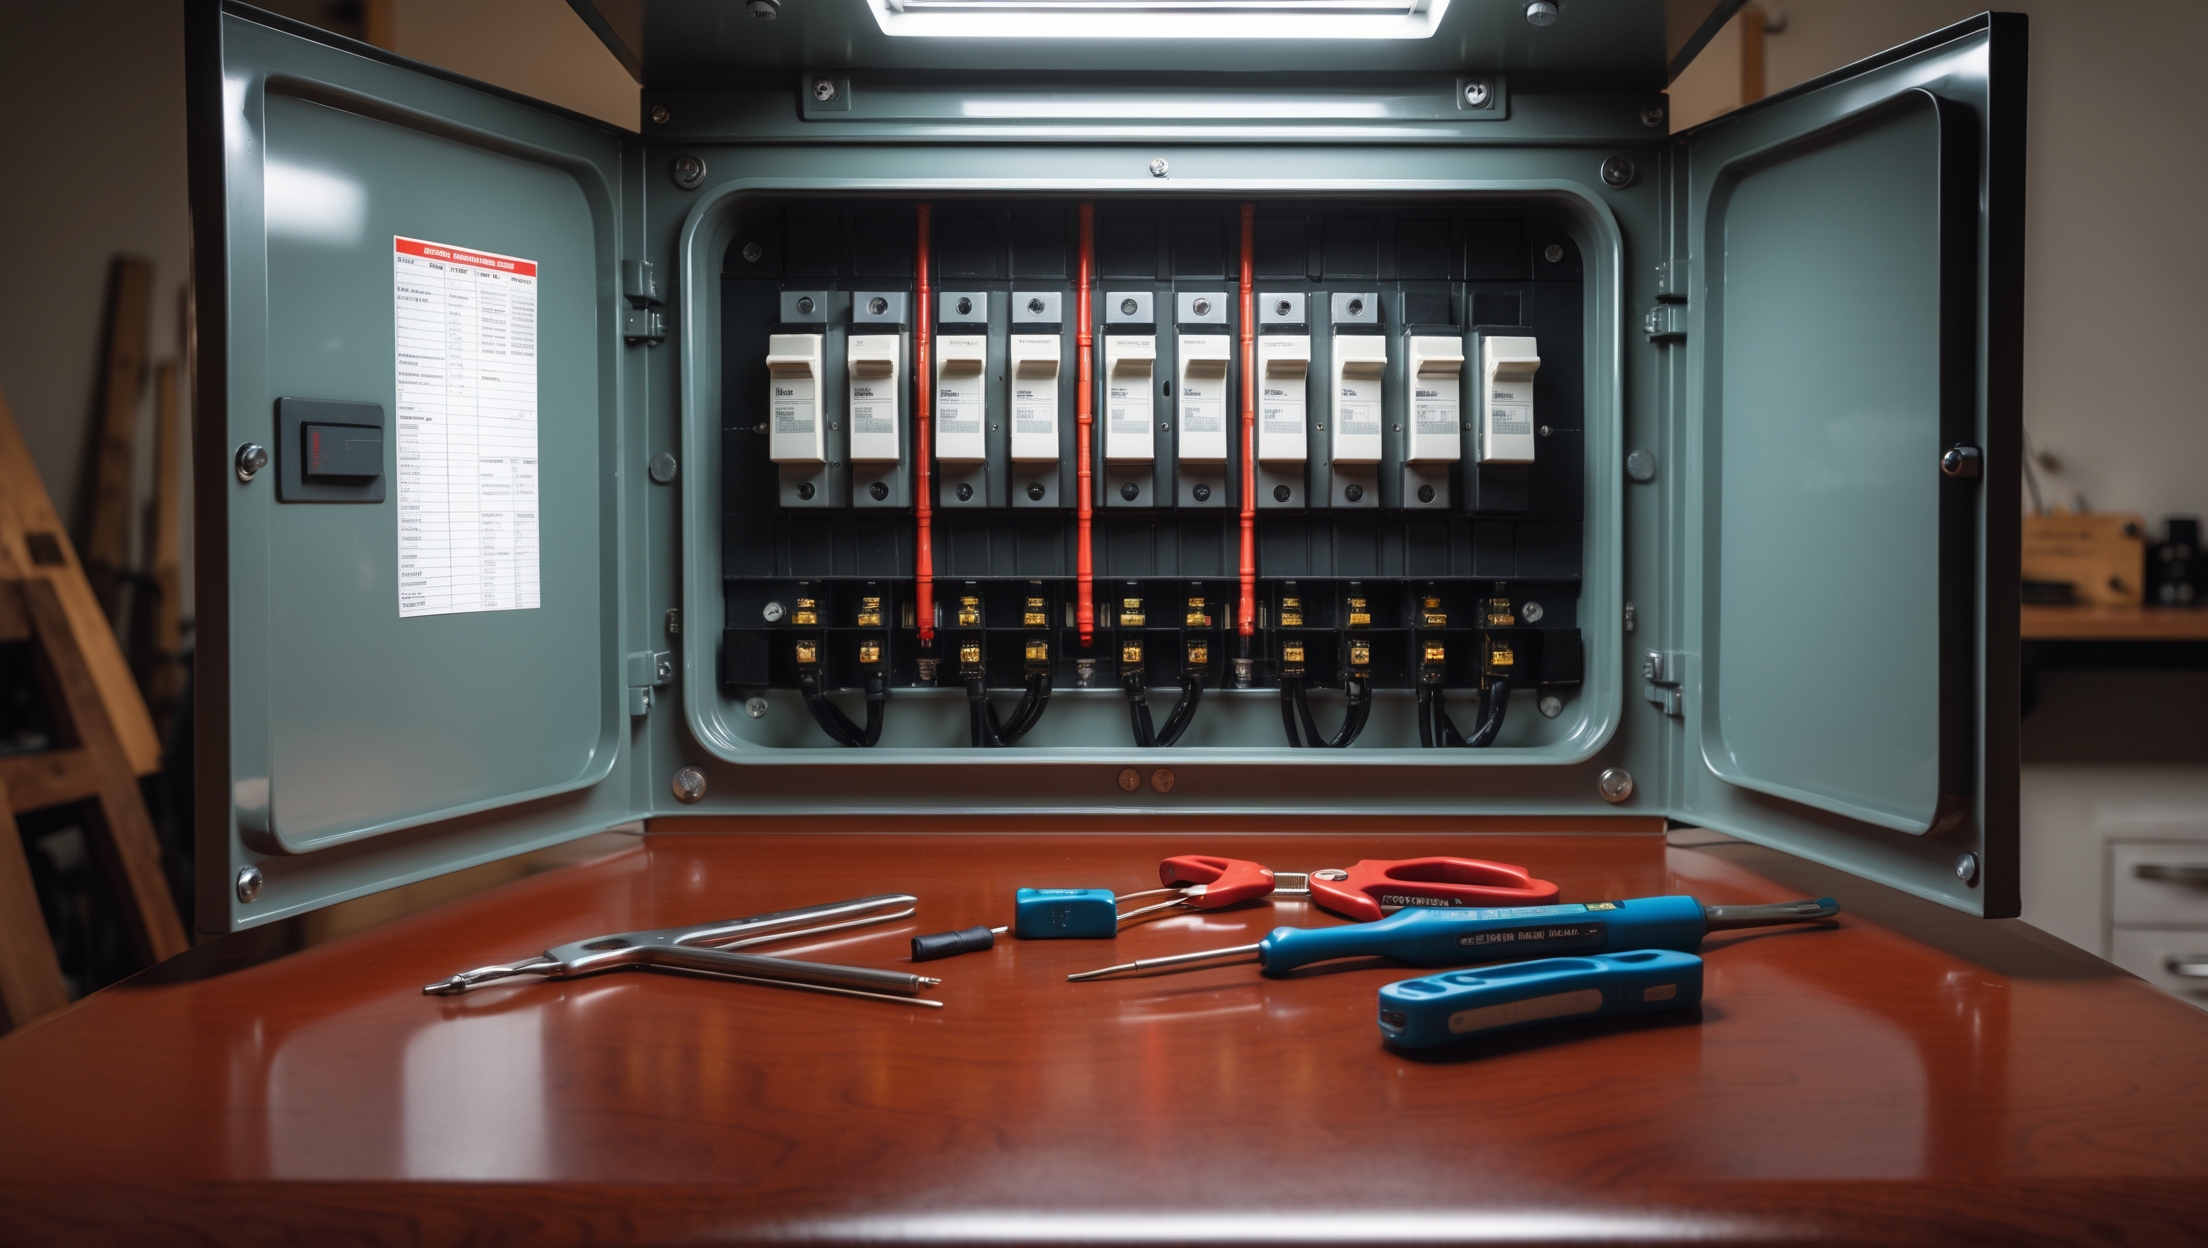
Essential Tools and Equipment for Panel Maintenance
Must-Have Tools
- Insulated screwdriver set: For removing panel covers and tightening connections. Insulation reduces shock risk.
- Non-contact voltage tester: Instantly checks if wires or breakers are live—essential for safety.
- Multimeter: Measures voltage, continuity, and occasionally amperage for deeper diagnostics.
- Headlamp or magnetic LED work light: Panels are often in dim spaces. Good lighting is crucial for accuracy and safety.
- Wire brush: Cleans corrosion from terminals (never use steel wool).
- Shop vacuum: For dust and debris inside the panel box.
- Protective gloves and safety glasses: Always wear both when working around live electricity.
Nice-to-Have Extras
- Thermal camera or infrared thermometer: Detects hot spots that indicate loose or overloaded connections.
- Label maker or permanent marker: For clear, lasting breaker labels.
- Replacement screws: In case panel cover hardware is missing or stripped.
DIY Electrical Panel Maintenance: A Step-by-Step Process
Step 1: Preparation and Safety First
- Notify household members you’ll be working on the panel. Avoid distractions.
- Wear rubber-soled shoes and stand on a dry, insulated surface (like a rubber mat).
- Gather your tools and check your workspace for water, clutter, or anything that could cause slips or accidents.
- Turn off sensitive electronics (computers, TVs) in case you need to flip breakers during inspection.
Step 2: Inspect the Panel Exterior
- Check for obvious issues: rust, water stains, or scorch marks on or around the panel.
- Ensure the panel door closes securely and isn’t blocked by storage or debris.
- Verify that the panel’s labeling is legible and up-to-date. Relabel as needed.
Step 3: Open the Panel Cover Safely
- Double-check the panel area with a non-contact voltage tester before touching anything.
- Use an insulated screwdriver to carefully remove panel cover screws. Set screws aside in a small tray or cup.
- Slowly lift the cover, keeping fingers away from the interior. Never touch wires or breaker terminals inside.
Step 4: Visual Inspection Inside
- With a headlamp, look for:
- Loose or frayed wires
- Corrosion or discoloration on terminals or bus bars
- Signs of overheating (melted insulation, dark spots, or a burned smell)
- Rodent nests, dead insects, or debris (use a vacuum with caution—never touch wires with the hose!)
- Check breaker handles for cracks or broken plastic.
Step 5: Check for Live Circuits
- Use a non-contact voltage tester on each breaker and exposed wire. If any part of the panel is unexpectedly live, stop and call an electrician.
- Never attempt maintenance on the main service wires at the top of the panel. They are always live, even if you turn off the main breaker.
Step 6: Tighten Connections (If Comfortable)
- Gently check for loose breaker mounting screws and terminal screws with an insulated screwdriver. Do NOT overtighten.
- If you find a loose neutral or ground connection, snug it gently. If in doubt or if you see arcing or melted insulation, stop and call a professional.
Step 7: Clean Out Panel Dust and Debris
- Use a shop vacuum to gently remove dust, cobwebs, and debris. Avoid contact with wires.
- If corrosion is present on neutral or ground bars, lightly use a wire brush (with the panel de-energized if possible—otherwise, call a pro).
Step 8: Check for Overheating (Optional)
- With an infrared thermometer or thermal camera, scan breakers and bus bars for temperature differences. Hot spots can indicate overloaded or loose connections.
- Note any readings above 120°F (49°C) and consult an electrician for further evaluation.
Step 9: Replace the Panel Cover and Restore Order
- Ensure all tools are accounted for and no debris remains inside the panel.
- Carefully replace the panel cover, using the original screws. Avoid cross-threading or overtightening.
- Test the door swing and make sure all labels are visible and legible.
Step 10: Test Breakers and Circuits
- Switch each breaker off and on one at a time, listening for clicks and checking for smooth movement. Do not force stuck breakers.
- Verify that power returns to each circuit and that sensitive devices (like clocks and computers) are functioning.
Safety Checklist: DIY Electrical Panel Maintenance
- Never touch the main service wires—these are always live and deadly.
- Work only with one hand inside the panel (keep the other behind your back) to reduce shock risk.
- Never work on a wet floor or in damp conditions.
- Always use insulated tools and personal protective equipment.
- If you see evidence of arcing, melted insulation, major corrosion, or a burned smell—STOP and call a licensed electrician.
- If you’re unsure about any step, prioritize safety and consult an expert.
When to Call a Professional
Some situations require a licensed electrician—no exceptions. Call a pro if you notice:
- Persistent tripping breakers that reset but trip again
- Scorch marks, melted plastic, or a hot electrical panel
- Water leaks or heavy rust inside the panel
- Loose main service wires
- Corroded or damaged bus bars
- Signs of pests or heavy debris that can’t be safely removed
Also, any upgrades involving new circuits, subpanels, or major rewiring should always be left to professionals. DIY maintenance is for inspection, cleaning, labeling, and basic tightening—not for replacing breakers or modifying wiring.
Maintenance Best Practices and Preventative Tips
- Check your panel every 12 months, or after any major power event (storms, surges, etc.).
- Keep a log of inspection dates, findings, and any maintenance performed. This record can be invaluable during home sales or insurance claims.
- Update your breaker labels anytime you change room layouts or add new appliances.
- Install a whole-house surge protector if you live in an area prone to lightning or utility surges.
- Keep the area around the panel clear—don’t block access with storage, coats, or furniture.
- Consider a leak sensor or humidity monitor if your panel is in a basement or garage.
Common Myths About Electrical Panel Maintenance—Debunked
- Myth: “If my breakers don’t trip, my panel is fine.”
Reality: Breakers can fail silently, and underlying issues may not cause immediate trips. - Myth: “Panels are maintenance-free.”
Reality: Dust, corrosion, loose screws, and label confusion are common without regular checks. - Myth: “Only old panels need attention.”
Reality: Even newer panels can develop issues from installation errors, pests, or environmental factors. - Myth: “I can fix anything myself with YouTube.”
Reality: DIY is for basic inspection and cleaning—not for rewiring or breaker replacements. Know your limits.
Conclusion: Take Control of Your Home’s Electrical Safety
Maintaining your home’s electrical panel might sound intimidating at first, but with the right tools, a methodical approach, and a strong emphasis on safety, it’s a task well within reach for many DIYers. Regular inspections help you catch minor issues before they escalate, keep your circuits running smoothly, and extend the lifespan of your electrical system. Remember, DIY maintenance is about prevention and peace of mind—never about taking unnecessary risks. Always respect the power of electricity and don’t hesitate to bring in a professional for anything outside your comfort zone. By making panel checks part of your annual home routine, you’re investing in your property’s safety, reliability, and value. Take pride in your role as a proactive homeowner, and keep your panel—and your home—running at its best for years to come.


When doing annual electrical panel maintenance as suggested, what are some clear warning signs I should watch out for that mean it’s time to stop and call a pro instead of continuing with DIY?
If you notice a burning smell, scorch marks, buzzing or crackling sounds, or if breakers are hot to the touch, stop immediately and call a professional. Also, if you see melted wires, loose or sparking connections, or experience repeated breaker trips even after resetting, it’s best to let a licensed electrician handle it. Your safety is always the top priority in these situations.
For someone who isn’t super handy but wants to try basic panel maintenance, what are the absolute must-have tools from your recommended list, and are any of them safe to borrow rather than buy? I want to stay safe but also keep it budget-friendly.
If you’re just starting out, the must-have tools are insulated screwdrivers, a non-contact voltage tester, and safety gloves. These are essential for both safety and effectiveness. Borrowing the voltage tester and screwdrivers is perfectly fine as long as they’re in good condition, but I recommend buying your own safety gloves for hygiene and proper fit.
When inspecting my electrical panel annually like you suggest, are there certain signs of wear or damage I should be especially concerned about if my house was built in the 1980s? I’m a little nervous about accidentally missing something important since the panel is original.
For a 1980s panel, look closely for signs like rust, scorch marks, or discoloration on wires and breakers. Check for any loose screws, buzzing sounds, or a burning smell. Older panels may also have outdated or recalled breaker models—if you see labels like Federal Pacific or Zinsco, it’s wise to consult an electrician. If you notice any of these issues, or if breakers trip often, it’s best to have a licensed professional inspect the panel for safety.
I noticed you mentioned inspecting the panel after electrical storms or surges. Are there any specific signs I should look for inside the panel that might indicate damage from a recent storm, or is a visual inspection enough for most DIYers?
When inspecting your panel after a storm, look for obvious signs like burnt or discolored wires, melted insulation, scorch marks, or a burnt smell. Check for tripped breakers that won’t reset or corrosion on connections. A careful visual inspection is usually enough for most DIYers, but if you notice anything unusual or feel unsure, it’s safest to call a licensed electrician.
I noticed you talked about both main panels and subpanels—do the maintenance steps differ at all for subpanels, or is the process exactly the same as for the main electrical panel?
The maintenance steps for subpanels are very similar to those for main panels, including safety precautions and checking for loose connections or signs of damage. However, one key difference is that subpanels should have their feeders turned off at the main panel before starting any work. Also, subpanels don’t have the main breaker, so be extra careful to identify the correct circuits. Otherwise, the process stays much the same.
If my electrical panel is located in a finished basement behind drywall, are there any extra precautions I should take before starting maintenance or inspection? The guide mentions common locations, but I’m not sure how to safely access mine.
When your electrical panel is behind drywall in a finished basement, extra care is important. Before starting, make sure you know exactly where the panel is and that you have clear, safe access—avoid cutting into walls unless you’re certain about the panel’s location and there are no hidden wires or pipes. Turn off power at the main breaker if possible, and use a stud finder to check for obstructions. If access seems complex, consider consulting an electrician to avoid damaging your home or risking injury.
If I plan to add a high-power device like an EV charger, should I do my panel maintenance before or after the installation? Also, are there extra steps to take in this situation?
It’s best to do any necessary panel maintenance before installing a high-power device like an EV charger. This ensures your panel is in good shape and ready to handle the increased load. Extra steps include checking if your panel’s amperage and circuit capacity are sufficient for the charger’s requirements, and making sure all connections are secure. Consulting a licensed electrician is highly recommended for safety and code compliance.
The article mentions inspecting the panel after a major electrical storm or power surge. What exactly should I look for inside the panel that might indicate damage from a surge, and is it something I can spot without special tools?
After a major electrical storm or power surge, you should look for visible signs of damage such as burnt or discolored wires, melted insulation, or a noticeable smell of burning near the electrical panel. Also, check if any breakers are tripped or won’t reset. Most of these signs can be seen without special tools, but always turn off the main power and use caution when opening the panel.
If I add a high-powered appliance like an EV charger, should I be doing the same kind of regular maintenance on any subpanel that serves it, or does that require a different approach compared to the main panel?
You should perform similar regular maintenance on a subpanel serving an EV charger as you would on your main panel. This includes checking for loose connections, corrosion, and signs of overheating. However, because an EV charger draws significant power, it’s extra important to ensure all components are rated for the load and to check for any signs of wear more frequently. If you’re ever unsure, consulting a licensed electrician is a good idea.
I’m new to this and wondering what essential tools I really need for safe electrical panel inspection. Can most of them be found at a regular hardware store, or are there any specialty tools required just for this job?
For a basic and safe electrical panel inspection, you’ll need a non-contact voltage tester, insulated screwdriver set, flashlight, gloves, and safety goggles. All of these are commonly available at regular hardware stores. Specialty tools aren’t typically required unless you’re doing advanced diagnostics or repairs. Just remember to always turn off the main power before starting any inspection.
If someone is planning to install a high-power device like an EV charger or HVAC unit, should they do a full panel maintenance beforehand, or is it better to have a professional inspect it right away? I’m curious about the safest approach before starting a major upgrade.
Before installing a high-power device such as an EV charger or HVAC unit, it’s safest to have a licensed electrician inspect your electrical panel. A professional can assess whether your panel can handle the increased load and check for any issues that DIY maintenance might miss. This ensures that your upgrade is both safe and up to code.
For DIYers, how can you tell the difference between maintenance you can handle yourself versus warning signs that mean it’s time to call in a professional? I’m confident with basics like tightening connections, but don’t want to miss something more serious.
It’s great that you’re confident with basics like tightening connections. You can usually handle tasks such as checking for loose wires, cleaning dust, or replacing panel covers. However, if you notice burnt smells, scorch marks, buzzing sounds, frequently tripping breakers, or any signs of melting or corrosion, these are serious issues that should be inspected by a licensed electrician. When in doubt, prioritize safety and consult a professional.
If my main panel is in a finished basement and not super accessible, do you have tips for safely removing the cover and accessing breakers and bus bars for inspection? I’m worried about tight spaces and potential hazards that might not be covered in a more open utility room setup.
When working in a tight, finished basement, clear as much space as possible around the panel before starting. Use a flashlight or headlamp to improve visibility. Stand on a dry, insulated surface, and keep tools organized within easy reach. If the cover is heavy or awkward, have someone nearby to help hold it. Be mindful of moisture and ensure you do not touch any live components. If you feel cramped or uncertain, it’s best to call a licensed electrician for added safety.
If someone recently installed a high-power device like an EV charger and started noticing flickering lights or tripped breakers, does your guide suggest any immediate troubleshooting steps before scheduling an electrician?
If you notice flickering lights or tripped breakers after installing a high-power device like an EV charger, the guide suggests first turning off the charger and checking if the problems stop. Inspect your panel for any obvious loose wires or signs of overheating, but don’t attempt repairs yourself. Avoid running other heavy appliances on the same circuit. If issues persist, it’s safest to turn off the affected breaker and contact a licensed electrician.
The article mentions inspecting the electrical panel annually and after major electrical storms or surges. What specific signs should I look for inside the panel that may indicate storm or surge damage, and are there preventative steps a homeowner can take to minimize risk before a storm hits?
Inside the panel, look for signs like scorch marks, melted insulation, a burnt odor, or tripped breakers that won’t reset, as these can indicate surge or storm damage. Rust or corrosion is another warning sign. To minimize risk before a storm, unplug sensitive electronics, install whole-house surge protectors, and ensure your grounding system is up to code. Regular inspections and prompt repairs also help protect your electrical system.
Could you clarify what are some of the ‘key warning signs’ that mean it’s time to call a professional instead of handling it myself? Sometimes it’s hard to tell when a flickering light is just a bulb or something more serious with the panel.
Some important warning signs to watch for include frequent circuit breaker trips, persistent burning smells near the panel, buzzing or crackling sounds from the panel, visible scorch marks, or any signs of melted wires. If you notice these issues, or if a breaker won’t reset, it’s safest to call a licensed electrician rather than attempting repairs on your own. Occasional flickering lights can be a simple fix, but if it happens regularly with multiple fixtures, it could signal a bigger electrical problem.