


Introduction: Why DIY Faucet Replacement is Worth Learning
Few home upgrades offer the instant satisfaction and practical value of replacing an old or leaking faucet. Whether you’re dealing with a persistent drip, outdated fixtures, or simply craving a kitchen or bathroom refresh, learning to replace a faucet yourself can save time, money, and the hassle of scheduling a plumber. But while it’s a popular DIY project, faucet replacement is not as straightforward as tightening a few bolts. The success of your installation hinges on using the right tools, following precise steps, and avoiding common pitfalls that can lead to leaks or damaged pipes. In this comprehensive guide, we’ll walk you through every aspect of DIY faucet replacement—from assembling your toolkit and prepping the workspace to mastering each installation step and troubleshooting unexpected issues. With detailed instructions, practical tips, and expert advice, you’ll gain the confidence to tackle this essential home repair safely and efficiently.
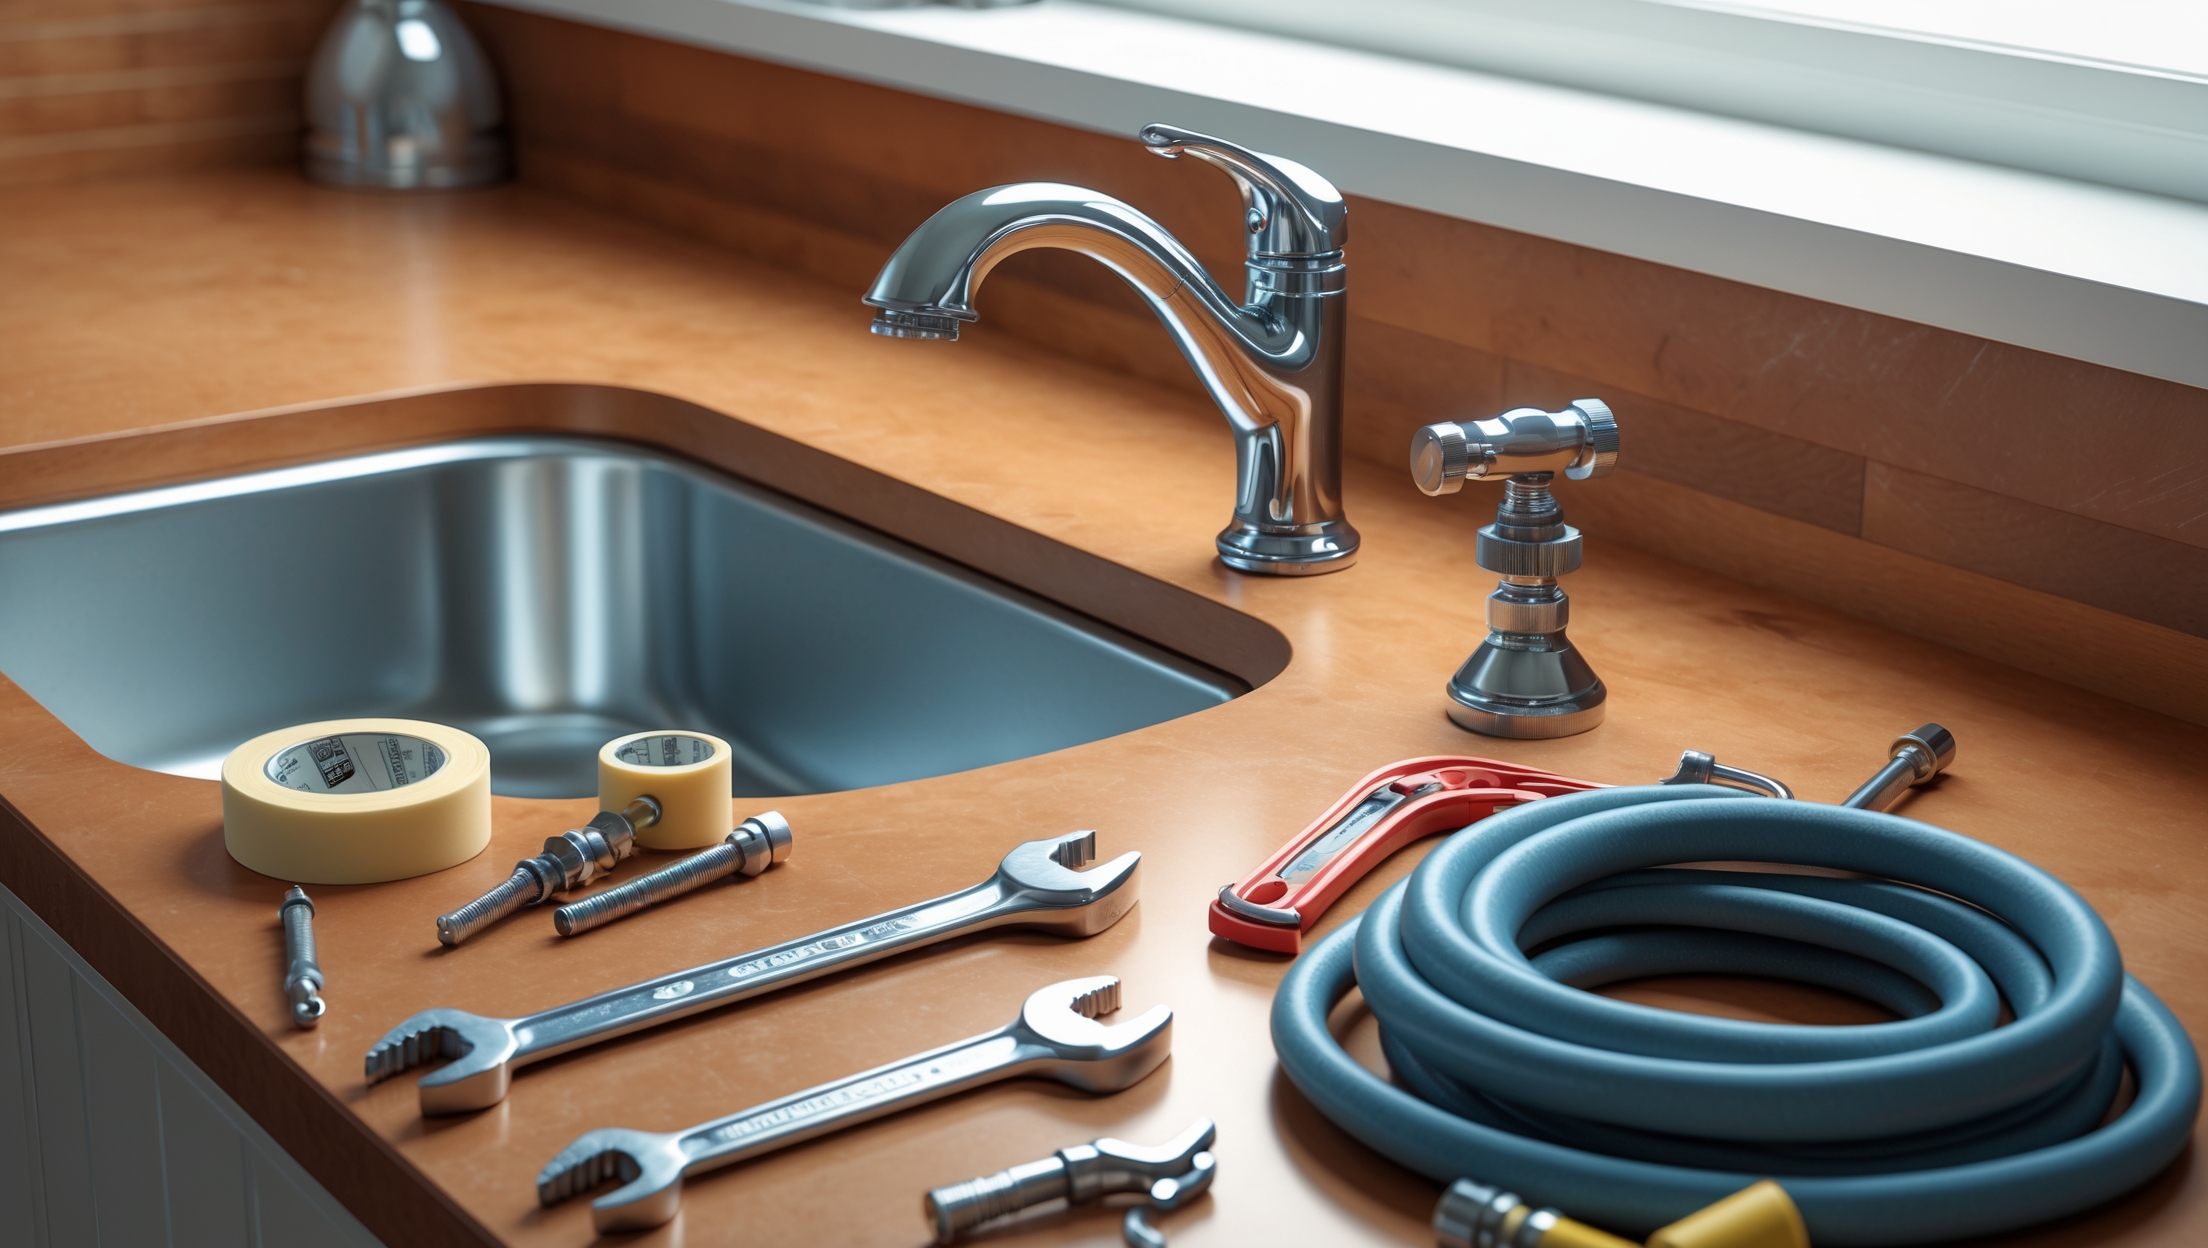
Essential Tools & Materials: What You Really Need
Tool Checklist
- Adjustable wrench – For loosening and tightening supply line connections.
- Basin wrench – Specially designed to reach and turn fasteners under sinks.
- Channel-lock pliers – Useful for gripping and stabilizing various plumbing parts.
- Plumber’s tape (Teflon tape) – Ensures watertight threaded connections.
- Putty knife – For scraping away old sealant or caulk.
- Bucket and towels – To catch water and keep the workspace dry.
- Flashlight or headlamp – Improves visibility in cramped, dimly-lit cabinets.
- New supply lines (if needed) – Flexible braided hoses are easiest for DIYers.
- Plumber’s putty or silicone sealant – For sealing the faucet base (check manufacturer’s instructions).
- Cleaning supplies – Rags, sponge, and mild cleaner for prepping the sink area.
Faucet Selection
Choose a replacement faucet that matches your sink’s mounting style (single-hole, centerset, widespread, or wall-mounted). Double-check the number and spacing of mounting holes. Consider features like pull-down sprayers, filter integration, or touchless operation—just be prepared for extra steps if your sink or countertop needs modification.
Preparation: Getting Your Workspace and Sink Ready
1. Clear the Area
Empty the cabinet under the sink. Remove cleaning supplies, bins, or any stored items. You’ll need ample room to lay on your back and maneuver tools.
2. Shut Off Water Supply
Locate the hot and cold water shutoff valves under the sink. Turn them clockwise until fully closed. If valves are corroded or stuck, do not force them—this could break the valve stems. In older homes, you may need to shut off the main water supply.
3. Relieve Water Pressure
Turn on the existing faucet to drain any remaining water from the lines. Place a bucket under the connections to catch drips.
4. Gather Tools and Safety Gear
Have all tools and materials within reach before starting. Wear gloves to protect hands from sharp edges, and safety glasses if working under a metal sink.
Step-by-Step Faucet Removal
1. Disconnect Supply Lines
Use an adjustable wrench to loosen the nuts connecting the water supply lines to the faucet. If lines are stiff or corroded, apply gentle pressure—never overtighten or twist. For stubborn connections, a spritz of penetrating oil can help.
2. Remove Mounting Hardware
Under the sink, locate the nuts or mounting brackets holding the faucet in place. A basin wrench is invaluable here, as its long handle and pivoting jaw reach tight spaces inaccessible to other tools. Loosen and remove all fasteners.
3. Free the Faucet
Once all mounting hardware is removed, gently lift the faucet up and out from above the sink. If stuck due to old caulk or mineral deposits, carefully work a putty knife around the base to break the seal. Avoid using excessive force that could damage the sink surface.
4. Clean the Surface
Scrape away any old putty, silicone, or grime. Wipe the area with a damp sponge and let it dry completely. A clean, level surface ensures a proper seal for the new faucet.
Installing the New Faucet: A Detailed Walkthrough
1. Position the Faucet
Align the faucet’s shanks with the sink holes. If your new faucet has a gasket or rubber base, set it in place according to the manufacturer’s directions. If not, apply a thin bead of plumber’s putty or silicone to the underside of the faucet base.
2. Secure the Mounting Hardware
From beneath the sink, thread the mounting nuts or brackets onto the faucet shanks. Tighten them evenly using your basin wrench, checking above to ensure the faucet stays straight. Avoid overtightening, which can crack porcelain or deform metal sinks.
3. Connect Water Supply Lines
- Attach flexible supply lines to the faucet’s hot and cold inlets. Wrap threads with plumber’s tape for a leak-free fit.
- Connect the other ends to the shutoff valves. Hand-tighten, then snug with a wrench—do not overtighten, as this can damage fittings.
- If your faucet includes a pull-out sprayer, connect the quick-connect or threaded hose to the diverter outlet as directed.
4. Reassemble and Seal (If Required)
Install faucet handles, spout, or decorative escutcheons as needed. Wipe away any excess putty or sealant.
Testing and Troubleshooting: Ensuring a Leak-Free Installation
1. Restore Water Supply
Slowly turn the shutoff valves counterclockwise to restore water. Check for leaks at all connections under the sink—use a dry paper towel to detect small drips. Tighten fittings only if necessary.
2. Flush the Faucet
Remove the aerator from the faucet spout (if present). Run both hot and cold water for several minutes to flush out debris and check flow. Replace the aerator once water runs clear.
3. Inspect for Leaks and Finalize
Check under the sink again after several minutes. Pay attention to supply line connections, mounting hardware, and the faucet base. If you spot moisture, shut off the supply and retighten connections or reapply plumber’s tape as needed.
Common Pitfalls and How to Avoid Them
- Incorrect Faucet Size: Always confirm sink hole spacing and faucet dimensions before purchase. Trying to force a mismatched faucet can damage your sink or countertop.
- Overtightening Connections: More torque isn’t always better. Overzealous tightening can strip threads, crack ceramic, or deform gaskets, leading to leaks.
- Skipping Plumber’s Tape: Threaded connections should always be wrapped with plumber’s tape to prevent leaks. Make sure to wrap in the direction of the threads.
- Ignoring Valve Condition: Old or corroded shutoff valves may leak or fail. Replace them proactively if signs of wear are present.
- Poor Surface Prep: Failing to fully remove old putty or sealant can prevent a watertight seal, leading to leaks beneath the faucet base.
- Using Worn-Out Supply Lines: Always inspect supply lines for signs of wear or corrosion. Replace them if there’s any doubt.
- Not Flushing Debris: Skipping the flushing step can cause clogs in the faucet aerator or valves, affecting water pressure and causing irregular flow.
When to Call a Professional
- Stuck or rusted nuts: If you cannot loosen mounting hardware without risking damage, a plumber’s specialized tools may be needed.
- Deteriorated or leaking shutoff valves: Replacing supply valves may require soldering or crimping pipes—best left to professionals if you’re not confident.
- Unexpected pipe damage: Discovering cracks, corrosion, or leaks in the supply pipes themselves requires expertise to repair safely.
- Custom sink modifications: Drilling new holes or resizing existing ones for modern faucets may demand professional tools and skills.
Frequently Asked Questions
How long does a typical faucet replacement take?
For most DIYers, expect 1–2 hours if all tools and materials are ready. First-time installations may take longer due to tight spaces or tricky hardware.
Can I reuse old supply lines?
While possible, it’s best practice to install new lines with each faucet replacement. Old lines can corrode or weaken, increasing the risk of leaks.
Is plumber’s putty or silicone better for sealing?
Follow your faucet manufacturer’s recommendations. Putty is easier to remove for future repairs, while silicone offers superior water resistance for some materials.
What if my faucet handle is loose after installation?
Most faucet handles can be tightened with a small Allen wrench or screwdriver. Refer to the faucet manual for specific instructions.
Conclusion: Empowering Your DIY Skills for Future Projects
Replacing a faucet is a practical, high-impact DIY project that enhances both the appearance and function of your kitchen or bathroom. By assembling the right tools, following a systematic installation process, and understanding common mistakes, you can achieve professional-quality results without the cost or wait of a plumber. This skill not only saves you money on future repairs but also builds confidence for tackling more advanced plumbing tasks. Remember, patience and preparation are your best allies—take time to select the correct faucet, double-check your fittings, and thoroughly test for leaks before considering the job complete. If you encounter unexpected obstacles, don’t hesitate to consult a professional; knowing your limits is part of being a great DIYer. With this guide, you’re equipped to handle faucet replacement and set the stage for more home improvements that make your space safer, more efficient, and uniquely yours. Happy DIYing!


When you mention replacing old supply lines, do you recommend going with braided hoses over the standard copper or plastic ones for all situations? I’d like to know if there are any drawbacks to using the flexible braided hoses that DIYers prefer.
Flexible braided hoses are very popular for DIY faucet replacements because they’re easy to install and reduce the risk of leaks during tightening. They’re generally reliable and suitable for most situations. However, their outer stainless steel layer can corrode if exposed to harsh cleaning chemicals or constant moisture, and very tight bends can cause kinking. Copper lines last a long time and are better in high-heat areas, while plastic is budget-friendly but less durable. For most home installations, braided hoses are a solid choice as long as they’re installed properly and checked periodically for wear.
If my old faucet has some stubborn caulk and mineral build-up around the base, does your guide suggest whether plumber’s putty or silicone is better for resealing when I install the new one? I want to avoid future leaks.
For resealing your new faucet, the guide recommends using silicone sealant rather than plumber’s putty. Silicone creates a waterproof, flexible seal that resists mold and mineral build-up, making it ideal for bathroom and kitchen faucets. Just be sure to thoroughly clean away the old caulk and mineral deposits before applying the silicone to ensure a long-lasting, leak-free installation.
How long should I expect the whole faucet replacement process to take for someone doing it for the first time? I’m trying to figure out if I need to set aside a full afternoon or if it’s quicker than that.
For a first-time DIYer, replacing a faucet usually takes between two to four hours, depending on your comfort level and whether you encounter any issues like stuck nuts or corroded parts. Setting aside a full afternoon is a good idea, as it gives you extra time for unexpected snags and clean-up without feeling rushed.
You talk about the importance of matching the faucet to the sink’s mounting style. If my current sink only has one hole but I want to install a centerset faucet, is there a safe and practical way to adapt the existing setup without replacing the whole sink?
If your sink has only one hole and you want to install a centerset faucet, adaptation options are limited. Centerset faucets typically require three holes. Drilling extra holes into most sinks is not recommended, as it could damage the sink or void its warranty. The safest approach is to choose a single-hole faucet or a centerset model designed to work with a single hole (sometimes they include a deck plate to cover unused holes, but not vice versa). Replacing the sink would be necessary for a true centerset faucet.
The step-by-step process sounds manageable, but I’m worried about stripping the supply line connections when using an adjustable wrench. Any tips for avoiding this kind of damage, especially for someone who’s never done plumbing repairs before?
To avoid stripping supply line connections, make sure to use an adjustable wrench that fits snugly on the nut—don’t overtighten. Hold the fitting steady with a second wrench if possible to prevent twisting. Turn slowly and stop if you feel resistance. If the nut feels stuck, a little penetrating oil and patience can help. Take your time and work carefully to minimize risk.
Can you elaborate on how to determine if I need to replace my supply lines during the faucet installation? Are there signs of wear or specific measurements I should check before deciding whether to reuse or buy new lines?
When checking your supply lines, look for visible signs of wear like cracks, corrosion, rust, or bulging. If the lines are several years old or have stiff, brittle areas, replacement is wise. Also, confirm the length and fitting size match your new faucet and shutoff valves. If the old lines don’t fit perfectly or show any damage, it’s safest to install new ones to prevent leaks.
Could you elaborate on the most common mistakes you see first-timers make during faucet replacement? I want to make sure I avoid leaks or damaging my pipes, especially since my plumbing is a bit older.
Absolutely. First-timers often forget to fully shut off the water supply, which leads to accidental leaks. Another common mistake is overtightening connections, especially on older pipes, which can cause cracks or stripped threads. Not cleaning the old mounting surface or failing to use plumber’s tape on threaded connections can also result in leaks. Take care when removing old fittings to avoid bending or damaging fragile pipes, and always check for leaks before finishing up.
The article says to use a basin wrench for hard-to-reach fasteners, but what if I don’t already own one? Is there a workaround, or is it really necessary to buy that tool for a typical bathroom sink faucet?
A basin wrench is designed to reach and turn fasteners in tight spaces under sinks, making the job much easier. If you don’t have one, you might be able to use an adjustable wrench or locking pliers, but it could be tricky and time-consuming, especially in cramped areas. If your sink has enough clearance, you might manage without it, but for most bathroom sinks, a basin wrench really helps and is worth considering.
Could you give a rough estimate of how long the entire faucet replacement process usually takes for someone who’s handy but not a pro? I’m hoping to plan this around my kids’ nap schedule.
For someone who’s handy but not a professional, replacing a faucet typically takes about 1.5 to 3 hours from start to finish. This includes gathering tools, shutting off water, removing the old faucet, installing the new one, and checking for leaks. If everything goes smoothly, you might finish closer to the shorter end of that range.
I noticed the checklist says to get new supply lines if needed. How do I know if my old supply lines are still okay to use, or if it’s safer to just replace them whenever I install a new faucet?
To decide if you should reuse your old supply lines, check for signs of wear like kinks, corrosion, rust, or cracking. If they’re over five years old or look worn, it’s usually safer to replace them, since leaks from old lines can cause water damage. Many people choose to replace supply lines whenever installing a new faucet for added peace of mind.
I only have basic tools like a regular wrench and pliers, but not a basin wrench. Is it really necessary for most under-sink setups, or are there workarounds you’d recommend for tight spaces?
A basin wrench is designed for tight spots under the sink, especially for reaching nuts in awkward places. If your faucet’s mounting nuts are accessible, your regular wrench and pliers might do the job. For very tight spaces, try using a socket wrench with an extension if you have one, or even a pair of locking pliers. Take your time and check for clearance before starting, but if access is limited, consider borrowing or renting a basin wrench to avoid frustration.
Do you have any tips for clearing out old caulk or sealant when prepping the sink area? I want to avoid scratching my countertop, but I also want to make sure the new faucet seals properly.
To remove old caulk without scratching your countertop, use a plastic putty knife or a caulk removal tool rather than metal blades. Gently work it under the caulk to lift it. If residue remains, apply a caulk remover gel and let it sit as directed before wiping away. After removal, clean the area with rubbing alcohol to ensure it’s residue-free before installing the new faucet.
When you mention using plumber’s putty or silicone sealant for the faucet base, how do I know which one is best for my specific faucet type? Are there certain materials or mounting styles that require one over the other?
If your faucet base is metal, plumber’s putty is usually suitable for a watertight seal unless the manufacturer says otherwise. For plastic or composite bases, or if your countertop is made of porous materials like granite, use silicone sealant since plumber’s putty can cause staining or may not adhere well. Always check your faucet’s installation guide, as some manufacturers specify which to use based on mounting style and material.
I noticed you mentioned using both plumber’s putty and silicone sealant for sealing the faucet base, depending on the manufacturer’s instructions. Is there any situation where one is clearly better than the other, or could using the wrong sealant cause leaks down the line?
Using the sealant recommended by your faucet’s manufacturer is important because some faucets are designed specifically for plumber’s putty, while others work better with silicone sealant. Using the wrong type can lead to poor adhesion or gaps, which might cause leaks over time. Plumber’s putty is generally easier to remove if you need to reseat the faucet, but silicone creates a more watertight, permanent seal. Always check the instructions to avoid any sealing issues.
I’m new to this kind of project and wondering how long a typical faucet replacement takes for a beginner. Is this something I should plan for an afternoon, or could it end up being an all-day job if I run into problems?
For most beginners, replacing a faucet usually takes about two to four hours if everything goes smoothly. It’s wise to plan for an afternoon, but be prepared for the job to take longer if you encounter stuck parts, stubborn old fittings, or unexpected leaks. Giving yourself extra time just in case will help avoid frustration and let you work at a comfortable pace.
The article talks about common pitfalls that could lead to leaks or damage. What’s the most common mistake beginners make during faucet replacement, and how can I avoid it, especially if I have never worked under a sink before?
One of the most common mistakes beginners make is not tightening the connections properly—either leaving them too loose, which can cause leaks, or overtightening, which can damage fittings. To avoid this, hand-tighten the nuts first, then use a wrench to give a final snug turn, but stop as soon as you feel resistance. Always check for leaks after turning the water back on.
I saw that a basin wrench is listed as essential, but I don’t own one—is there a workaround if I only have regular adjustable wrenches and pliers? Or is it worth buying just for one project?
A basin wrench is designed to reach and turn the hard-to-access nuts under your sink, making faucet removal much easier. While you might manage with adjustable wrenches or pliers if there’s enough space, it can be quite challenging and time-consuming. If your faucet connections are tucked away, buying a basin wrench can save you frustration and potential knuckle scrapes, even for a single project. Many hardware stores also offer tool rentals if you prefer not to buy one.
If my current faucet has some tight spots and corrosion underneath, is a basin wrench usually enough to loosen those fasteners, or should I be prepared with any extra tools or tricks for stubborn cases?
A basin wrench is very helpful for reaching tight spots, but if there’s significant corrosion, you might need extra tools. It’s wise to have penetrating oil to loosen rusted fasteners, and possibly a pair of locking pliers or a small hacksaw in case nuts are too seized to remove. Sometimes gently tapping the fastener with a hammer can help break up corrosion before applying the wrench.
About how long does a typical DIY faucet replacement usually take for someone doing it for the first time, including gathering tools and cleaning up? I have a busy evening schedule and I’m not sure how much time to set aside.
For a first-time DIY faucet replacement, you should set aside about 2 to 3 hours. This time includes gathering all necessary tools, removing the old faucet, installing the new one, and cleaning up afterward. If you encounter stubborn old parts or hard-to-reach connections, it might take a bit longer, so it’s smart to give yourself some extra buffer just in case.
The checklist suggests replacing the supply lines if needed, but how do I know whether my current ones actually need replacing? Are there any signs I should look for before deciding to reuse or replace them?
To determine if your supply lines need replacing, look for signs of wear such as rust, corrosion, cracks, bulging, or leaks near the fittings. If the lines feel brittle, show visible damage, or are more than 5 years old, it’s safer to replace them. Also, if the fittings are hard to loosen or the hoses look kinked, that’s another indicator. Replacing older or questionable lines helps prevent leaks down the road.
About selecting new supply lines, is there a major difference in reliability or lifespan between flexible braided hoses and the standard copper supply lines? I want to avoid future leaks, so any insight on what most homeowners prefer for DIY jobs would be great.
Flexible braided hoses are popular for DIY faucet replacements because they’re easier to install and generally reliable. They resist bursting and kinking, but some homeowners prefer copper supply lines for their long-term durability and resistance to deterioration. Most DIYers choose braided hoses for convenience, but whichever you pick, make sure the connections are tight and check manufacturer warranties for peace of mind. Regularly inspect for signs of wear to prevent leaks.
The article mentions using plumber’s tape for threaded connections. Is there a specific type or brand you recommend for beginners to avoid leaks, or is any Teflon tape from the hardware store sufficient?
Any standard white Teflon (PTFE) tape from your local hardware store will work well for most household faucet connections. For beginners, look for tape labeled as suitable for water pipes. You don’t need a special brand—just avoid tapes specifically marked for gas lines, which are usually yellow. Apply the tape snugly around the threads two to three times for a good seal and to help prevent leaks.
When replacing a faucet in older homes, have you run into issues with stuck or corroded supply line connections? The article mentions channel-lock pliers and an adjustable wrench—do you have any tips for safely dealing with stubborn fittings without damaging the pipes?
Dealing with stuck or corroded supply line connections is common in older homes. To avoid damaging pipes, try spraying a penetrating oil on the fittings and let it sit for 10–15 minutes before loosening. Use two wrenches—one to hold the pipe steady and the other to turn the fitting—to reduce stress on the pipes. Avoid excessive force and, if needed, use a heat gun gently to help loosen metal fittings, but be cautious near plastic parts.
Is a basin wrench really necessary for a basic kitchen faucet swap, or can I get by with just an adjustable wrench and channel-lock pliers? Trying to keep my tool purchases minimal for this first-time project.
You can sometimes get by with just an adjustable wrench and channel-lock pliers, especially if there’s enough space under your sink and the old faucet’s mounting nuts aren’t stuck. However, a basin wrench is designed for those hard-to-reach spots behind the sink, making removal and installation much easier. If you want to avoid frustration and scraped knuckles, borrowing or renting a basin wrench could be worthwhile for your first-time project.
When replacing a faucet, how do you know whether you should use plumber’s putty or silicone sealant at the base? The article mentions checking manufacturer instructions, but are there general situations where one is better than the other?
Plumber’s putty is typically used for sealing the base of metal faucets on sinks where you want a watertight but removable seal. Silicone sealant is better for non-metal or plastic faucets, or when you need a permanent, waterproof bond. If your countertop is made of materials like granite or marble, silicone is often preferred to avoid staining. When in doubt, check the faucet finish and sink material—this usually helps guide your choice.
If I don’t already have a basin wrench, can I substitute something else from a basic toolbox, or is it essential for loosening those hard-to-reach fasteners under the sink?
A basin wrench is specifically designed to reach and turn fasteners in tight spaces under the sink, making the job much easier. While you might be able to use adjustable pliers or a socket wrench in some cases, they rarely fit well in the confined area and can make the task much harder. For most faucet replacements, a basin wrench is strongly recommended to avoid frustration and ensure you can loosen those tricky fasteners safely.
In the section about essential tools, you mention both plumber’s putty and silicone sealant for sealing the faucet base. Are there cases where one is preferred over the other, or should I always check the faucet manufacturer’s recommendation?
Plumber’s putty and silicone sealant serve similar purposes, but their suitability depends on your faucet and sink materials. Plumber’s putty is often used for metal sinks and traditional faucet bases, while silicone sealant is better for non-metal or porous surfaces and prevents water seepage more effectively. It’s always best to check your faucet manufacturer’s guidelines, as some finishes or materials can react poorly with putty or silicone.
I know a basin wrench is on the tool checklist, but if I don’t have one, are there any alternative tools that could work, or is a basin wrench really essential for most modern faucets?
A basin wrench is designed specifically for reaching and loosening the nuts behind a sink, which can be tricky to access with standard tools. If you don’t have one, you might try using a pair of long-handled adjustable pliers or a socket wrench with an extension, but these can be awkward and may not fit in tight spaces. For most modern faucets, a basin wrench makes the job much easier and helps avoid damaging fittings.
The article mentions that using the correct type of plumber’s putty or silicone sealant depends on the manufacturer’s instructions. Is there a way to tell which one is better for preventing leaks around the faucet base?
The best way to know whether to use plumber’s putty or silicone sealant is to check the faucet manufacturer’s instructions, as some finishes or materials can be sensitive to certain sealants. If instructions aren’t available, plumber’s putty is generally good for most metal sinks, while silicone is better for non-metal or delicate surfaces, as it creates a watertight seal. Using the recommended product is key to preventing leaks and protecting the faucet’s finish.
About replacing supply lines—are there any signs I should look for to determine if the old lines really need to be swapped out, or is it just safer to always install new ones during a faucet replacement?
When replacing a faucet, it’s wise to inspect the old supply lines for any signs of corrosion, rust, cracking, stiffness, or leaks. If the lines look worn or are several years old, replacing them can help prevent future leaks. Even if they look fine, many pros recommend installing new supply lines as a precaution for better long-term reliability.
I’m planning to replace my old bathroom faucet over the weekend. Realistically, how long should I expect the whole process to take if I’ve never done any plumbing work before, including prep and clean-up?
If you’re new to plumbing, set aside about 2 to 4 hours for the entire faucet replacement, including gathering tools, prepping the area, doing the actual installation, and cleaning up afterward. The time can vary depending on how easily the old faucet comes out and if you run into any issues like stuck parts or unexpected leaks.
I’m curious about the removal process for really stubborn old faucets, especially ones that have corroded connections or gunky buildup. Are there any extra tools or tips you’d recommend for tackling tough removals and avoiding damaging the sink or pipes?
For stubborn, corroded faucets, penetrating oil like WD-40 is helpful—apply it to the threads and let it soak in for a while. A basin wrench is essential for hard-to-reach nuts, while a pair of tongue-and-groove pliers can provide extra grip. If buildup is severe, gently use a wire brush. Always support pipes with one hand while loosening fittings to avoid twisting or damaging them. Go slowly and avoid using too much force.
If I’m replacing a leaky kitchen faucet for the first time, about how long should I expect the whole project to take from start to finish, including setup and clean up?
If this is your first time replacing a kitchen faucet, you should plan for the project to take about 2 to 3 hours from start to finish. This includes gathering your tools, shutting off the water, removing the old faucet, installing the new one, checking for leaks, and cleaning up. Giving yourself extra time helps if you run into any unexpected issues.
Can you clarify how long the whole faucet replacement process usually takes for someone doing it the first time, and are there any steps where most people end up spending more time than expected?
For someone replacing a faucet for the first time, the process generally takes 2 to 4 hours. Most people spend extra time on removing the old faucet, especially if there’s corrosion or hard-to-reach mounting nuts underneath the sink. Preparing the work area and checking for leaks after installation can also take longer than expected, so it’s a good idea to allow some extra time for those steps.
Could you clarify what to look for when deciding if my old supply lines need replacing, or if it’s safe just to reuse the existing ones? I want to avoid any leaks down the line but also keep costs low.
When checking your old supply lines, look for visible wear such as cracks, bulges, rust, or brittleness. If you see corrosion on the fittings or any signs of leakage, it’s best to replace them. If the lines are flexible braided stainless steel and appear in perfect condition, you can sometimes reuse them, but if they’re more than 5-10 years old, replacement is safer to avoid future leaks.
The guide lists a basin wrench as an essential tool, but I don’t have one. Is there a realistic workaround for removing old fasteners under the sink, or is it worth picking one up even if I only plan to do this once?
While it’s sometimes possible to use adjustable pliers or a socket wrench with extensions to reach fasteners under the sink, those tight spaces can make it pretty frustrating without a basin wrench. If the nuts are hard to reach or stuck, a basin wrench will save you a lot of hassle, even for a one-time job. Many hardware stores rent them, too, if you don’t want to buy one.
How do you know if you really need to replace the supply lines when swapping out an old faucet? Are there any warning signs to look for, or is it fine to keep using the existing ones if they seem in good shape?
When replacing an old faucet, it’s a good idea to inspect the supply lines closely. Look for signs like corrosion, rust, cracks, stiffness, or any evidence of leaking. Even if they seem fine, supply lines can become brittle over time. If they’re several years old or original to the faucet, replacing them is usually safest to prevent future leaks. If they’re relatively new and in excellent condition, you might be able to reuse them, but always check the manufacturer’s recommendations.
If a faucet has been leaking for a while and there’s old, stubborn caulk around the base, do you have tips for removing it without scratching porcelain sinks? Also, are there signs I should check for damage to the sink itself before installing the new faucet?
To remove old caulk without scratching porcelain, gently use a plastic putty knife or a caulk removal tool rather than metal scrapers. Softening the caulk with a hairdryer or a caulk remover gel can help. After removing the caulk, inspect the sink for chips, cracks, or discoloration—especially around the faucet holes. If you notice any damage, address it before installing your new faucet for a secure, watertight fit.
Could you explain how long the whole faucet replacement process typically takes for someone with minimal DIY experience, including the cleanup and troubleshooting steps you described?
For someone with minimal DIY experience, the entire faucet replacement process—including removing the old faucet, installing the new one, handling any troubleshooting, and cleaning up—usually takes around 2 to 4 hours. This time frame allows for careful work, following instructions, and addressing any small leaks or adjustments that might come up during installation.
How long does a typical DIY faucet replacement take for someone who’s never done it before? I have a pretty packed weekend and I’m trying to figure out whether I should set aside a whole afternoon or just a couple hours.
For someone replacing a faucet for the first time, it usually takes about two to four hours, depending on how easily the old faucet comes out and if you encounter any surprises like stubborn fittings or leaks. Setting aside a whole afternoon is a safe bet, especially if your schedule is tight, so you don’t feel rushed and have time for adjustments or clean-up.
How long should the whole faucet replacement process take for someone with little DIY experience, and are there any specific warning signs during the installation that signal I should stop and call a plumber instead?
For someone with little DIY experience, expect the faucet replacement to take about 2 to 4 hours. Watch for warning signs like unexpected water leaks that won’t stop, difficulty shutting off the water supply, or damaged plumbing connections. If you see rusted or corroded pipes, or if you can’t get a secure fit with the new faucet, it’s best to stop and call a plumber to avoid bigger issues.
How much time should I realistically set aside for this project if I have never replaced a faucet before, including cleanup and any unexpected issues that might come up?
If this is your first time replacing a faucet, it’s wise to set aside about 3 to 4 hours for the entire project. This includes gathering tools, reading instructions, the actual replacement, and a thorough cleanup. Allowing extra time also helps you handle minor surprises, like stubborn old fittings or small leaks, without feeling rushed.
I noticed the checklist includes both plumber’s tape and plumber’s putty. Could you clarify which situations call for plumber’s putty versus Teflon tape when sealing connections on a new faucet?
Plumber’s tape, or Teflon tape, is used on threaded pipe connections to prevent leaks—mainly on the water supply line threads. Plumber’s putty, on the other hand, is applied around the base of the faucet or under the drain flange to create a watertight seal between the fixture and sink. Use tape for threaded joints, putty for sealing between surfaces.
When it comes to sealing the faucet base, how do you decide between using plumber’s putty and silicone sealant? I saw you mentioned both, but I’ve heard manufacturers sometimes recommend one over the other. Would love to avoid leaks down the road.
Choosing between plumber’s putty and silicone sealant depends on the faucet and sink materials, as well as manufacturer instructions. Plumber’s putty is traditional for many metal sinks and faucets, but some modern faucets (especially with plastic or stone surfaces) require silicone for a stronger, waterproof seal. Always check the instructions that come with your faucet—using the recommended sealant ensures the best fit and prevents leaks.