


Introduction: Why Every Home Needs a Thoughtful DIY Plumbing Toolkit
Imagine a leaky faucet at midnight, a clogged drain on a weekend, or a loose pipe fitting just before guests arrive. For the prepared DIYer, these are minor inconveniences—not emergencies—thanks to a well-stocked plumbing toolkit. But if you’re just getting started, the overwhelming number of tools, brands, and price points can make building your toolkit a daunting task. Should you splurge on high-end wrenches, settle for budget pipe cutters, or buy those tempting all-in-one kits? And what’s the real cost to get started without sacrificing reliability or safety?
This guide breaks down exactly what you need for common home plumbing repairs and upgrades, how much you should expect to spend, and the best strategies to avoid overspending—whether you’re assembling your kit from scratch, upgrading a few essentials, or seeking specialty tools for specific projects. You’ll get a clear, itemized cost breakdown for basic, intermediate, and advanced toolkits, plus expert tips on where to save, when to invest, and how to avoid common financial pitfalls. By the end, you’ll be equipped with both the knowledge and the gear to tackle your next plumbing challenge—without draining your wallet.
The Essential Plumbing Toolkit: What Every DIYer Needs
Core Tools for Everyday Repairs
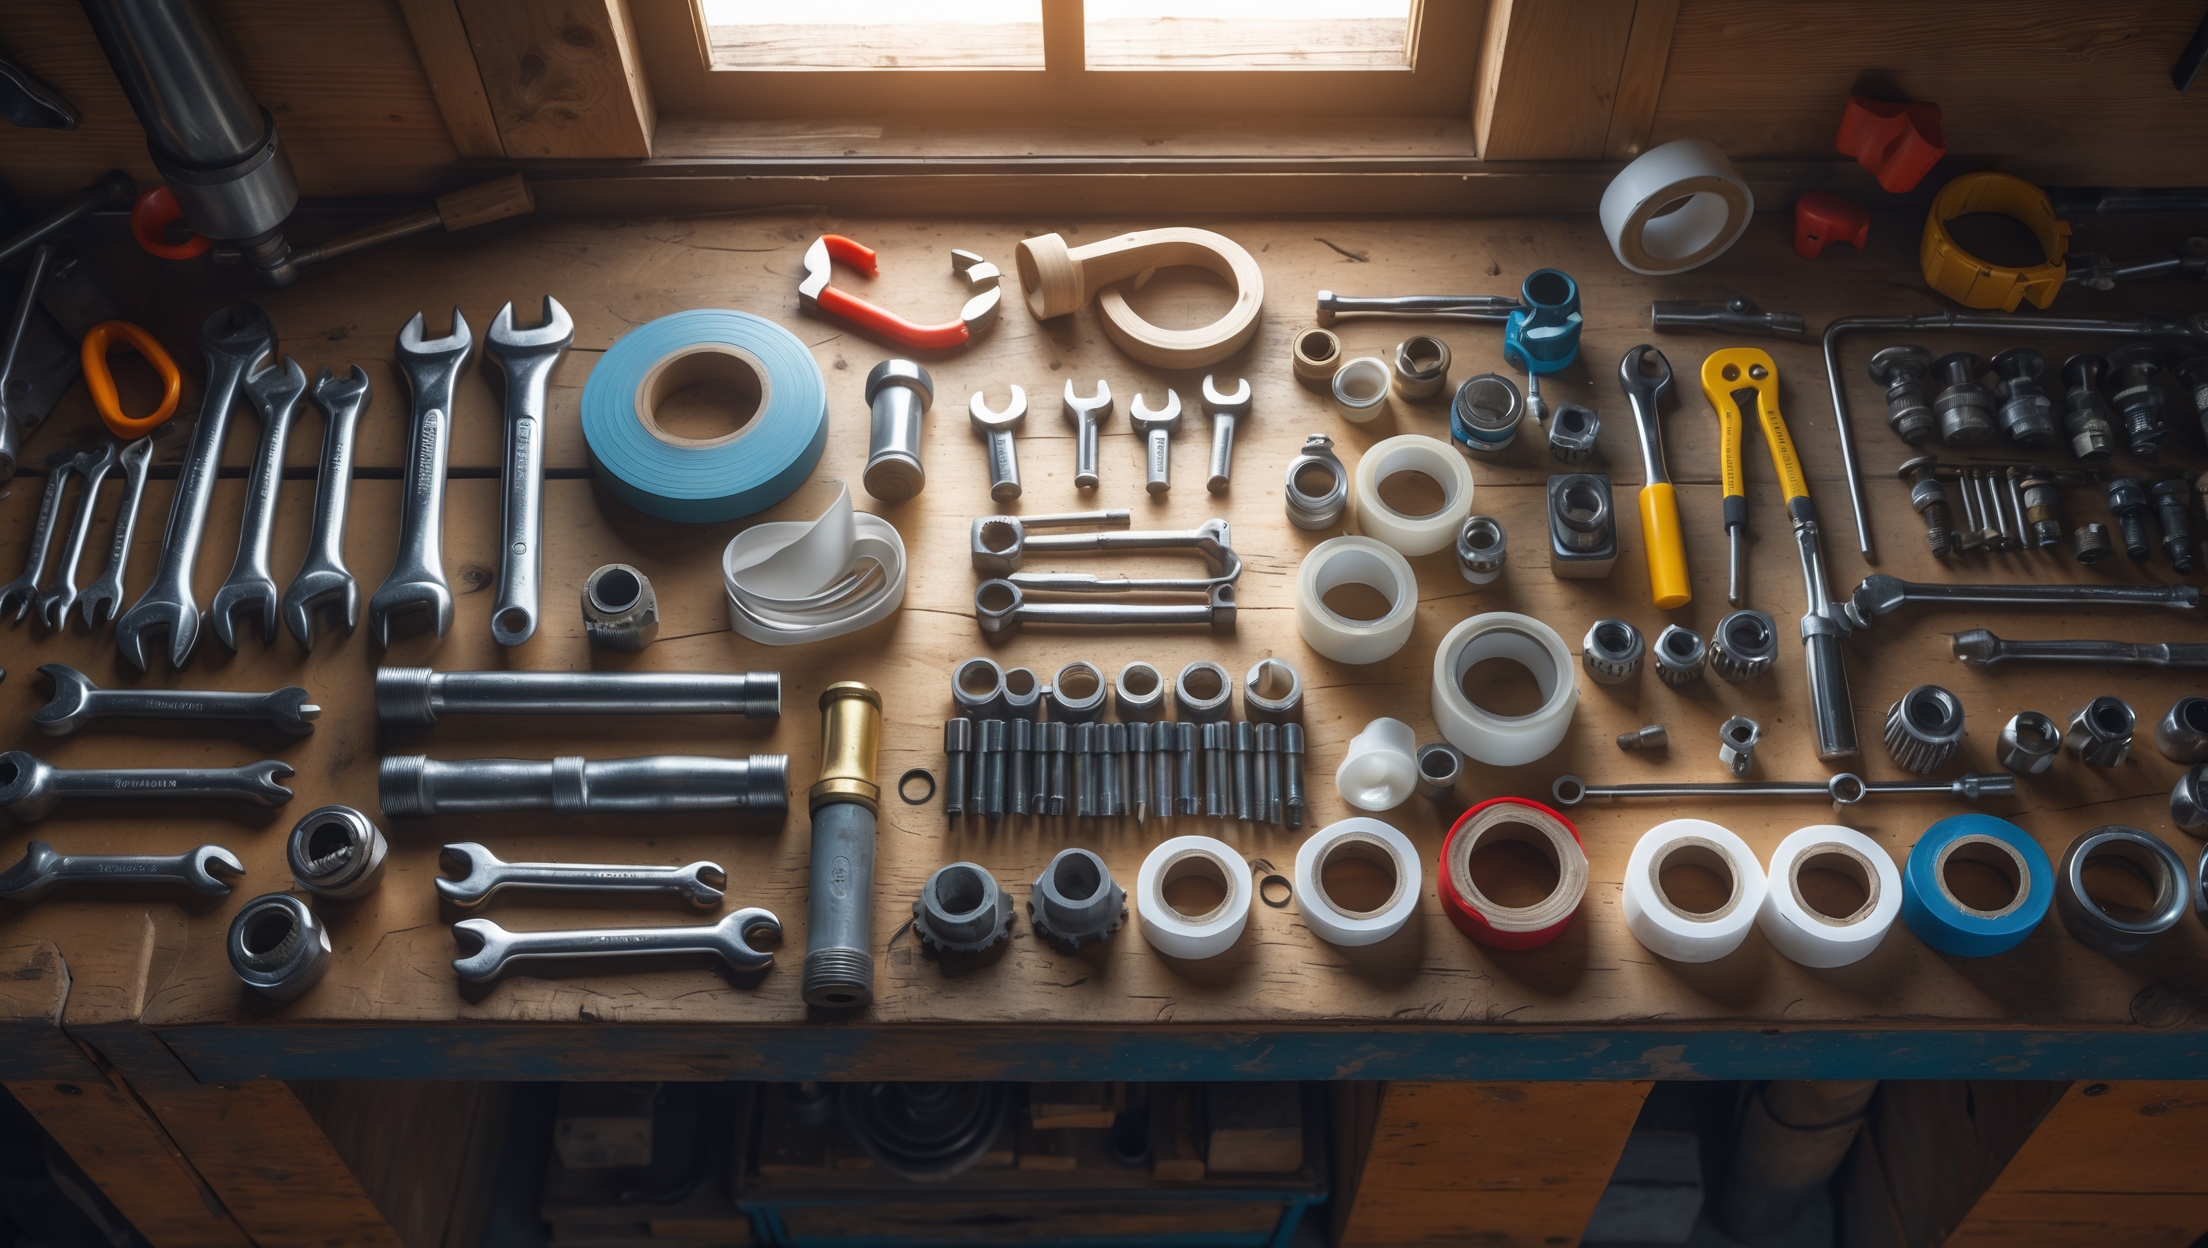
Before exploring price points, let’s identify the non-negotiable tools every home plumbing kit should include. These essentials cover the vast majority of repairs and upgrades:
- Pipe Wrench (10–14 inch): For tightening and loosening threaded pipes and fittings.
- Adjustable Wrench (8–12 inch): Versatile for nuts and compression fittings.
- Channel Lock (Groove-Joint) Pliers: Excellent grip for larger pipes and fixtures.
- Pipe Cutter (Copper/PVC): Clean, precise cuts on common household pipes.
- Hacksaw: For cutting through metal and plastic pipes, bolts, and brackets.
- Plumber’s Tape (Teflon/PTFE): To seal threaded pipe joints and prevent leaks.
- Plunger (Cup & Flange): Essential for clearing clogs in sinks, toilets, and tubs.
- Basin Wrench: Reaches awkward nuts behind sinks and faucets.
- Plumber’s Putty: Forms watertight seals on drain assemblies and fixtures.
- Utility Knife: For trimming pipes, tape, and sealants.
Consumables and Small Accessories
- Assorted Washers & O-Rings: For faucet and valve repairs.
- Pipe Joint Compound (Pipe Dope): For threaded connections.
- Bucket/Rag: For catching drips and cleaning up.
- Measuring Tape: Accurate pipe and fitting length measurements.
Itemized Cost Breakdown: Basic, Intermediate, and Advanced Kits
Basic DIY Plumbing Toolkit (Budget: $60–$90)
- Pipe Wrench (1): $15
- Adjustable Wrench: $10
- Channel Lock Pliers: $12
- Pipe Cutter (PVC only): $10
- Plunger: $8
- Plumber’s Tape & Putty: $4
- Utility Knife: $5
- Bucket/Rags: $2
- Assorted Washers/O-Rings: $5
Total: $71 (average, varies by store and brand)
Intermediate Toolkit (Budget: $120–$180)
- Pipe Wrench Set (2 sizes): $30
- Adjustable Wrench (premium): $20
- Channel Lock Pliers (large + small): $25
- Pipe Cutter (Copper & PVC): $25
- Hacksaw (with blades): $15
- Basin Wrench: $15
- Plungers (Cup & Flange): $16
- Plumber’s Tape, Putty, Joint Compound: $7
- Utility Knife (heavy-duty): $10
- Measuring Tape: $7
- Accessories (washers, O-rings, bucket): $10
Total: $180 (covers most home plumbing scenarios)
Advanced Toolkit (Budget: $250–$400)
- Full Pipe Wrench Set (3+ sizes): $60
- Adjustable Wrench (2 sizes, pro-grade): $35
- Channel Lock Pliers (3 sizes): $40
- Pipe Cutter Set (Copper, PVC, PEX): $50
- Hacksaw (pro, with extra blades): $20
- Basin Wrench (extendable): $25
- Plunger Set (professional): $25
- Plumber’s Torch (for sweating copper): $40
- Deburring Tool: $10
- Plumber’s Tape, Putty, Joint Compound, Flux: $12
- Utility Knife (locking, retractable): $15
- Measuring Tape (magnetic, pro): $10
- Consumables and organizer case: $18
Total: $360 (for ambitious DIYers and major upgrades)
Where to Save—and Where to Invest
Tools Worth Buying Top-Quality
Not all tools are created equal, and some are worth the extra investment. Here’s what deserves your budget’s upper end:
- Pipe Wrenches: Cheap ones flex or slip, risking injury and damage. Look for cast iron or steel with comfortable grips.
- Channel Lock Pliers: Inferior brands don’t grip securely. Reputable brands like Channellock, Knipex, or Irwin last for decades.
- Pipe Cutters: Dull or poorly machined wheels can crush pipes instead of cutting. Invest in a cutter with replaceable blades.
Where You Can Save
- Plungers: Even budget models work well—just ensure a proper seal for the job (flat for sinks, flange for toilets).
- Plumber’s Tape/Putty: Generic brands are just as effective as name brands.
- Utility Knives: Basic models suffice; prioritize one with replaceable blades.
- Small Accessories: Washers, O-rings, and buckets are inexpensive and often sold in value packs.
Smart Shopping Tips: Stretching Your Toolkit Budget
Buy Only What You Need—And Expand Gradually
It’s tempting to grab a giant toolbox set, but most DIYers use just a core handful of tools. Start with the basics for your most likely repairs (leaky faucets, toilet fixes, simple drain repairs) and add specialty tools only as needed.
Tool Quality: Brand vs. Budget
For tools you’ll use repeatedly (wrenches, pliers), opt for midrange or reputable brands. For infrequent-use items (deburring tool, basin wrench), budget options can suffice. Read reviews and handle tools in-store if possible—feel matters!
When to Buy Used or Refurbished
Many plumbing tools are built to last. Check local classifieds, tool libraries, or reputable online marketplaces for gently used gear. Avoid buying used consumables or tools with worn-out cutting edges.
Look for Kits and Bundles—But Check Contents
Combo kits often save money, but beware of filler pieces or low-quality extras. Ensure the kit includes core items you’ll actually use and check the quality of each piece before purchasing.
Specialty Tools for DIY Plumbing Upgrades (And When They’re Worth It)
PEX Crimp Tools & Pipe Expanders
Modern plumbing upgrades often involve cross-linked polyethylene (PEX) tubing. For running new water lines or replacing copper/CPVC, a PEX crimp tool ($30–$70) or expander ($70–$150) is essential. Consider borrowing or renting if you only need it for one project.
Plumber’s Torch & Soldering Kit
For copper pipe repairs or installations, a torch kit (torch, striker, flux, solder) is necessary. Expect to spend $40–$70 for a reliable set. Invest if you plan frequent copper work; otherwise, hire a pro for isolated jobs.
Drain Snake/Auger
A manual drain snake (under $30) or powered auger (up to $100) helps tackle stubborn clogs. For most households, a basic 15–25 foot hand auger is sufficient and cost-effective.
DIY Plumbing Toolkit: Maintenance & Organization Best Practices
Tool Care Tips
- Clean after use: Remove debris, dry thoroughly to prevent rust.
- Oil moving parts: A drop of light oil on wrenches and pliers keeps them smooth.
- Sharpen blades: Replace or sharpen pipe cutter wheels and utility knife blades regularly.
Smart Storage Solutions
- Toolbox with compartments: Keeps small pieces like washers and tape organized.
- Hang large tools: Mount wrenches and pliers on a wall pegboard for easy access.
- Label consumables: Store O-rings, washers, and joint compound in labeled containers to avoid confusion.
Budgeting Pitfalls: Common Mistakes DIYers Make When Assembling Their Plumbing Toolkit
Overbuying Specialized Tools
It’s easy to get carried away with specialty gadgets. Unless you’re planning major renovations, stick to essentials. Tools like pipe threaders, pressure test kits, or inspection cameras are rarely needed for basic repairs.
Underestimating Consumables
Don’t forget the cost of plumber’s tape, putty, joint compound, and replacement washers. Stock up—they’re inexpensive but critical to successful repairs.
Ignoring Ergonomics
Cheap tools may be uncomfortable or unsafe. Test grip comfort and weight, especially for tools you’ll use frequently (wrenches, pliers).
Forgetting Safety Gear
Always budget for safety glasses ($3–$10) and gloves ($5–$15). Protect yourself from splashes, sharp edges, and chemical exposure.
Case Study: Building a DIY Plumbing Toolkit on a $100 Budget
Scenario
Alex just bought an older home and wants to be ready for basic plumbing repairs without overspending. Here’s how Alex assembled a reliable starter kit for under $100:
- Pipe Wrench (medium): $15
- Adjustable Wrench: $10
- Channel Lock Pliers: $12
- Pipe Cutter (PVC): $10
- Plunger (cup): $8
- Plumber’s Tape: $2
- Plumber’s Putty: $2
- Utility Knife: $5
- Bucket: $3
- Assorted Washers: $5
- Safety Glasses: $8
- Work Gloves: $10
Total: $90
This kit covered Alex for leaky faucets, running toilets, and minor drain clogs. As more complex repairs arose, Alex gradually upgraded to better-quality wrenches and added a hacksaw and copper pipe cutter—but never overspent on unnecessary extras.
Conclusion: Your Plumbing Toolkit—Built for Reliability, Tailored to Your Budget
A well-chosen DIY plumbing toolkit empowers you to handle common household repairs safely, confidently, and without costly emergency calls. As we’ve seen, there’s no need to buy every tool at once or chase the most expensive brands. Start with proven essentials, prioritize quality where it counts, and expand as your skills and projects evolve. Remember that consumables and safety gear are just as important as the big-ticket tools, and smart organization will save you time (and headaches) during urgent repairs.
By breaking down costs and focusing on practical, real-world needs, you can build a toolkit that’s reliable, versatile, and perfectly matched to your home and budget. Whether you’re fixing a leaky faucet, swapping out a shutoff valve, or tackling your first DIY bathroom upgrade, you’ll be ready for the job—and you’ll know exactly what you spent (and why). Happy plumbing!


How often do these basic plumbing tools actually need to be replaced? I’m wondering if investing a bit more upfront saves money over time, or if the budget versions tend to hold up just as well for occasional home repairs.
For most basic plumbing tools like wrenches, plungers, and pipe cutters, replacement is rarely needed if they’re used occasionally and cared for properly. Investing in mid-range tools usually pays off, as they often last longer and work better than the cheapest options. Budget tools can work for light, infrequent jobs, but they’re more likely to break or wear out, especially if you tackle tougher repairs now and then.
You mention expert tips on when to invest versus where to save. Can you provide any specific examples of tools where budget options have actually held up well for DIY business owners, and which ones really justify spending more upfront?
For most DIY plumbing tasks, budget-friendly tools like pipe wrenches, adjustable pliers, and Teflon tape often perform well and can last if cared for properly. However, investing more in a quality pipe cutter or a dependable basin wrench usually pays off, since these tools get frequent use and precision matters. Spending more on these ensures smoother work and fewer replacements.
About the cost breakdown for basic, intermediate, and advanced kits—is there a ballpark figure for what a reliable starter toolkit would actually cost if you’re shopping at common US retailers these days? It would help to have a realistic number before I start buying.
Absolutely, a realistic estimate for a reliable starter DIY plumbing toolkit at common US retailers is usually around $40 to $70. This should cover basics like an adjustable wrench, pipe wrench, pliers, plumber’s tape, a plunger, and a pipe cutter. Prices can vary based on brand and quality, but shopping store brands or value packs can help you stay within this range.
I noticed you mention both a pipe wrench and an adjustable wrench as essentials. Is there a situation where one really does the job better than the other, or could I get by with just one of them if I’m trying to minimize initial costs?
A pipe wrench is designed specifically for gripping and turning round pipes, especially when they’re stuck or need a lot of torque. An adjustable wrench works best on nuts and bolts with flat sides, like fittings and compression nuts. If you’re focusing mainly on basic repairs and want to cut costs, start with an adjustable wrench—it’s more versatile for general tasks. Add a pipe wrench later if you find yourself dealing with tougher plumbing jobs involving pipes.
For someone just starting out, is it better to buy one of those all-in-one plumbing toolkits you mentioned, or purchase each tool separately? I’m not sure if the cheaper kits are reliable enough for basic home repairs, or if I’d end up needing to replace tools sooner.
For beginners, an all-in-one plumbing toolkit can be a cost-effective way to get started, especially if you’re focusing on basic repairs. While some cheaper kits might not last as long, many provide decent quality for light home use. If you plan to tackle more complex projects over time, you might consider gradually upgrading your most-used tools individually as you gain experience.
When building out the basic toolkit you described, is it better to prioritize brand-name tools for things like the pipe wrench and channel lock pliers, or do lower-cost options really perform about the same for most DIY home plumbing jobs?
For essential tools like a pipe wrench and channel lock pliers, quality matters because they’ll get a lot of use and need to withstand significant force. Well-known brands often offer better durability and grip, but some budget tools can perform well for light, occasional DIY jobs. If you plan to use these tools regularly, it’s worth investing a bit more in reputable brands for these key items, while saving on lesser-used tools.
When it comes to pipe cutters, the article mentions both copper and PVC options. Is it necessary to have a separate cutter for each type of pipe, or is there a versatile tool that works well for beginners doing occasional repairs?
For occasional repairs, you can find pipe cutters labeled as ‘universal’ or ‘multi-purpose’ that handle both copper and PVC pipes, though they’re not always as precise as dedicated cutters. If you mostly work with one type of pipe, a specific cutter is usually easier and gives cleaner results. For beginners, a basic ratcheting PVC cutter and a mini tube cutter for copper should cover most needs without overspending.
If I already have a few core tools, like a pipe wrench and adjustable wrench, but want to upgrade to an intermediate set, which additional tools offer the most value without making things too complicated or expensive?
Since you already have a pipe wrench and adjustable wrench, consider adding a quality basin wrench, a pipe cutter, a plumber’s tape (Teflon tape), a set of channel-lock pliers, and a hacksaw. These tools expand your ability to handle most household plumbing jobs without complicating your toolkit or driving up costs. A plunger and a basic tubing bender can also be very handy for intermediate DIY projects.
When you talk about upgrading essentials versus buying specialty tools, how do I know the right time to invest in the more advanced stuff? Should I wait until I have a specific project, or is there a general guideline?
It’s usually best to invest in specialty or advanced plumbing tools when you have a specific project that requires them, rather than buying them just in case. Start with a solid set of essentials for everyday repairs. When you encounter a job where your basic tools aren’t enough, that’s a good sign it’s time to upgrade. This way, you avoid overspending on tools you may rarely use.
How long can I expect a budget-friendly pipe wrench or pipe cutter to last with occasional DIY use, or is it really worth investing more upfront for better reliability?
A budget-friendly pipe wrench or pipe cutter used only occasionally for DIY projects should last several years, provided you clean and store them properly after each use. However, if you plan to use them more often or on tougher jobs, investing a bit more upfront typically means smoother operation and increased durability. For light, infrequent tasks, budget tools are usually sufficient.
When choosing between buying tools individually versus those all-in-one plumbing kits you referenced, which option typically provides better long-term value and reliability for someone who only tackles occasional repairs?
For someone handling occasional plumbing repairs, buying tools individually often gives better long-term value and reliability. All-in-one kits can be convenient, but they sometimes include lower-quality items or tools you might not use. By purchasing only the essential, higher-quality tools as you need them, you build a toolkit tailored to your tasks, and the tools will likely last longer.
You mention saving money by knowing when to upgrade essentials or add specialty tools. Are there any specific brands or stores where you’ve consistently found affordable yet durable plumbing tools for a beginner’s kit?
For a beginner’s plumbing toolkit, brands like Kobalt, Husky, and Stanley often provide good quality without a high price tag. Many readers have found solid deals at stores like Home Depot, Lowe’s, and even Harbor Freight for basics like wrenches, pliers, and pipe cutters. Keep an eye out for bundled starter kits or sales, which can stretch your budget further while still giving you reliable tools.
You mention itemized cost breakdowns for basic, intermediate, and advanced toolkits. How long did it take you to assemble your own kit to a point where you felt ready for most repairs, and did you buy everything at once or build gradually over time?
It took me about a year to feel my toolkit was ready for most plumbing repairs. I started with the basic essentials first, then gradually added intermediate and advanced tools as specific repair needs came up. Spreading out purchases helped me budget and avoid buying unnecessary items right away.
About the cost breakdowns for basic and intermediate toolkits, can you give more specific price ranges for each essential tool? I’m trying to set a budget but not sure if some of the lower-priced options are reliable enough.
Certainly! For basic toolkits, adjustable wrenches typically range from $10 to $25, pipe wrenches from $15 to $35, pliers from $8 to $20, and Teflon tape is usually under $3. Intermediate sets might include a basin wrench ($12–$30), a hacksaw ($10–$25), and a pipe cutter ($15–$30). Lower-priced tools can work but check for solid build quality and user reviews to ensure reliability. Investing a little more often means better durability.
For someone who has only handled minor faucet fixes, how long does it usually take to get comfortable using tools like a pipe cutter or channel lock pliers? I’d like to know what kind of learning curve to expect before tackling bigger plumbing issues.
Most people with basic DIY experience can start feeling comfortable using tools like a pipe cutter or channel lock pliers within a few hours of hands-on practice. Watching a couple of instructional videos and practicing on scrap pipes can speed up the process. Expect a short learning curve—usually about a weekend of tinkering—before you’ll be ready to tackle more involved plumbing repairs with confidence.
Could you give a ballpark estimate of how much time it might take to assemble a basic DIY plumbing toolkit if I’m shopping in person versus ordering everything online? I want to plan ahead before dealing with any sudden repairs.
If you’re shopping in person, assembling a basic DIY plumbing toolkit could take a few hours, especially if you visit a large hardware store—plan on 2 to 3 hours including travel and browsing. Ordering online is often quicker in terms of selection, possibly under an hour, but you’ll need to wait a few days for shipping. Either way, setting aside some time ahead will help you be prepared for unexpected repairs.
If I’m just starting to put together my first plumbing toolkit, which of the essential tools listed should I prioritize buying first, and are there any cheaper versions that actually hold up pretty well for occasional use?
For your first plumbing toolkit, prioritize buying an adjustable wrench, a pipe wrench, a plunger, and a pair of channel-lock pliers. These cover most basic repairs. For occasional use, many hardware stores offer budget-friendly brands that are surprisingly sturdy—just check user reviews for durability. You can save on items like Teflon tape and a basic pipe cutter, but with wrenches and pliers, avoid the absolute cheapest to ensure they don’t slip or break easily.
I noticed you mentioned both pipe cutters and hacksaws for cutting pipes. Is there a situation where one is better than the other for a beginner, or do I really need both in a basic toolkit?
For most beginners, a pipe cutter is usually easier and safer to use, especially for copper or plastic pipes—it gives clean, straight cuts with minimal effort. Hacksaws can be used for a wider variety of materials and pipe sizes, but they require more skill to get a straight cut and can be messier. If you’re just starting out, a pipe cutter is a great first choice, and you can add a hacksaw later if you need more versatility.
If I invest in a mid-tier toolkit now, how often do you think I’d need to upgrade the tools for typical apartment plumbing issues? Is it worth waiting and saving for pricier tools, or do basic ones last long enough for most student renters?
A mid-tier toolkit should serve you well for most common apartment plumbing tasks, such as fixing leaks or replacing washers. These tools can last several years with proper care, especially if you’re only using them occasionally. For student renters handling basic repairs, there’s usually no need to invest in expensive, professional-grade tools—basic ones are reliable enough and rarely need upgrading unless you start tackling more advanced projects.
When it comes to adjustable wrenches for a basic toolkit, is it worth getting a set with multiple sizes, or can I get by with just one in the 8–12 inch range for most home repairs?
For most home plumbing repairs, a single adjustable wrench in the 8–12 inch range will handle the majority of tasks. It offers good versatility for typical nuts and fittings. However, if you plan on tackling a wider variety of projects or working in tight spaces, having a set with multiple sizes can be helpful. For a basic toolkit, though, one medium-sized wrench should be sufficient.
You mention both a pipe cutter and a hacksaw as essential tools for a basic DIY plumbing kit. Could you elaborate on situations when one is preferable over the other? I want to avoid unnecessary duplication while making sure I’m prepared for most home repairs.
A pipe cutter is ideal for making clean, straight cuts on copper, brass, or plastic pipes—it’s quick and leaves smooth edges, which is great for fitting connections. A hacksaw, on the other hand, is more versatile and can cut different materials, including metal or plastic pipes in tight spots or unusual shapes. If you expect to work mostly with straight pipe sections and want quick, neat results, a pipe cutter is usually best. For tackling a wider range of materials or awkward locations, a hacksaw adds flexibility. Having both covers nearly all home plumbing needs, but if you must pick one, consider the types of repairs you’ll do most often.
Could you expand on the itemized cost breakdown for the intermediate toolkit? I’m trying to plan out expenses for upgrading my business’s maintenance kit and want to get a sense of realistic pricing before I start shopping.
Certainly! For an intermediate DIY plumbing toolkit, you can expect approximate costs like: adjustable wrenches ($20–$35 each), pipe wrench ($25–$40), channel-lock pliers ($15–$30), hacksaw ($10–$20), basin wrench ($15–$25), plumber’s tape ($3–$5), pipe cutter ($15–$25), and a plunger ($10–$15). Altogether, you’re likely looking at a total between $120 and $195 depending on brands and local pricing.
The article talks about both all-in-one plumbing toolkits and building your kit piece by piece. Are the pre-made all-in-one kits actually reliable for most home plumbing jobs, or do they usually end up missing a few essentials mentioned in the basic toolkit list?
Pre-made all-in-one plumbing toolkits can be convenient and cost-effective for basic home repairs, but they often miss a few essentials, such as specific pipe wrenches or Teflon tape, that you’ll find in a carefully built kit. If you just need tools for simple fixes like leaky faucets or clogged drains, an all-in-one kit will usually suffice. For more versatility and reliability, consider supplementing a pre-made kit with any missing items from the article’s basic toolkit list.
I noticed you mentioned both high-end wrenches and budget pipe cutters. How do you decide which tools are worth spending more on versus going with cheaper options? Are there certain tools where quality really makes a difference for durability or safety?
When building a plumbing toolkit, it’s smart to invest more in tools you’ll use frequently and where strength matters, like adjustable wrenches and pipe wrenches. High-quality versions last longer and are less likely to slip or break, which is safer. For items like pipe cutters or Teflon tape you use less often, budget options usually work fine. Prioritize durability and safety for main tools, and save money on accessories or less-used items.
Could you give more specifics on what qualifies as a ‘reliable’ budget pipe cutter or hacksaw? There are so many brands out there, and it’s tough to tell which low-cost options won’t fall apart after a couple of uses.
A reliable budget pipe cutter should have a sturdy metal body (aluminum or steel is best), a sharp replaceable cutting wheel, and a comfortable grip. Avoid plastic-bodied cutters, as they tend to break easily. For hacksaws, choose one with a solid steel frame and an easily replaceable blade. Even in the budget range, brands like Stanley and Irwin are known for durability. When shopping, test the tool’s rigidity, and check for smooth adjustment mechanisms and secure blade fittings.